Biscoff Blondies
This post contains affiliate links. Read the full disclosure here.
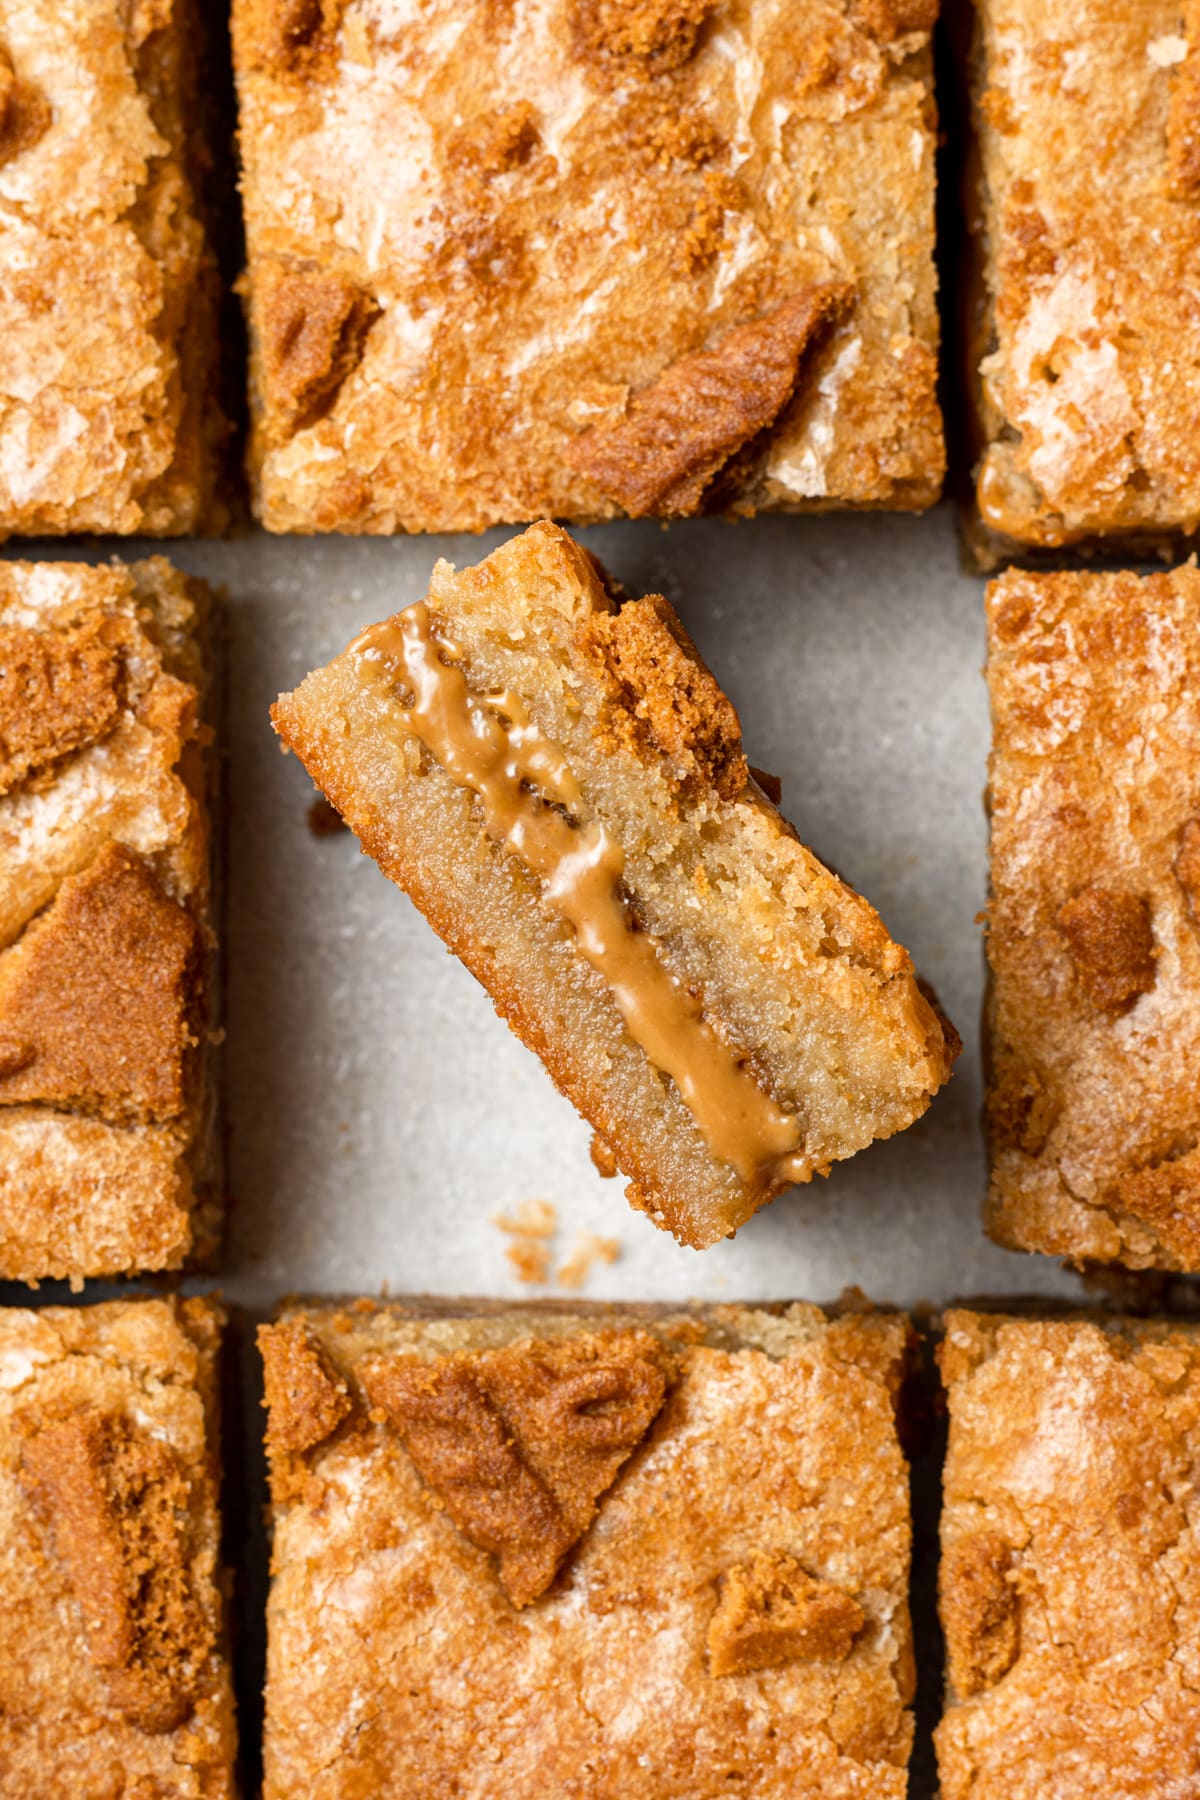
Say hello to the best biscoff blondies ever! These blondies have a layer of biscoff and the perfect crinkle top. You only need 9 ingredients to make these cookie butter blondies and no mixer required!

After my biscoff brownies were so beloved by readers, I knew I had to make a blondie version. These cookie butter blondies have the gooiest texture and you can add chocolate chips if you want!
These chewy biscoff blondies are based off of my chocolate chunk blondies but have a delicious biscoff cookie butter layer inside plus more lotus biscoff cookies on top.
Why You’ll Love These Biscoff Blondies
- You only need 9 ingredients to make these biscoff blondies! Plus, it’s using simple ingredients that you probably already have in your pantry.
- You don’t need any fancy equipment or a mixer to make them, and no mixer required!
- If you want to give these a chocolate kick you can add chocolate chips to the batter.
- Looking for a dairy free recipe? These biscoff blondies can be made with dairy free ingredients!
- This is a freezer friendly recipe, so you can always have cookie butter blondies on hand.
Ingredients Needed

- Butter: feel free to use regular butter or vegan butter if you need this recipe to be dairy free.
- Flour: I tested this recipe with all purpose flour.
- Eggs: I haven’t tested this recipe with egg substitutes and I don’t recommend it!
- Biscoff Cookies: these biscoff cookies go on top of the batter just before baking, it is totally optional but gives a nice crunch!
- Biscoff: you don’t have to use the biscoff brand and instead can use any other cookie butter! You can find biscoff spread at Trader Joe’s, Target, President’s Choice or your local grocery store. Feel free to use the smooth or the crunchy version!
Step By Step Instructions
Note: Full ingredient measurements and instructions can be found in the recipe card at the bottom of this page.
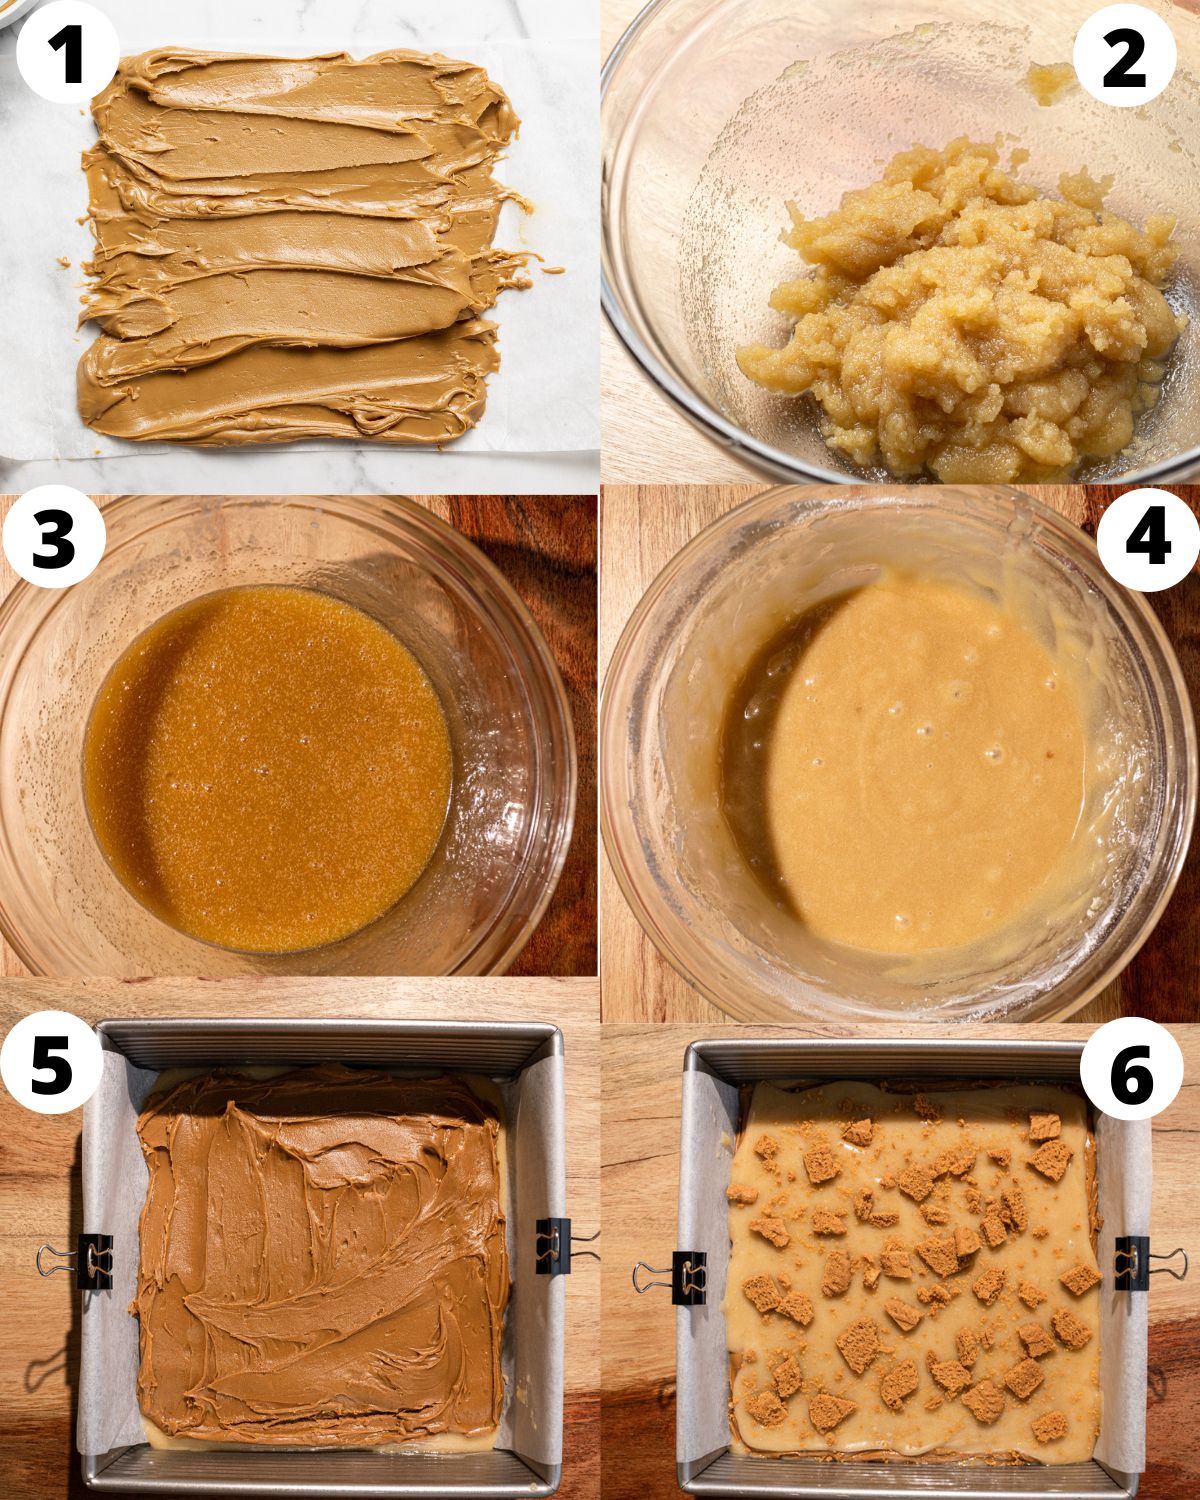
Step 1: Cut a piece of parchment paper so it fits into your 8×8 baking pan, leaving a slight overhang. Place this in the pan and fold the parchment that is overhanging to form a crease in the shape of the square pan.
Step 2: Take the parchment paper out and place it on a flat surface. Spread the biscoff cookie butter onto the square that you’ve made on the parchment paper, create one large cookie butter square. Place in the freezer while you work on the blondies.
Step 3: Preheat the oven to 350°Fahrenheit and line your 8×8 baking pan with parchment paper, making sure you have some overhanging so you can easily remove the blondies when they’re done.
Step 4: Melt the butter in the microwave or in a small pan on the stove. Pour the melted butter into a medium bowl.
Step 5: Add the sugars and whisk into the melted butter. Whisk until it forms a thick paste that pulls away from the sides of the bowl.
Step 6: Add the eggs and vanilla extract and whisk to combine.
Step 7: Pour in the flour and salt and whisk briefly, until it is just combined – you don’t want to over mix it!
Step 8: Pour half of the blondie batter into the prepared pan. Take out the cookie butter layer from the freezer and gently peel it from the parchment paper. If it doesn’t peel off easily, place it back in the freezer for another 5 minutes. Place the cookie butter square on top of the blondie batter.
Step 9: Pour the rest of the blondie batter on top, using an offset spatula to smooth it into an even layer. Sprinkle over crushed biscoff cookies on top of the batter. This is totally optional but so delicious!
Step 10: Bake for 30-40 minutes. Check the biscoff blondies at 30 minutes and insert a toothpick in the middle, it should come out with some wet crumbs but not wet batter. The top of the biscoff blondies will be crinkly. Let the blondies cool completely before slicing.
Expert Tips
- Properly measure your flour – I highly recommend using a $15 kitchen scale to weigh your dry ingredients (metric measurements are in the recipe card below). If you aren’t using a scale, use the scoop and level method. Using too much flour will make your biscoff blondies dry!
- Add Chocolate Chips – if you want some chocolate flavor in there then feel free to add about ⅓ -½ cup of chocolate chips!
- Whisking the wet ingredients – make sure to whisk the melted butter with the two sugars until a thick paste forms and it begins to pull away from the sides of the bowl. This is what gives us that crinkly top!
- Freezing the cookie butter layer – if your cookie butter layer doesn’t easily peel away from the parchment paper, give it another 5 minutes or so in the freezer! We want to have one thick layer of cookie butter to put on top of the biscoff blondie batter.
Storage Instructions
Store these biscoff blondies at room temperature in an airtight container for up to 4 days. Freeze the sliced blondies in a freezer bag, let them thaw completely before enjoying.
More Biscoff Recipes You’ll Love


If you make this recipe, let me know how it went in the comments below, I’d love to hear from you! You can also tag me on Instagram or Facebook so I can check it out!
Baking FAQ
These are the topics I’m asked about most frequently:
You can get these answers and more in my frequently asked questions post!

Biscoff Blondies
Video
Ingredients
- ¾ cup (225 g) Lotus Biscoff Spread (or other Speculoos cookie butter spread brand)
- ¾ cup (158 g) butter, melted, (regular or vegan)
- ¾ cup (150 g) light brown sugar
- ¾ cup (150 g) granulated sugar
- 2 eggs
- 1½ teaspoons vanilla extract
- 1½ cup (188 g) all-purpose flour, SEE NOTES
- ¾ teaspoons salt
- 4-5 Lotus Biscoff cookies, roughly chopped, (optional)
Instructions
- Cut a piece of parchment paper so that it fits into your an 8×8 square baking pan, leaving some hanging over the edges. Place it in the pan and fold the parchment that is overhanging to form a crease in the shape of the square pan.
- Remove the parchment from the pan and place it on a flat surface like a cookie sheet, cutting board, or cooling rack. Spread the cookie butter onto the parchment in the shape of the square pan, so that it will fit into the baking pan in one piece. Freeze while you make the blondies.
- Preheat the oven to 350°F and line an 8×8 square baking pan with parchment paper. Leave parchment paper hanging over the sides of the pan so that you can easily remove the blondies from the pan later.
- Melt the butter in the microwave or in a small pan over the stove. Transfer the melted butter to a medium sized bowl.
- Add in both the sugars and use a whisk to whisk the butter and sugars together. Keep whisking until the mixture resembles a paste that pulls away cleanly from the side of the bowl when you mix it.
- Add the eggs and vanilla and mix again.
- Pour the flour and salt into the bowl and mix with the whisk until just combined (do not over mix!).
- Pour half of the batter into the lined baking pan, then take the cookie butter out of the freezer, peel it from the parchment (it should come off easily and in one piece, but if not you can leave it in the freezer for another 5 minutes), and place the whole piece on top of the blondie batter.
- Pour the remaining blondie batter on top of the cookie butter into the pan and smooth into an even layer.
- Sprinkle crush biscoff cookies on top of the batter if desired (adds some crunch and more biscoff flavor).
- Bake for 30-40 minutes*. Begin checking the blondies at 30 minutes by inserting a toothpick in the middle. The top of the blondies should be crinkly and the toothpick should not come out clean. The blondies are ready when the toothpick has a few wet crumbs, but not wet batter.
- Let the blondies cool completely before slicing. Enjoy!
Equipment

Notes
The calorie information provided for this recipe is an estimate. The accuracy of the calories listed is not guaranteed.
This recipe is soooo good! A success with my family. I’m in love with the biscoff taste. I took a picture of the final result on my Instagram page (link below).
Is it correct that this recipe doesn’t require baking powder?
That’s correct!
Never made this before but had the idea to brown my butter first. Sooooo goood!!
Thanks Kate! Glad you enjoyed these 🩵
Made this for a family dinner,
Followed recipe (used salted butter instead of adding salt.
The biscoff needed slightly longer in the freezer to freeze up (about 20 min) and I cooked mine for 35 min.
They were an absolute hit, family has asked for them again!
Thanks Katie! So glad to hear these were a hit!
Loved this recipe!!! The freezing of the cookie butter layer is genius! I love that you don’t need a mixer and it calls for most ingredients I already had in my pantry. They’re so fun and it’s truly a luxurious dessert bar!! Will make again 🙂
Yay! I am so happy you loved them Hanna! Thanks for the review 😀
I loved this recipe, my blondies went crazy, I added biscoff cookies on top and it was awesome!!!!
Hi Nicole! So glad the blondies were a hit 😀
Having just become a hero to my grand-nephew and -niece by bringing them a [an of your Nutella Blondies, I am very excited to try this recipe. Your notes say:
“I highly recommend using a $15 kitchen scale to weigh your dry ingredients (metric measurements are in the recipe card below).”
Sadly, I was not able to find the metric measurements. Would I be correct in assuming 166g for the flour?
Thanks, Gabby!
Hi John, so happy that you and your family are loving the recipes! To find the metric measurements, just click the “metric” tab above the ingredients. Hope that helps!
Hi, these look amazing, can they be baked and then frozen, or will it affect the taste/texture you expect from a brownie?
Thank you.
Hi Jasmine! Yes, you can freeze these after baking. Just let them thaw completely before enjoying them and they should taste the same 🤗
These are so delicious and so easy to make. Instead of putting biscoff cookies on top, I added white chocolate chips into the batter. I’ll definitely be making these again.
I am so happy you loved them Elissa! Love the white chocolate chips addition too. Thanks for the review!
Deliciousness! Loved the trick of freezing the Biscoff spread.
So happy you loved them Tamara!!
Holy Smokes, these are fantastic. I increased the cookie butter so we’d have lots of gooey stuff inside. Freezing the butter spread on parchment is next level brilliant. These will be in my potluck treat repertoire forever now.
Hi Penny! I am so happy that you loved the blondies! Thanks so much for taking the time to come back and leave a review 😀
these were so good. i used salted butter and added chocolate chips and they were devoured by the kids. thank for the recipe will be trying more of your recipes
Hi Alice! I’m so happy you all loved the blondies! Thanks so much for the review 🙂