Red Velvet Oreo Cake
This post contains affiliate links. Read the full disclosure here.
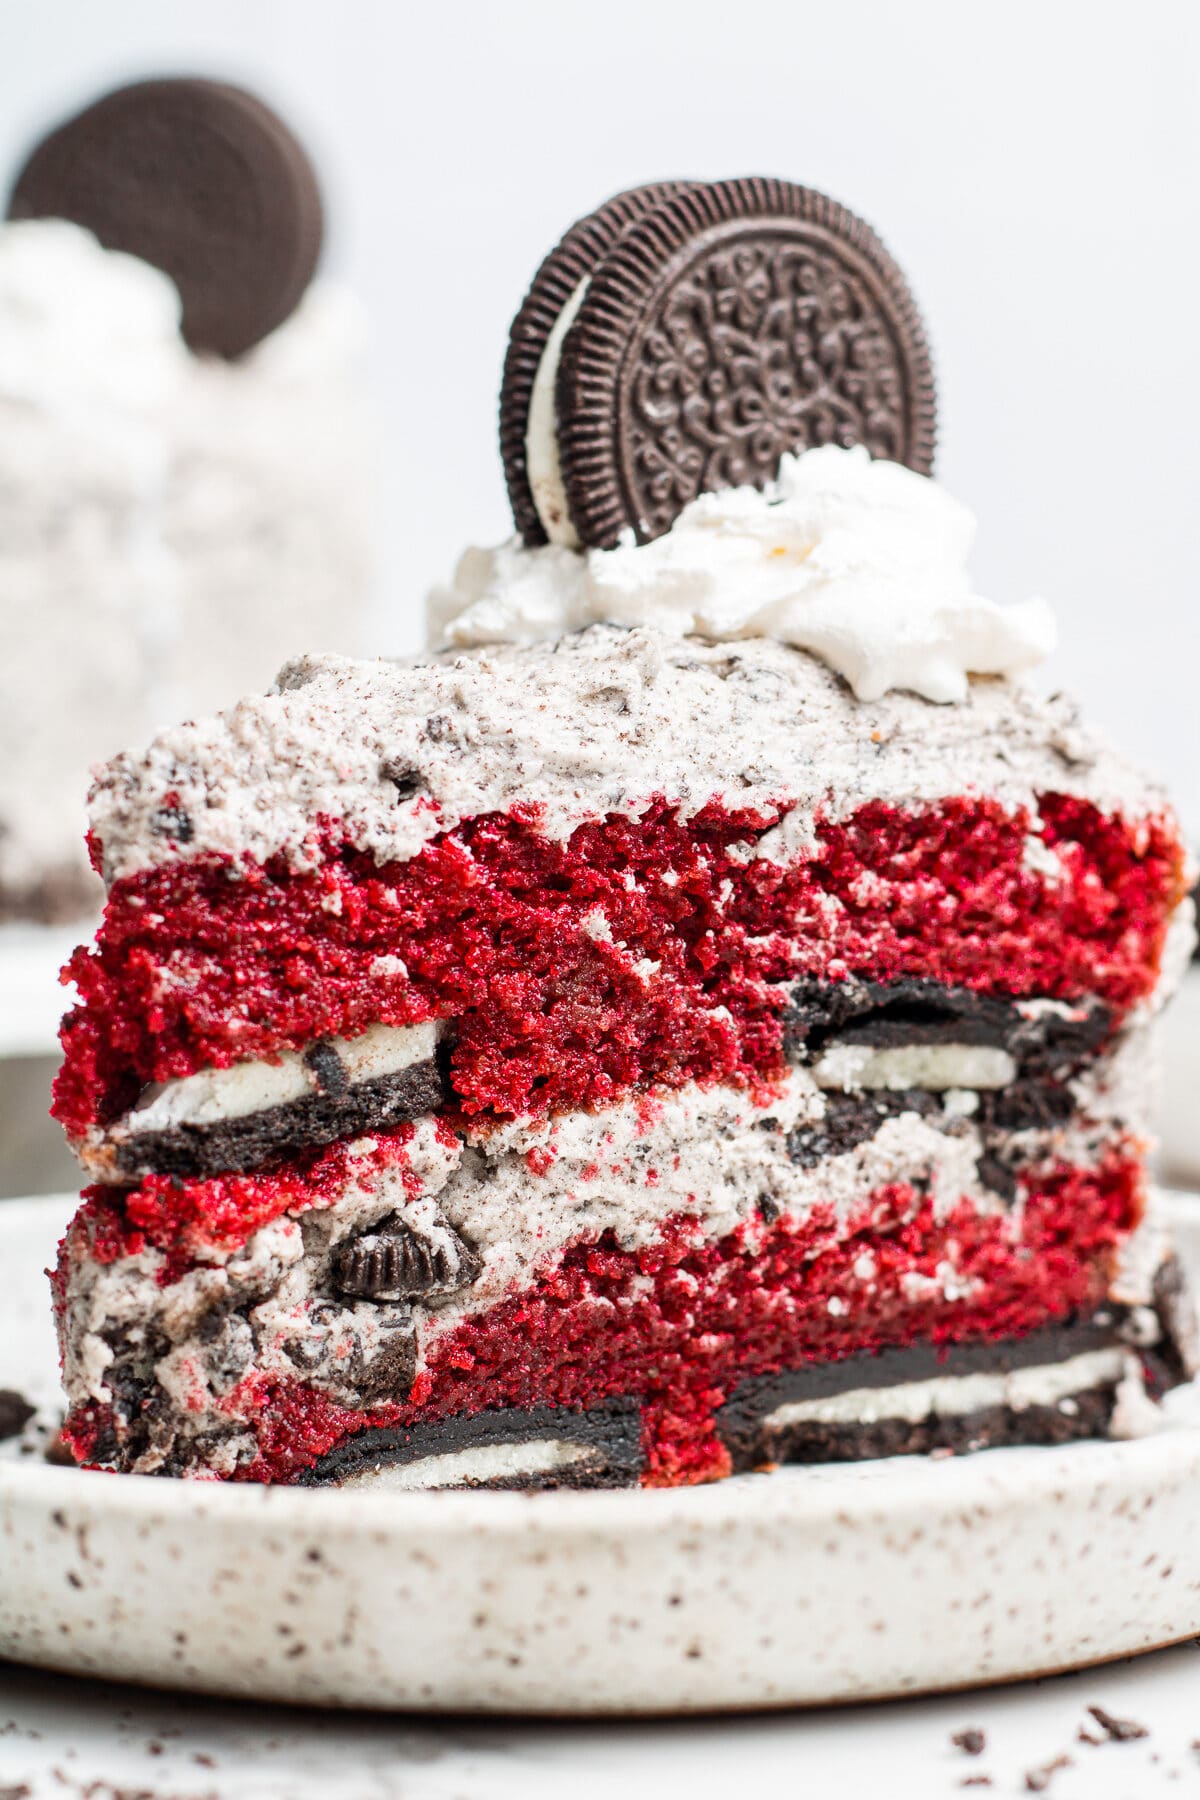
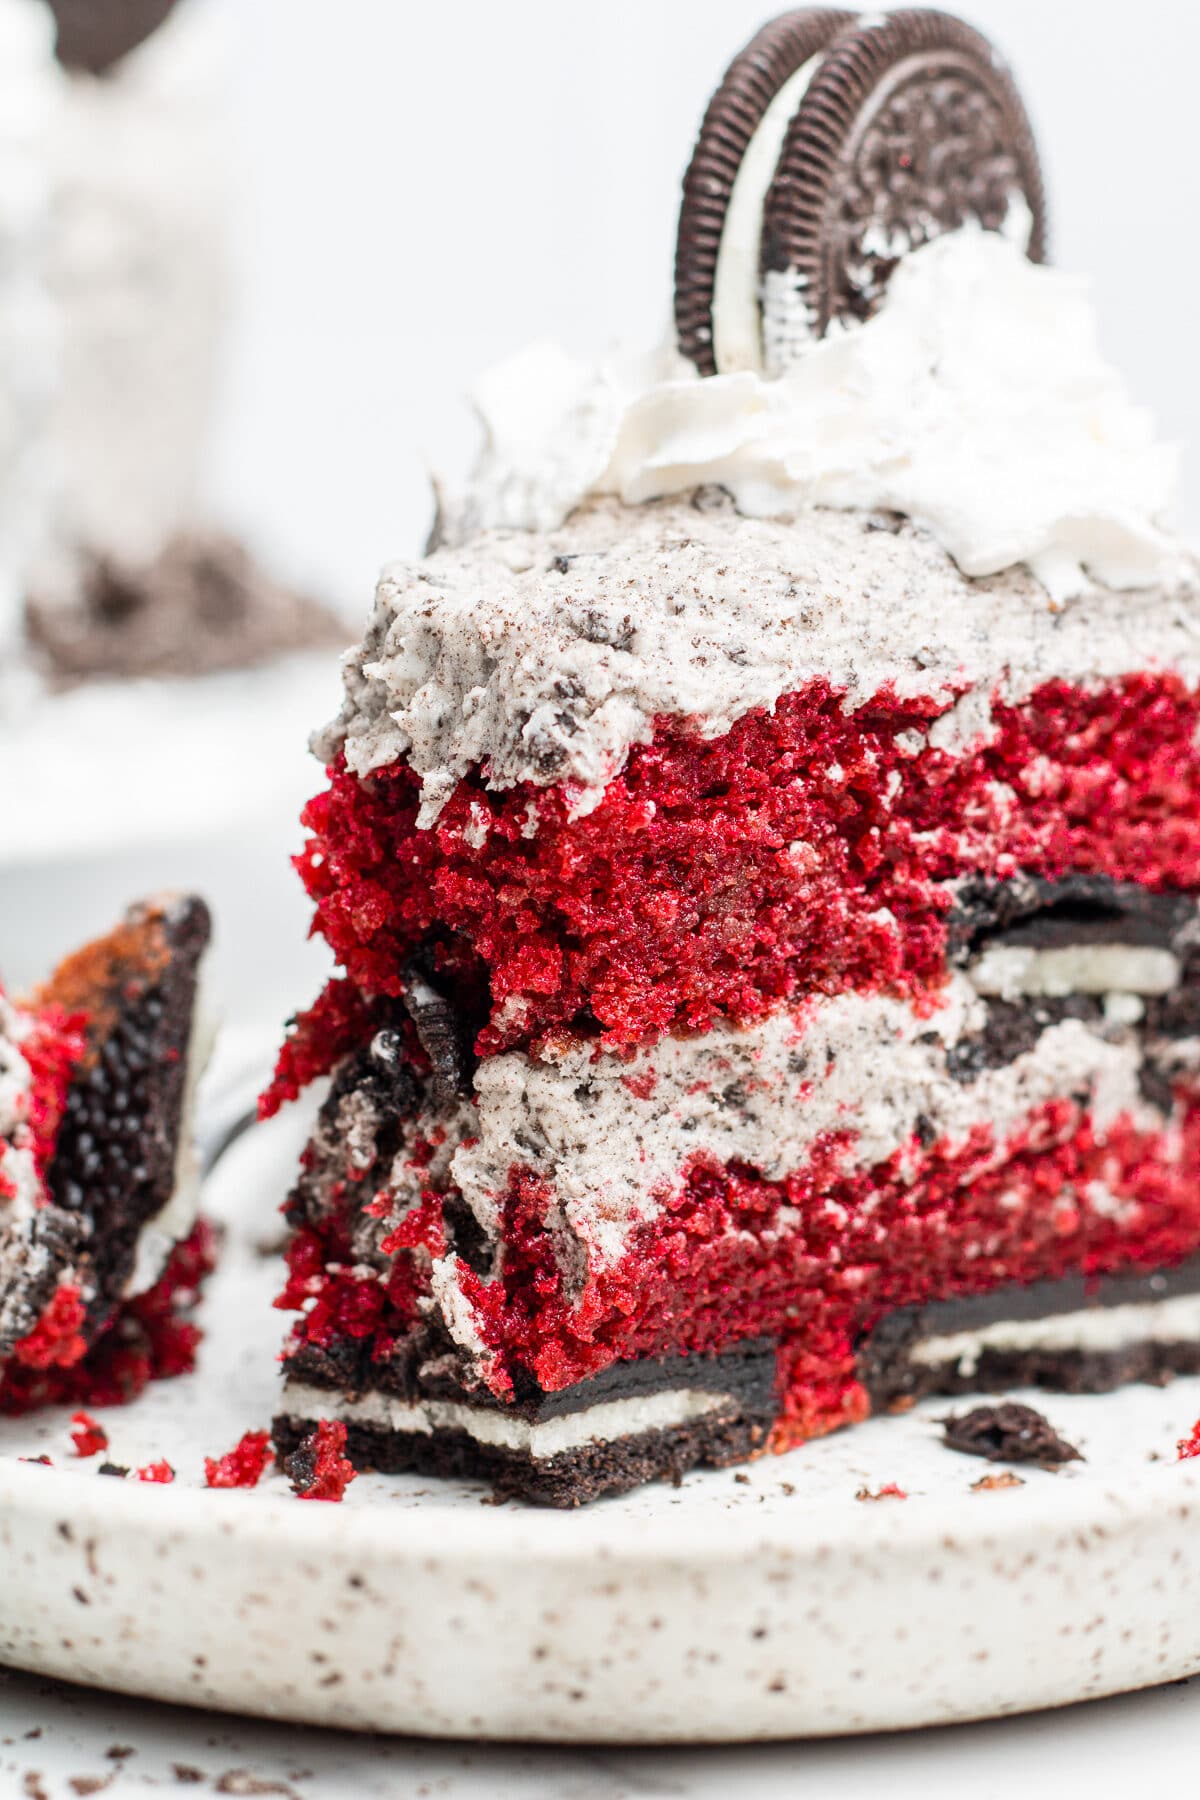
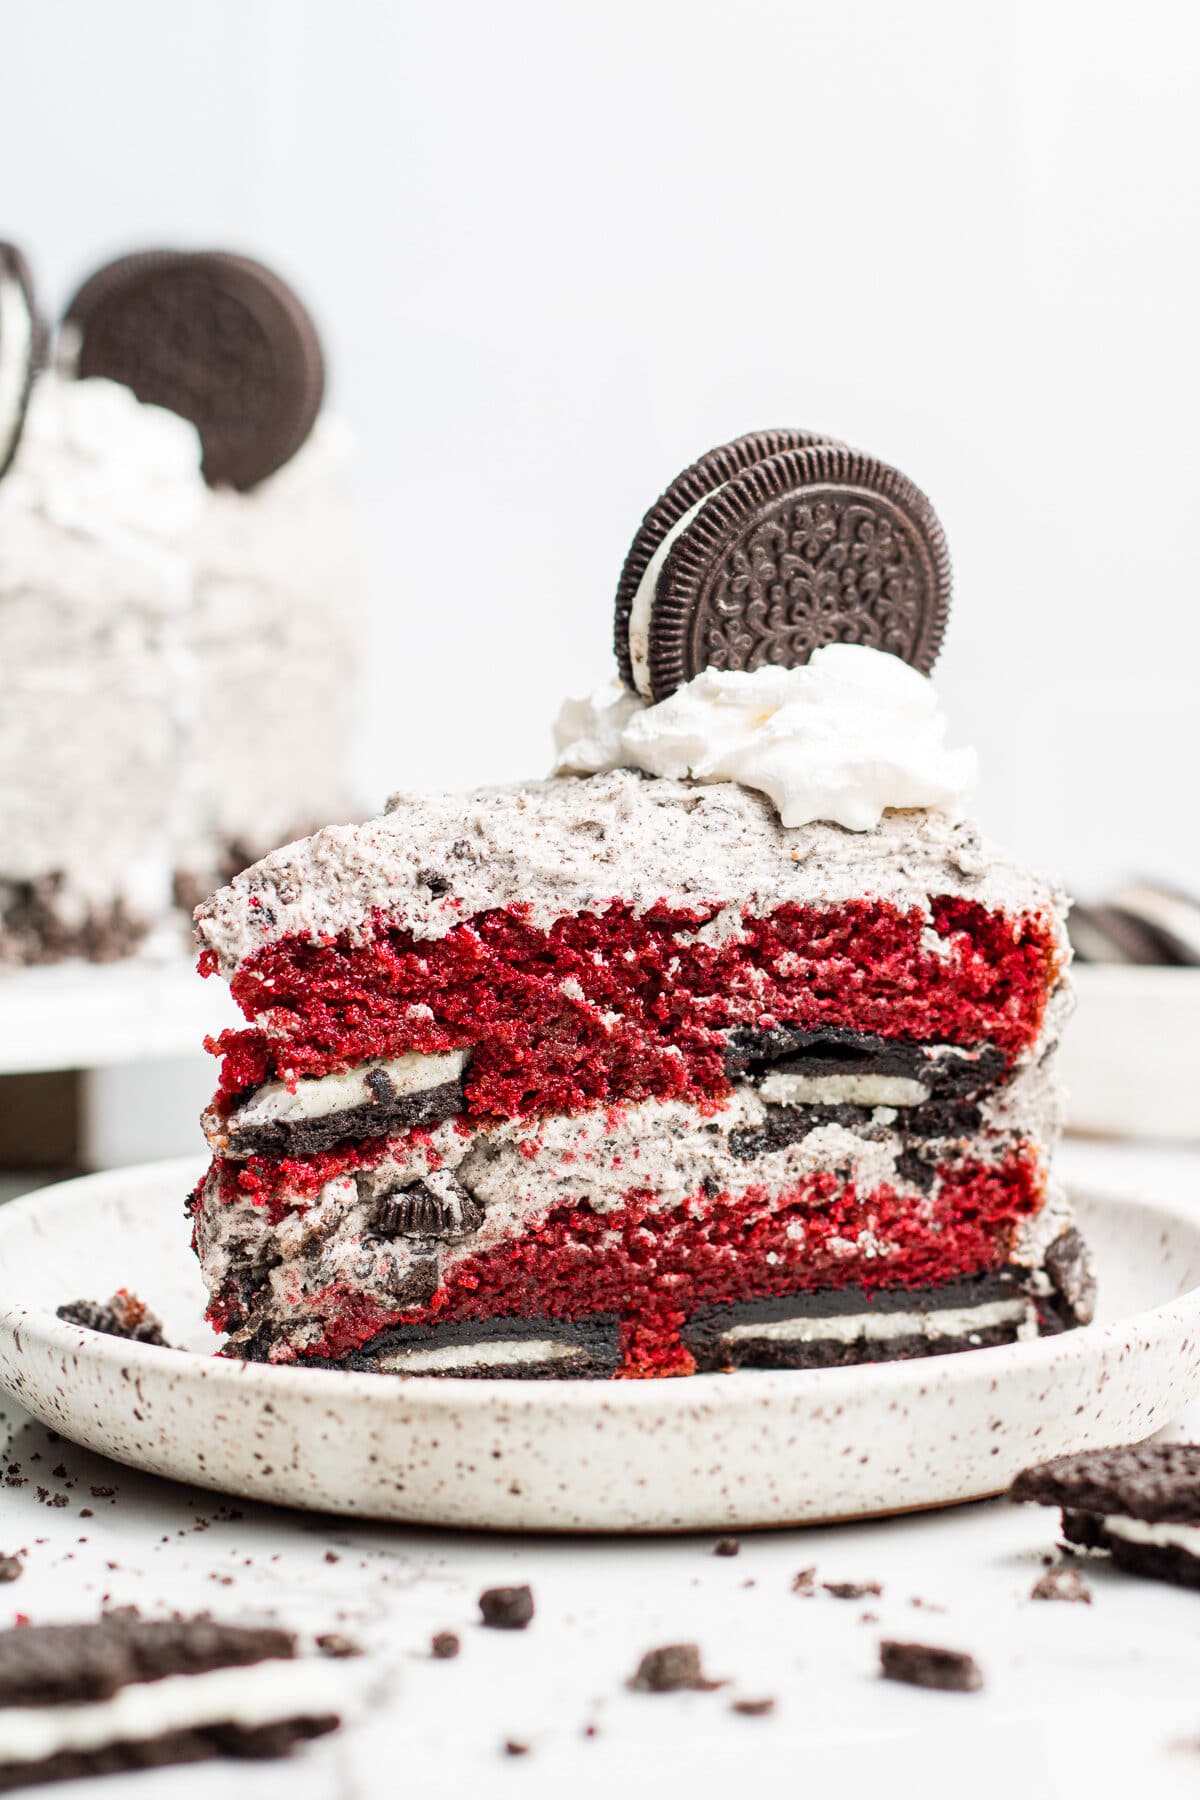
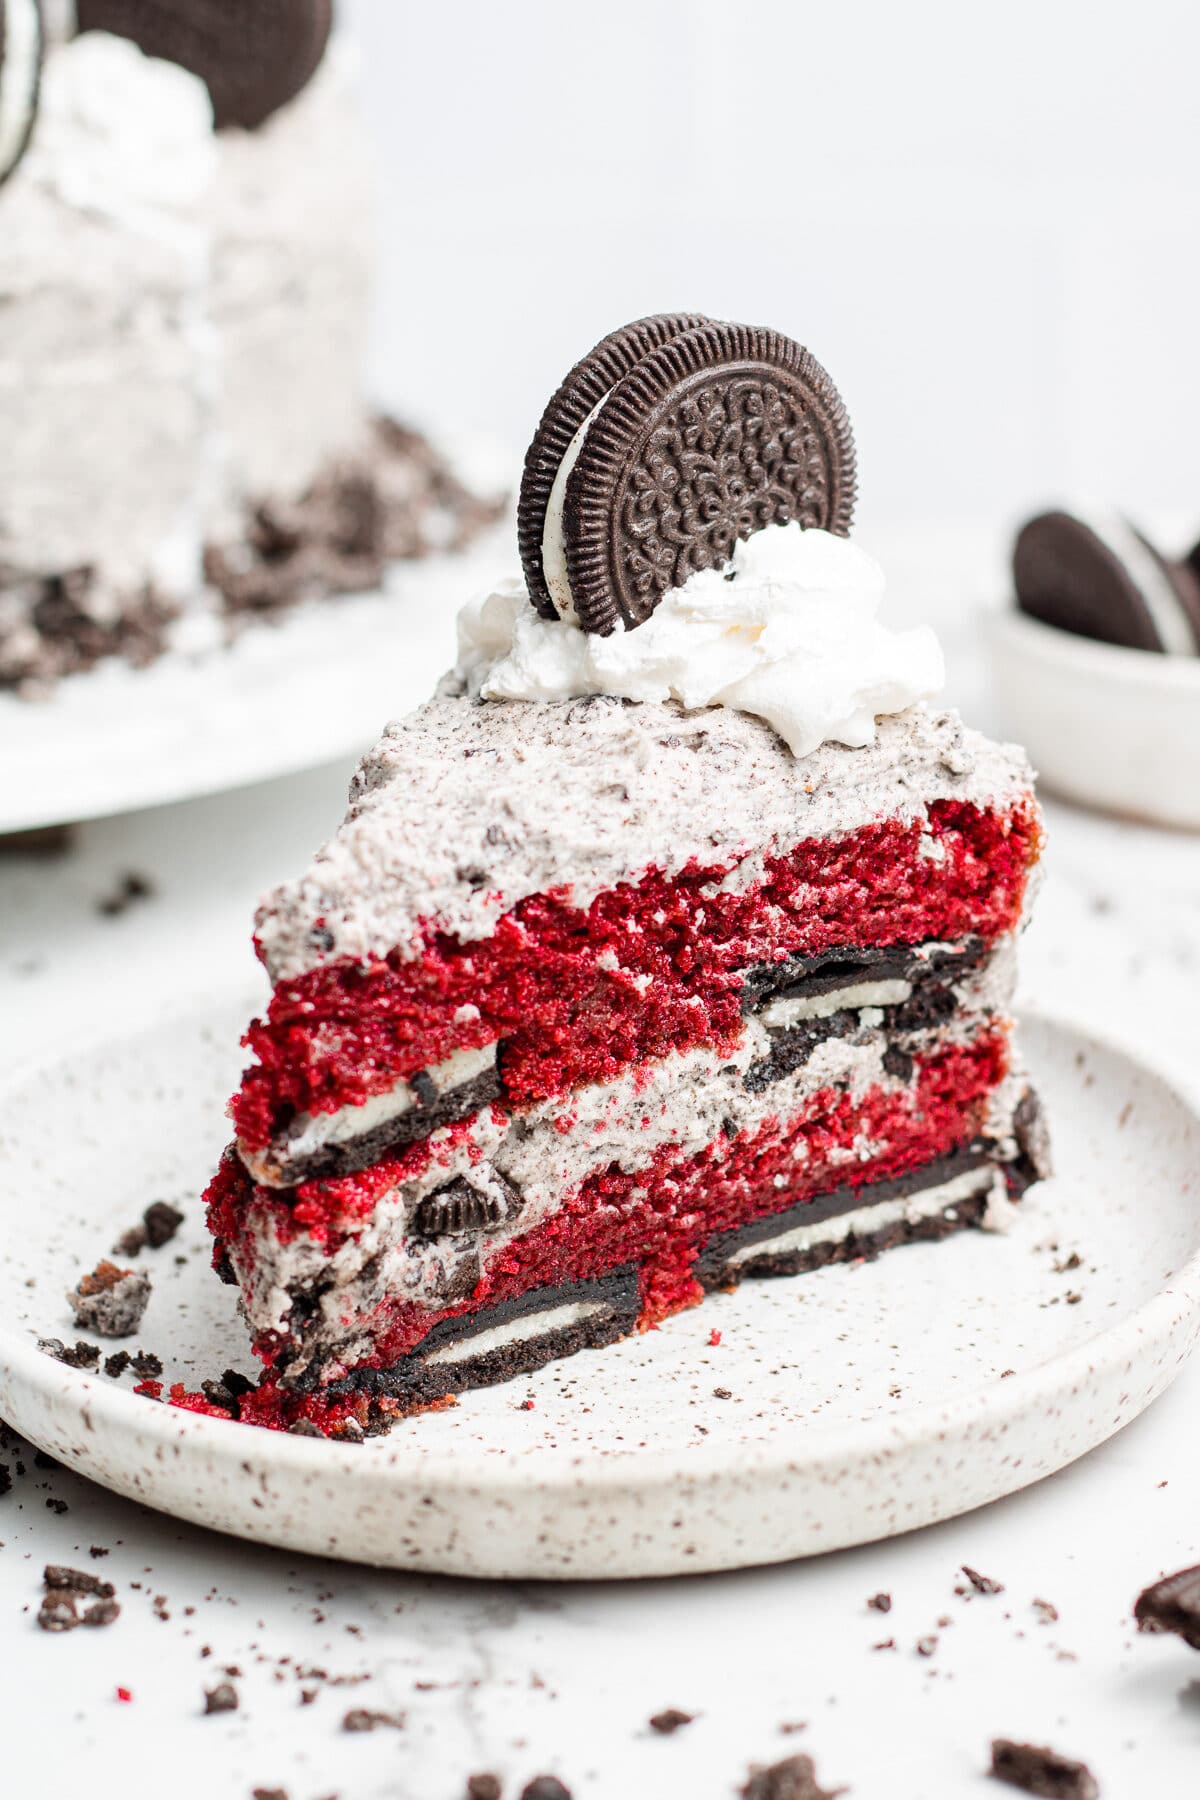
This red velvet Oreo cake is a super fun twist on red velvet cake! This light and fluffy cake is paired with a creamy Oreo buttercream and layers of Oreo cookies baked right into the cake. It’s heavenly!
Although many will say red velvet isn’t a flavor, the rich red color makes me feel like it is! Since my red velvet cookies are such a hit around Valentine’s Day, I thought I should get to work on another red velvet recipe for this year!
Featured Reader Review
“OMG. Mine didn’t look as pretty as yours because I didn’t add the oreos and whipping cream on top but I made this for Galentines day and it was SO GOOD.”
Kasey
This Oreo red velvet cake is easy to make and so delicious! Although red velvet cake is typically paired with cream cheese icing, this recipe uses an Oreo buttercream (the same one used in this chocolate Oreo cake recipe) instead and the cake is just sweet enough to balance out the buttercream.
Why This Is The Best Red Velvet Oreo Cake
- Each red velvet cake layer has Oreos baked right into it, and there are crushed Oreos in the buttercream too! If you want even more Oreo flavor, you can even add chopped Oreos to the cake batter.
- The cake batter is made using the reverse creaming method, where the butter is mixed directly into the dry ingredients, which gives the cake a soft and fluffy crumb.
- This is a two layer cake recipe, but you can easily make it into a 3 layer cake and it can be made using different sized pans (I’ve provided instructions in the recipe card at the bottom of this post).
- If you prefer your cake to have a cream cheese frosting instead of the Oreo buttercream, you can make your favorite cream cheese frosting and use that instead!
- This cake is perfect for birthdays, Valentine’s Day, Christmas, or any other holiday!
Ingredients Needed
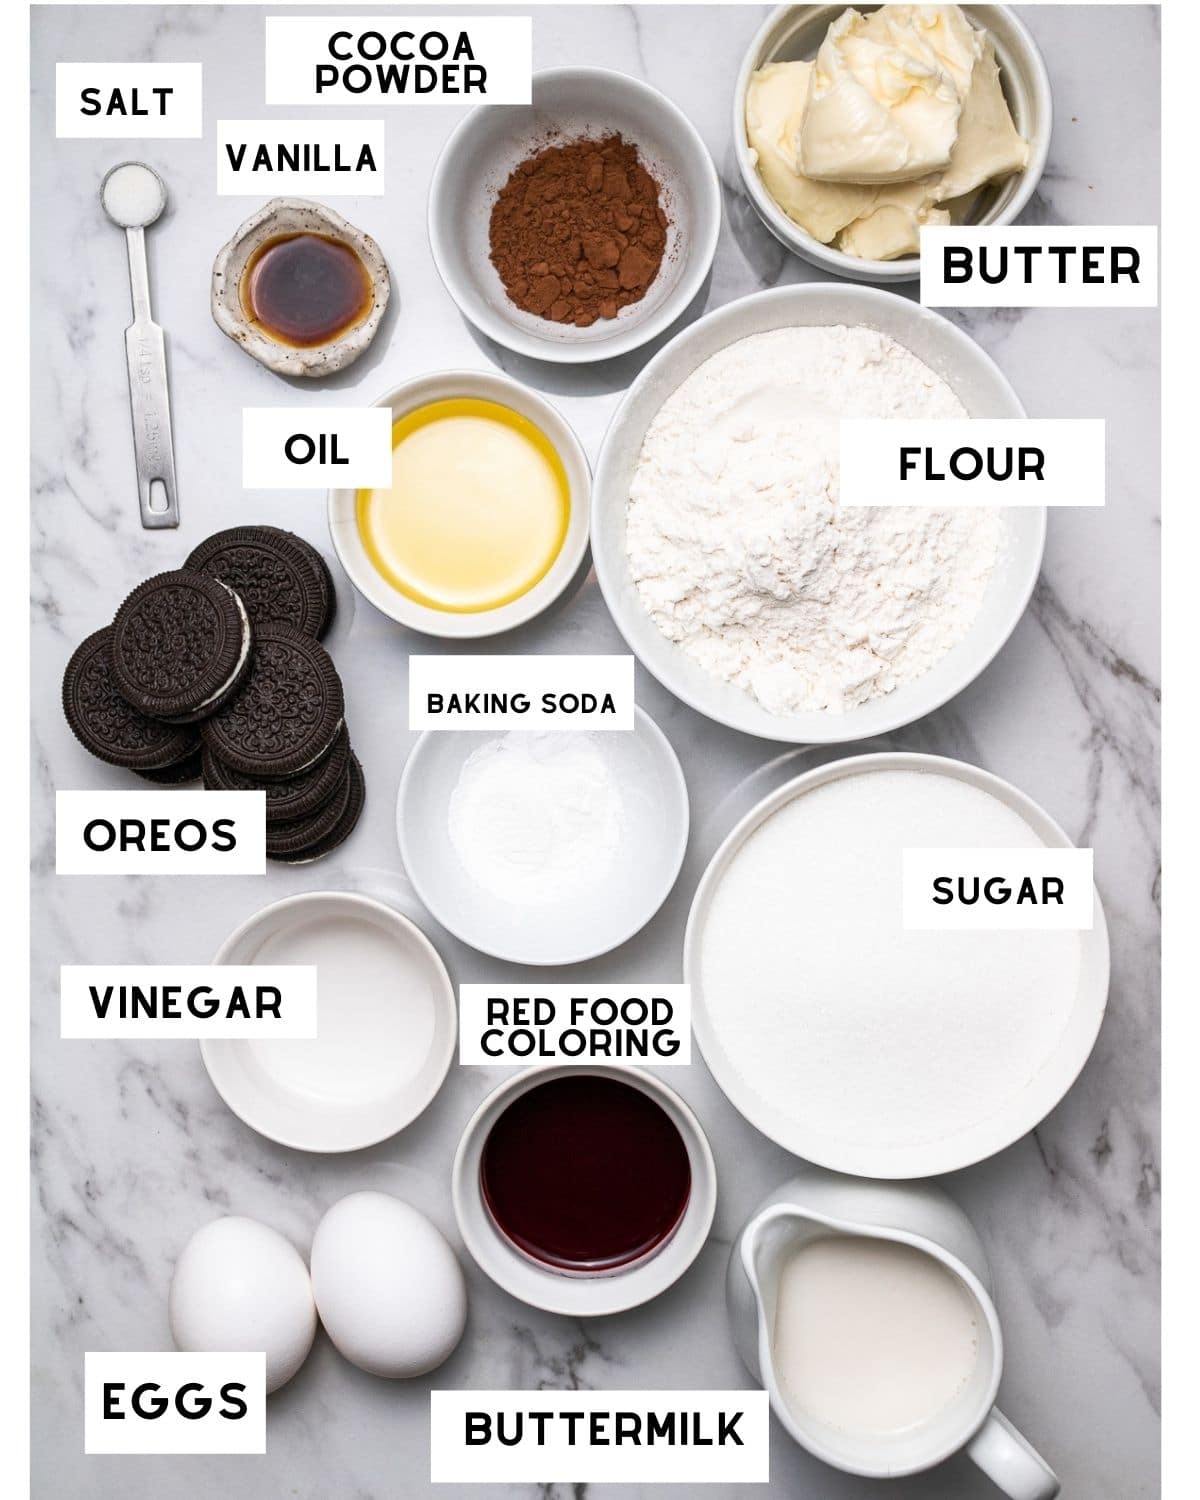
- Flour: This recipe was developed with all-purpose flour, and has not been tested with gluten free flour.
- Butter: This recipe has been tested with regular butter and dairy free butter – both work great!
- Buttermilk: you can use regular buttermilk, or you can make your own dairy free buttermilk by adding 1 Tablespoon of white vinegar to 1 cup of milk (more detailed instructions are further down in the post).
- Red Food Coloring: I use the liquid kind, but you can use gel as well. The amount needed will vary, so adjust the amount to your preference of color.
- Oreos: regular classic Oreo’s work best.
- Cocoa Powder: I recommend unsweetened dutch-process cocoa powder, but if you only have natural, that works fine.
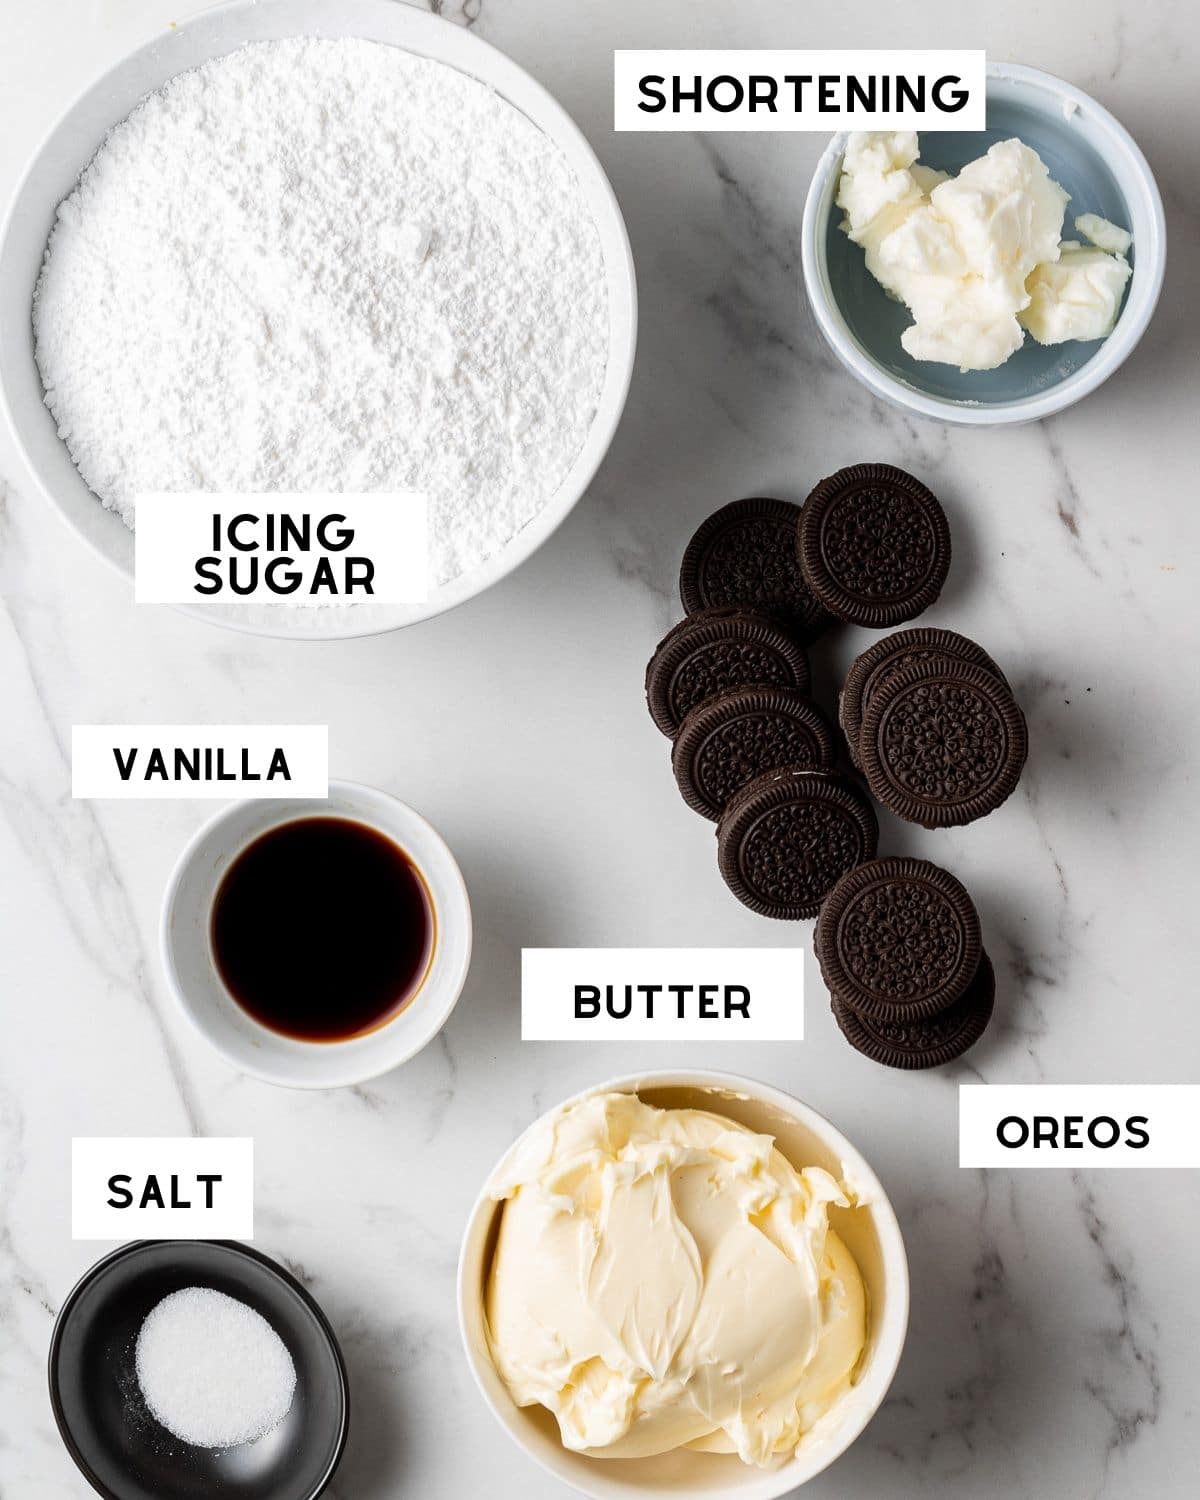
- Vegetable Shortening: If you are making this cake using dairy free butter, vegetable shortening will help create a firmer buttercream that holds its shape at room temperature. If you’re using regular dairy butter you can replace the shortening with more butter (1:1).
Step By Step Instructions
Note: Full ingredient measurements and instructions can be found in the recipe card at the bottom of this page.
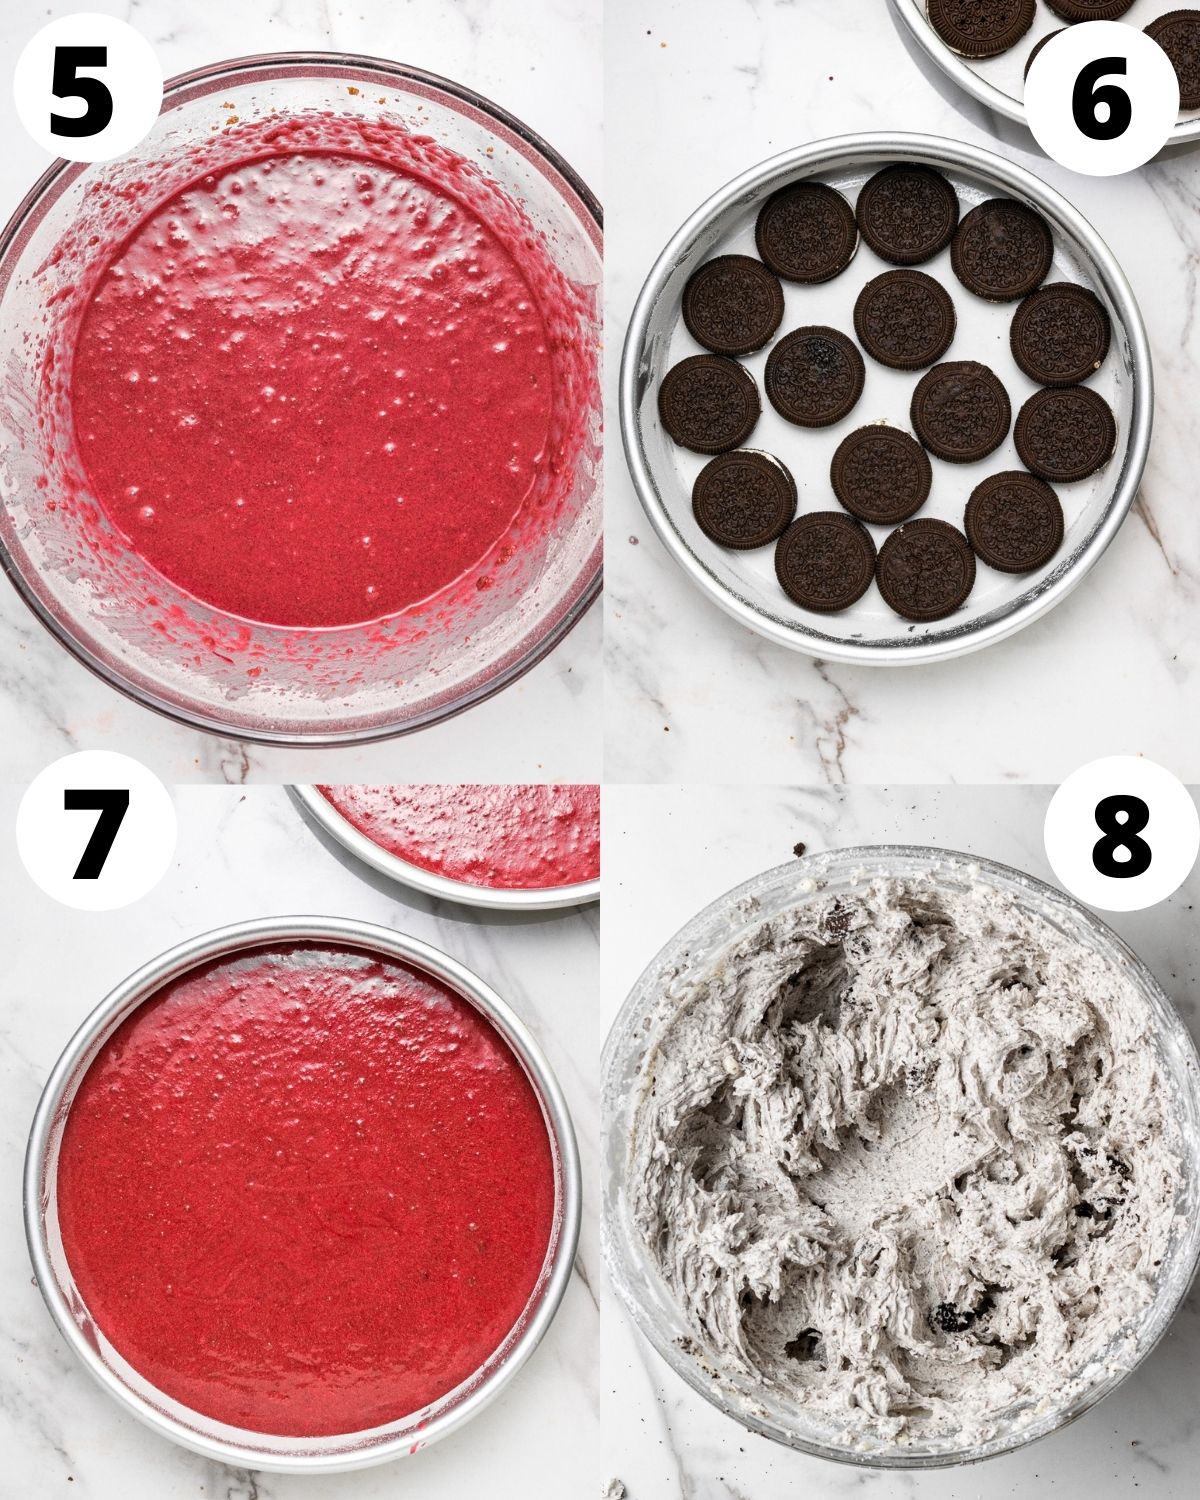
Step One: Preheat the oven to 350°F and prepare two 8 inch round cake pans. Spray the inside of each pan with cooking spray. Cut round pieces of parchment paper out in the shape of the pans and place one into each pan. Place Oreos into the bottom of the pan in an even layer until you can’t fit anymore (16 Oreos per pan). Make your buttermilk, then set aside.
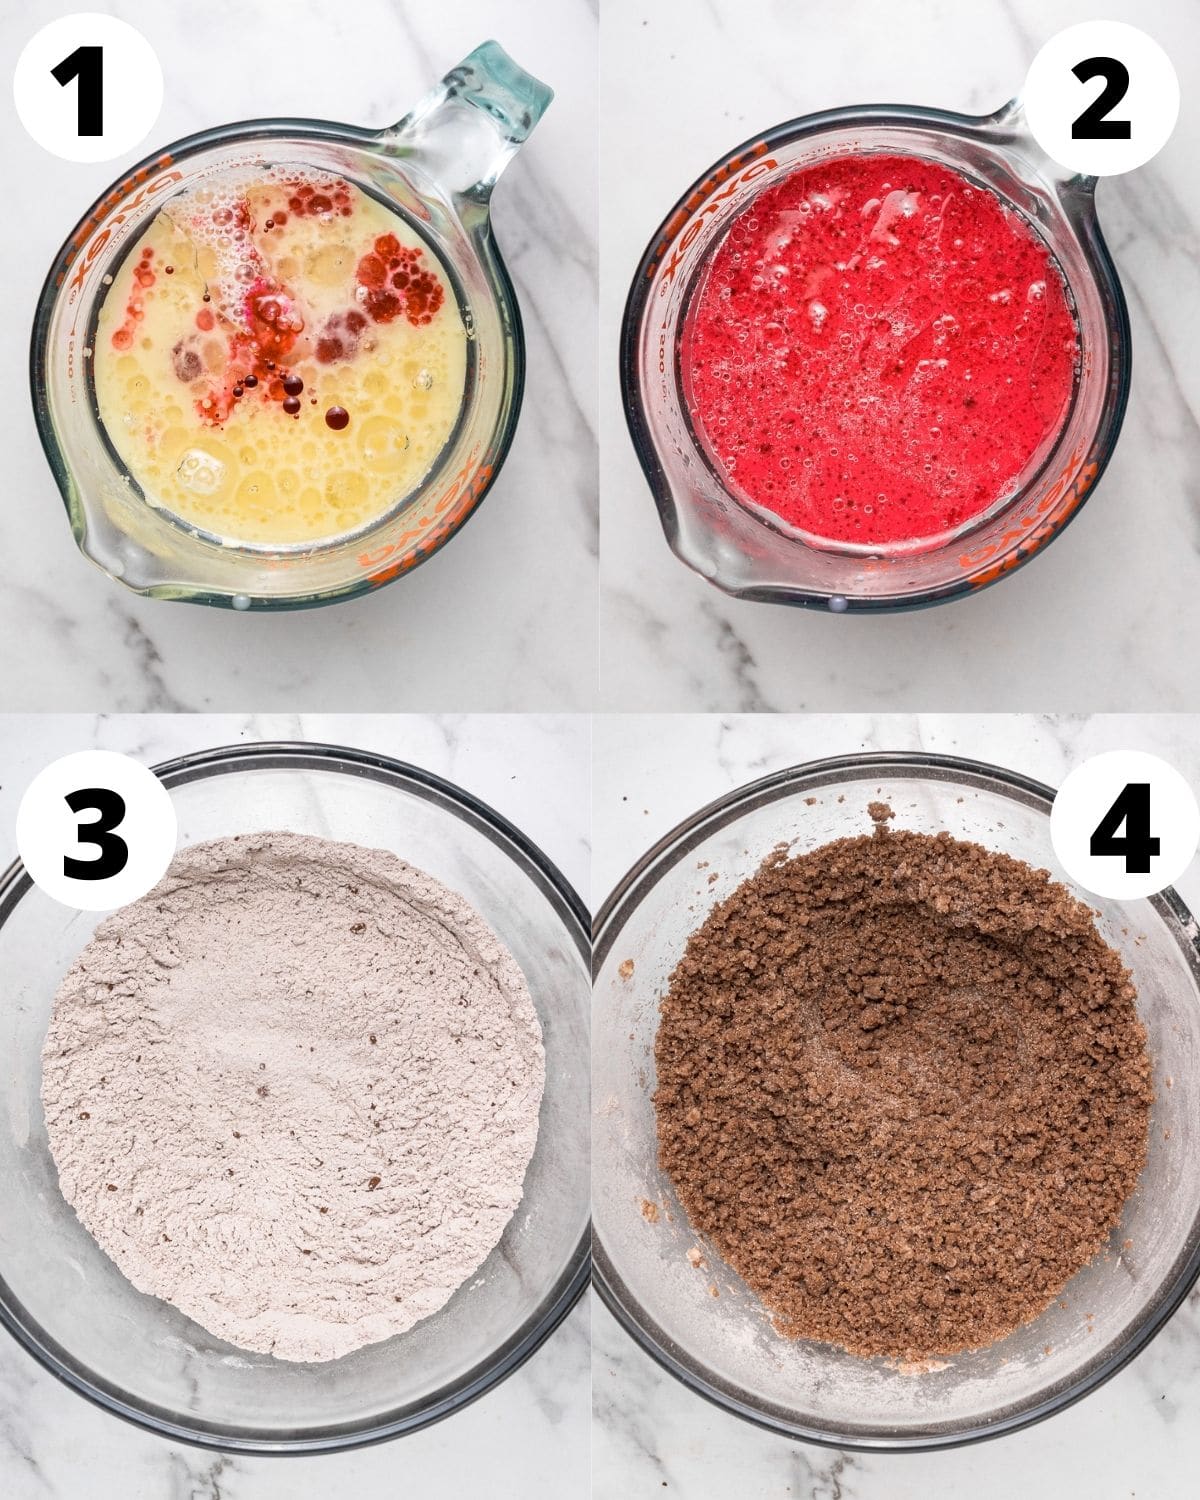
Step Two: In a medium bowl or large measuring cup, combine oil, buttermilk, vinegar, vanilla, food coloring, and eggs, then set aside. In the bowl of a standing or handheld mixer, combine the flour, sugar, salt, baking soda, and cocoa powder.
Step Three: Add the butter into the bowl with the dry ingredients and use the paddle attachment on your mixer to mix it together with the dry ingredients until combined and somewhat crumbly. Pour the wet ingredients in and mix until combined and there are no more lumps.
Step Four: Divide the cake batter between the cake pans then bake for 22-32 minutes, or until a toothpick inserted into the middle of the cakes comes out clean.
Step Five: Let the cakes cool in the pan for 20 minutes then transfer to a cooling rack until completely cooled. Meanwhile, make the Oreo buttercream.
Step Six: Crush the whole Oreo cookies up using a food processor, or put them in a ziploc bag and roll over the bag with a rolling pin. You can also finely chop them, and make the chunks as large or as small as you’d like (I like to use a mix of crumbs with some big chunks as well). Set aside.
Step Seven: Add vegetable shortening (or butter if not using dairy free butter) and butter to the bowl of your mixer, then mix until smooth, then add the vanilla and salt. Add in powdered sugar ½ cup at a time until your desired consistency is reached. If the buttercream is too thick, add in 1 teaspoon of milk to thin it out.
Step Eight: Add in the Oreo crumbs (and chunks) into the buttercream. Cover and refrigerate until the cakes have completely cooled. Assemble the cake layers (see tips below) and enjoy!
Assembling The Cake
When you remove the cakes from the pan, you can leave them to cool upside down on the cooling rack, which helps flatten out the top of the cake. This makes it easier to stack the layers!
To assemble the cake, put the thickest cake layer onto your cake plate, cake stand, or cake board. Top it with a big scoop of buttercream and spread it around with an offset spatula, leaving about an inch of unfrosted cake around the outside edges.
Place the second layer of cake on top, then freeze the cake for about 15 minutes. After 15 minutes, remove the cake from the freezer and use an offset spatula to frost the cake with a small amount of frosting.
Smooth it out using a bench scraper, scraping the crumb filled frosting into a separate bowl so that the crumbs don’t mix into the rest of the Oreo buttercream. Don’t worry if it’s not pretty, as this is your crumb coat and this layer will be covered. Freeze the cake again for 15 minutes, then add the remaining frosting to the cake, then decorate!
How To Make Buttermilk From Scratch
If you don’t have buttermilk, or if you are making this cake dairy free, don’t worry – it’s actually super easy to make your own! Add 1 cup of milk to a measuring cup (my favorite dairy free milk to use for buttermilk is soy milk, but any kind will work). Stir in 1 tablespoon of white vinegar and let it sit for 10-15 minutes.
The milk will start to curdle (I find it doesn’t curdle as much with oat milk, but it still will add that tang to the milk). Since this recipe only calls for one cup of buttermilk, be sure to pour out some of the buttermilk once it’s ready so that you only have one cup of liquid (not one cup plus 1 tablespoon).
Decorating The Cake
Here are a few fun ideas for decorating this red velvet Oreo cake!
- Make a chocolate ganache by melting chocolate chips and coconut cream (or regular cream if not dairy free) over the stove and then drizzling it over the buttercream.
- Pipe buttercream or stabilized whipped cream on top of the cake
- Top the cake with crushed Oreos or mini Oreos
- If you’re making this cake for Valentine’s day, add some red and pink heart sprinkles on top!
- Add a few drops of red food coloring to the buttercream to add more pops of red to your cake! It will be a dark red.
Cake Pan Size Adjustments
Here are a few adjustments in case you would like to make your Oreo red velvet cake in a different size pan:
3 Layer Cake: The easiest way to convert a 2 layer 8 inch cake into 3 layers is to simply divide the batter between three cake pans. With this method, you’ll end up with thinner cake layers, since the cake batter is divided between three pans instead of 2. Another option is to multiply all the ingredients in the recipe by 1.5.
9 Inch Round Cake Pans: The cake layers will be thinner and will bake quicker. Start checking on them after around 16 minutes in the oven.
9×13 Rectangular Pan: To make this into an Oreo red velvet sheet cake, use a 9×13 pan, then bake for around 20 minutes or until a toothpick inserted in the middle comes out clean. Since there aren’t multiple layers for a sheet cake, you can halve the Oreo buttercream recipe.
Expert Tips
- Don’t skip the parchment paper lining at the bottom of the pan! Seriously, you’ll thank me later! Everytime I haven’t lined the pan with parchment paper, my cakes always stick to the pan or break, regardless of whether the pan was greased and floured. The parchment paper makes the whole process so much easier.
- Do not over-measure your flour – This is the most common mistake bakers make! If you over-measure your flour, the cake will be dry. I strongly recommend weighing it with a kitchen scale or using the scoop and level method.
- Adjust the buttercream recipe as needed – If your Oreo buttercream seems too thin, add a little more powdered sugar. Start with around ¼ cup at a time. If the buttercream is too thick, you can add in 1 tablespoon of milk until your desired consistency is reached.
- Let the cakes cool for at least 20 minutes before taking them out of the pan – otherwise they could fall apart! To remove the cake, run a butter knife around the outside of the cake then flip it over onto the cooling rack.
Storage Instructions
The red velvet oreo cake can be stored covered at room temperature for 3-4 days. I like to store mine in a cake carrier.
If you’d like to freeze the cake layers for later, let them cool completely then wrap each individual layer in plastic wrap, and then wrap each one in aluminum foil. Store the cakes in a large ziploc bag and freeze for up to 3 months. Let them thaw at room temperature.
Store leftover Oreo buttercream in an airtight container in the freezer for up to 2 months. Thaw the buttercream in the fridge, then use a mixer to make it fluffy again before frosting your cake.
You can also freeze any leftovers from the assembled cake in individual slices, using the same process (plastic wrap, then aluminum foil).
More Cake Recipes You’ll Love


If you make this recipe, let me know how it went in the comments below, I’d love to hear from you! You can also tag me on Instagram or Facebook so I can check it out!
Baking FAQ
These are the topics I’m asked about most frequently:
You can get these answers and more in my frequently asked questions post!

Red Velvet Oreo Cake
Video
Ingredients
Red Velvet Oreo Cake
- 1 cup (250 ml) buttermilk (regular or dairy free), SEE NOTES
- 1 teaspoon white vinegar
- 1 teaspoon vanilla extract
- 2 Tablespoons liquid red food coloring
- ¾ cup (162 ml) oil (canola oil, vegetable oil, grapeseed oil, or sunflower oil)
- 2 eggs
- 2⅓ cup + 1 Tablespoon (299 g) all-purpose flour, SEE NOTES
- 2 Tablespoons (11 g) unsweetened cocoa powder
- 1¼ cup (250 g) granulated sugar
- ½ teaspoon salt
- 1 teaspoon baking soda
- ½ cup (105 g) butter, softened, (regular or dairy free)
- 28 Oreos
Oreo Buttercream
- 1¼ cup (262 g) butter, softened , (regular or dairy free)
- ½ cup + 2 Tablespoons (131 g) vegetable shortening, (or butter if not dairy free, SEE NOTES)
- 2 teaspoons vanilla extract
- ½ teaspoon salt
- 3¾-4¼ cup (450 g) powdered sugar (icing sugar)
- 16-20 Oreo cookies, plus more for decorating
Instructions
Red Velvet Oreo Cake
- Preheat the oven to 350°F (177°C). Prepare two 8 inch round cake pans by spraying the inside of each pan with cooking spray. Cut round pieces of parchment paper out in the shape of the pans and place one into each pan. Place Oreos into the bottom of the pan in an even layer until you can’t fit anymore (16 Oreos per pan).
- If making your own buttermilk (see notes), make it and set aside. In a medium bowl or large liquid measuring cup, whisk together oil, buttermilk, vanilla, vinegar, food coloring, and eggs, then set aside.
- In the bowl of a standing or handheld mixer, whisk the flour, sugar, salt, baking soda, and cocoa powder together.
- Add the butter into the bowl with the dry ingredients and use the paddle attachment on your mixer to mix until combined and crumbly like sand (photos in post above). Add in the wet ingredients in and mix until combined, scraping along the sides of the bowl as you go. Mix until there are no more lumps.
- Divide the cake batter between the cake pans then bake for 22-32 minutes, or until a toothpick inserted into the middle of the cakes comes out clean. Let the cakes cool in the pan for 20 minutes then transfer to a cooling rack until completely cooled. Meanwhile, make the Oreo buttercream.
Oreo Buttercream
- Crush the whole Oreo cookies up using a food processor, or put them in a ziploc bag and roll over the bag with a rolling pin. You can also finely chop them, and make the chunks as large or as small as you’d like (I like to use a mix of crumbs with some big chunks as well). Set aside.
- Add vegetable shortening (or butter if not using dairy free butter) and butter to the bowl of your mixer, then mix until smooth. Add the vanilla and salt. Add in powdered sugar ½ cup at a time until your desired consistency is reached. If the buttercream is too thick, add in 1 teaspoon of milk to thin it out.
- Add in the Oreo crumbs (and chunks) into the buttercream. Set aside and frost the cakes once they've cooled completely. (See post above for tips on assembling and decorating). Enjoy!
Equipment
Notes
The calorie information provided for this recipe is an estimate. The accuracy of the calories listed is not guaranteed.
Hi Gabby.
2 questions: Would avocado oil or olive oil work? My husband will not eat seed oil. Also, my favorite cake is red velvet, and oreo anything is right up there! Could half the butter be substituted with cream cheese for a nod to traditional red velvet?
I CANNOT wait to try this!! ❤️
Avocado oil is fine! If your second question is referring to the Oreo buttercream frosting, I haven’t tested the buttercream this way so I can’t say for sure! But you could try this cream cheese frosting recipe, with regular butter and cream cheese and then add the oreos to it. If you’re talking about the butter in the cake, no, do not sub with cream cheese!
I have tried Red Velvet Cake and it was super delicious. Thank you so much for sharing your recipes with us . ?
Hi Aqsa! I am so happy that you loved the cake, thank you for the review! 🙂
I don’t use the word “amazerbeams” lightly, but holy hell does it fit on this occasion. The cake was moist and perfectly balanced between icing and actual cake. Somehow the Oreos stayed crunchy to add texture (and who doesn’t love Oreos). I’ve tried previous CDD recipes (all of which were incredible), but this is my new favourite.
Hi Chloe! Wow, thank you for the amazing review! This makes me so happy to hear! 😀
This cake is dynamite!!! I do not consider myself a baker, and even I nailed this recipe!! I baked this cake as a one layer 9×13, and baked for closer to 40 minutes at the recommended time. It was for my sons first grade class for Valentines Day, and they all loved it. All the adults who were able to get a piece said it was the beat red velvet they’ve ever had!! My kids are all requesting it for their birthday cake this year, and I’ll happily oblige!!
Hi Stacy! YAY! This seriously made my day! I’m so so happy to hear that the cake was such a hit with both the kids and the adults! Thanks so much for taking the time to leave a review! 😀
OMG!! Was the first response I got when my wife and I ate this amazing cake. Shockingly, in my past I was not a red velvet cake fan but this cake just changed my life for the better!! Thanks so much for this life changing cake recipe!! AMAZING!
Hi Scott! YAY! I am so happy to hear how much you both loved the recipe! Thank you so much for taking the time to leave a review 😀
This is hands down the most delicious cake I’ve ever tasted, couldn’t stop eating it.. ?
Thanks G&T ?
Hi Darcy! Wow, what a compliment, I’m so happy to hear that you loved the cake! Thanks so much for the review 😀
OMG. Mine didn’t look as pretty as yours because I didn’t add the oreos and whipping cream on top but I made this for Galentines day and it was SO GOOD.
Hi Kasey! I’m so happy to hear that the cake was a hit! Thanks so much for the review 😀
The photograph is enticing and amazing!!! Not to mention the delicious cake!!
Hi! Thank you so much, I really appreciate that and so glad you loved the cake!