4 Inch Cake Recipe
This post contains affiliate links. Read the full disclosure here.
This 4 inch cake recipe is the perfect size for just a handful of people to share! It also makes a perfect vanilla smash cake or mini birthday cake. It’s deliciously light and fluffy, easy to make, and super cute!

There’s just something so adorable about mini desserts isn’t there?! The same way that mini donuts are somehow so much cuter than regular donuts, this mini cake is somehow cuter than a regular sized vanilla cake!
The base of this 4 inch cake recipe, as well as the vanilla buttercream, is adapted from my recipe for vanilla cupcakes.
This recipe uses a reverse creaming method, where the butter is mixed into the dry ingredients, and it gives it such a light and fluffy crumb!
Why You’ll Love This 4 Inch Cake Recipe
- It’s the perfect little personal cake size, and it’ll yield enough cake for around 6 slices.
- This mini cake can be made using regular or dairy free ingredients – it’s been tested both ways.
- 4 inch pans make this recipe the perfect size for a mini birthday cake or even a smash cake!
- This 4 inch cake recipe uses the reverse creaming method, where the butter is mixed directly into the dry ingredients, making the cake layers extra light and fluffy.
- This recipe can easily be made in two 6 inch round cake pans instead of 4 inch cake pans!
Ingredients Needed
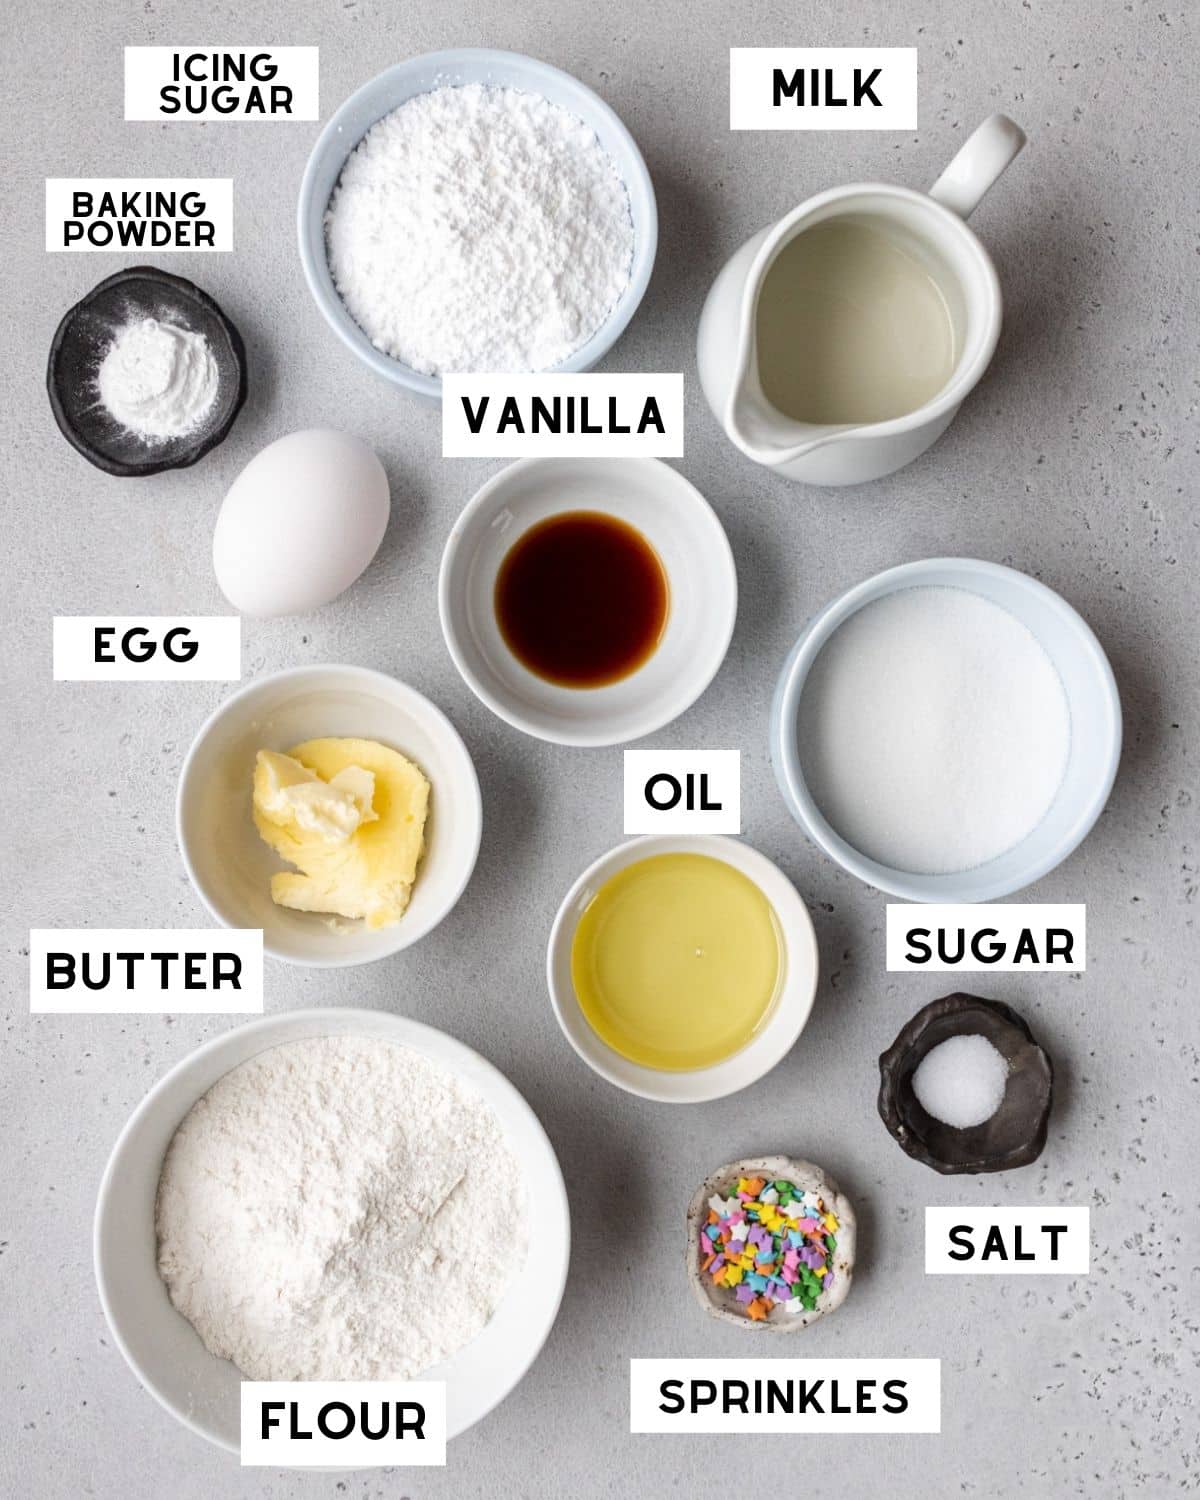
- Flour: This 4 inch cake recipe calls for all-purpose flour, and has not been tested with gluten free flour.
- Milk: Regular milk, or dairy free milk works great. I like to use soy milk in my cakes.
- Butter: Regular or vegan butter works great in both the cake and the buttercream recipe.
- Oil: Be sure to use a neutral oil like canola, sunflower, or grapeseed oil.
- Vanilla Extract: Because vanilla is the main flavor of this cake, I highly recommend using real vanilla extract if you can. It makes a huge difference!
Step By Step Instructions
Note: Full ingredient measurements and instructions can be found in the recipe card at the bottom of this page.
Step One: Preheat the oven to 350°F and prepare three 4 inch round cake pans. Spray the inside with cooking spray, then cut out pieces of parchment paper so that they fit in the bottom of each pan (do not skip this step!). Set the pans aside.
Step Two: Add flour, salt, baking powder, and sugar to the bowl of a standing mixer or handheld mixer. Whisk them together until combined.
Step Three: Add the butter into the bowl of the dry ingredients and beat until the butter is incorporated and the mixture resembles the texture of sand.
Step Four: Pour in vanilla extract, milk, and oil and mix again. Lastly, add in the egg and mix until just combined (don’t over-mix).

Step Five: Divide the cake batter between the three cake pans and bake for 18-24 minutes, or until a toothpick inserted in the middle of the cakes comes out clean.
Let the cakes cool in the pan for 10-15 minutes, then remove them from the pan (by running a butter knife or offset spatula around the edges and then flipping the cake upside down onto a cooling rack). While the cakes cool, make the buttercream.
Step Six: In the bowl of a mixer, beat the butter (and vegetable shortening if using) together until combined, then add in vanilla extract and food coloring (if using).
Add in the powdered sugar, ¼ cup at a time until your desired consistency is reached. If the buttercream is too thick, you can add ½ tablespoon of milk in at a time, thinning it out as much as you’d like. If buttercream is too thin, add in more powdered sugar ¼ cup at a time.

Assembling the Mini Cake
To assemble the cake, you can either make a naked cake, do a crumb coat or you can just frost the outside of the cake in the traditional way.
To make a crumb coat, add a thin layer of frosting to the outside of the cake, scraping off the excess with a bench scraper (this is called a crumb coat). Then place the cake in the freezer for 20 minutes then add another layer of frosting.
If you’d rather skip the crumb coat, you can simply frost the outside of the cake in one layer then decorate with sprinkles or as desired. Have fun with it!

Expert Tips
- Properly measure your flour – If you over-measure your flour, the cake could turn out dry and crumbly. It is very easy to over-measure your flour, so I strongly recommend weighing it with a $10 kitchen scale or using the scoop and level method.
- Line your pans with parchment paper! It’s the best way to prevent sticking. You should also grease the sides of the pans.
- Careful not to over-mix your batter! Over-mixing the cake batter will affect the texture of the cakes.
Storage Instructions
The cake can be stored covered at room temperature for 3-4 days.
You can also freeze the cake layers if you want to make this cake ahead of time. Let them cool completely, then tightly wrap each individual cake layer in parchment paper, then aluminium foil. Freeze in ziploc bags for up to 3 months, then let them thaw at room temperature.
You can store leftover buttercream in an airtight container in the freezer for up to 2 months. Thaw it in the fridge then re-whip it using a handheld or standing mixer before frosting the cakes.
More Small Batch Recipes You’ll Love


If you make this recipe, let me know how it went in the comments below, I’d love to hear from you! You can also tag me on Instagram or Facebook so I can check it out!
Baking FAQ
These are the topics I’m asked about most frequently:
You can get these answers and more in my frequently asked questions post!

4 Inch Cake Recipe
Video
Ingredients
4 Inch Vanilla Cake
- 1 cup + 1 Tablespoon (138 g) all-purpose flour
- 1 teaspoon baking powder
- ½ cup (100 g) granulated sugar
- ⅛ cup (26 g) butter, softened, (regular or dairy free)
- ¼ cup (59 ml) oil (canola oil, vegetable oil, grapeseed oil, or sunflower oil)
- 1 egg
- ½ teaspoon salt
- 1½ teaspoon vanilla extract
- ⅓ cup (83 ml) milk of choice, (regular or dairy free)
Vanilla Buttercream
- ¾ cup (158 g) regular or dairy free butter, softened, SEE NOTES if using dairy free
- ¾ teaspoon vanilla extract
- ⅛ teaspoon salt
- 1½-2 cups (180 g) powdered sugar (icing sugar)
- sprinkles (optional)
- food coloring (optional)
Instructions
- Preheat the oven to 350°F and prepare three 4 inch round cake pans. Spray the inside with cooking spray, then cut out pieces of parchment paper so that they fit in the bottom of each pan (do not skip this step!). Set the pans aside.
- Add flour, salt, baking powder, and sugar to the bowl of a standing mixer or handheld mixer. Whisk them together until combined.
- Add the butter into the bowl of the dry ingredients and beat until the butter is incorporated and the mixture resembles the texture of sand.
- Pour in vanilla extract, milk, and oil and mix again. Lastly, add in the egg and mix until just combined (don't over-mix).
- Divide the cake batter between the three cake pans and bake for 18-24 minutes, or until a toothpick inserted in the middle of the cakes comes out clean.
- Let the cakes cool in the pan for 10-15 minutes, then remove them from the pan (by running a butter knife or offset spatula around the edges and then flipping the cake upside down onto a cooling rack). While the cakes cool, make the buttercream.
Vanilla Buttercream
- In the bowl of a mixer, beat the butter (and vegetable shortening if using) together until combined, then add in vanilla extract.
- Add in the powdered sugar, ¼ cup at a time until your desired consistency is reached. If the buttercream is too thick, you can add ½ tablespoon of milk in at a time, thinning it out as much as you'd like. If buttercream is too thin, add in more powdered sugar ¼ cup at a time.
Assembling the Cake
- Add an even layer of buttercream between each of the completely cooled cake layers.
- Frost the outside of the cake, scraping off the excess frosting with a bench scraper (this is called a crumb coat). Then place the cake in the freezer for 20 minutes then add another layer of frosting.
- If you'd rather skip the crumb coat, you can simply frost the outside of the cake in one layer then decorate with sprinkles or as desired.
Equipment

Notes
The calorie information provided for this recipe is an estimate. The accuracy of the calories listed is not guaranteed.
Hi, I made this cake for my daughters smash cake and the sponge was perfect! So tasty with vanilla whipped cream frosting. Just wondering if you have a similar recipe for a 9 x13 inch cake I would love to make a bigger version? thank you!
Hi! I am so happy the cake was a hit and happy birthday to your daughter! This vanilla cake recipe is very similar and could be made into one 9×13 cake. Then instead of the chocolate frosting, you can double the vanilla frosting from the 4 inch cake recipe! Enjoy 🙂
Hey! I was just wondering if it is possible to bake all the dough at once and then cut it in layers? Thanks
Sure but if you’re not dividing into 3 cake pans, you might need to adjust your timing; check to see if it’s done when a toothpick inserted in the middle of the cakes comes out clean.
Can you use coconut oil instead of canola oil?
Coconut oil may alter the taste slightly, but if you don’t mind a mild coconut flavoring, then it should work!
can this cake recipe be made in one 8 inch round or 8 inch square pan? also long to bake if so, thanks
Hi Deborah! It may be a thinner cake but it should work. You can start checking on it at 12 minutes or so.
Hi!!! I just baked this cake but haven’t tasted it yet. However, it was so fun and easy to do that I already gave it 5 stars! I bake fairly often so I had all of the ingredients on hand. That’s one of my favorite parts of the recipe!
I do have a question – is the butter in the cake and the icing supposed to be salted? I defaulted to salted since it didn’t specify in the recipe. However, I’m not used to a slightly “salty” frosting, so I was curious if I made a mistake by using salted butter. Thanks!!
Hi Kensey! I typically recommend using unsalted butter so you can control the saltiness with added salt. If using salted butter, I would adjust any added salt measurements since you’ve already added salt through the butter.
I only had 4in bundt pans and the batter made 2 and 20mins was perfect timing and i use 1tsp cake batter extract and 1/2 vanilla and its delish..definitely saving this recipe.
Hi Tina! I’m so happy you loved the recipe, thanks for the review!
First thank you so much for having metric measurements 🙂 I made your small chocolate cake last nite and it was delish, turned out perfectly. Am making the small vanilla cake now. Why does that recipie go together so oddly? Just wondering. 😉
So happy you loved the chocolate cake! Vanilla cakes are very different than chocolate and adding the butter to the dry ingredients is called the reverse creaming method – which leads to a more tender crumb! You can read more about the reverse creaming method here 🙂
I wanted to step out of my confort zone and finally try a different recipe. I have never tried a cake so small and 3 layers. It went down so well, recipe saved and looking already to bake again 🙂
I covers it with fondant as I’m trying different styles for this year’s Christmas cake.
I’m so happy you loved the recipe!!
I used raw butter, raw milk and avocado oil. These were the best cakes I’ve ever made!! Thank you!
Hi Shelly! Thank your for your review, I’m so glad you enjoyed!
Thank you for sharing this 4inch cake recipe. Do we bake all 3 pans on the same shelf please? Thank you in advance.
Ideally yes!
This recipe is amazing. I made this cake vegan using plant based butter and an egg replacer that uses psyllium husk fiber, potato starch, and tapioca starch. I initially used another recipe, very similar to this, but in different order of steps and it failed 3 times 🤦♀️ The metric measurements were super helpful, even in the US. Thank you for saving the day for me!!!
I’m so happy you loved the recipe Mandy! Thanks so much for the review 🙂
Hi, I was wondering if I can replace the granulated sugar with either brown or coconut sugar without a baking issue. Thanks
Hi Fernanda, this will change the texture of the cake so I don’t recommend it.
I am in the UK and I made this cake a few days ago and it turned out great! No sunken middle and no burned edges ?
I used oven temp 160c fan, and left the cakes in about 5-7 minutes longer than specified and they turned out well. So I think 170c fan would probably be the perfect temp.
I also never knew you could add sprinkles direct to the buttercream! Nice tip and gave a nice crunch with each bite
Hi Diana! I am so happy to hear that you loved the recipe! Thanks so much for the review!
Going to try the recipe- what’s 1/8 th cup gms equivalent for butter .
Hi Veena! The measurements in grams are all available under the “Metric” tab. Enjoy!
Hiya when the recipe says x1 is that one layer or is that on cake with 3 layers please ?
It’s the full cake recipe, all 3 layers like in the pictures 🙂
I am working out of town for my birthday but the airbnb i’m in had a small kitchen so I went out and bought everything i needed to make myself a personal sized birthday cake. It was too much to eat in one sitting but I can’t say it lasted the whole weekend either. so tasty
Hi Raina! I love that! I’m so glad to hear that you enjoyed the cake – and happy birthday! 😀
Please give option for egg I don’t want to add .measurements are for 1 cake of 4 inch pan Right?please clarify !
This recipe makes 3 round 4 inch cakes. If you aren’t using egg you could try replacing it with 1/4 cup of oil or applesauce, but I haven’t tested that myself so I really can’t say for sure how it would turn out.
Hello m’am. Thank you for sharing this recipe. I was looking for the right amount of ingredients for a 4inch cake. This is going to be really helpful to me. Going to try it and see.
I have one small question. Instead of using oil can i use butter for the same or less amount? If so, then how much butter grams should i use? Thank you again.
You can, although the oil in the cake makes it much more moist! You’d need 52 additional grams of butter on top of the 26 grams already in the recipe.