Cookie Dough Cake
This post contains affiliate links. Read the full disclosure here.
This cookie dough cake is the best cake for cookie dough lovers! It starts with a moist and delicious two layer chocolate cake with pieces of cookie dough baked into each layer. It’s then frosted with the best cookie dough frosting ever!

Based on the name of my blog, you know I had to have a cookie dough cake recipe! This cake combines my two favorite things – edible cookie dough and and chocolate.
(P.S. if you love both those things, might I also suggest these chocolate covered cookie dough bites.)
The moist chocolate cake is based off of my chocolate cake recipe and each layer has balls of cookie dough bits baked right into it. It’s then finished off with a dreamy cookie dough frosting!
Featured Reader Review
“My daughter found this recipe and requested it for her birthday. Quite possibly the best chocolate cake I’ve ever made! The cookies gave the cake a different texture and it was great. I used a fluff-buttercream frosting because it’s our favorite. Was a perfect birthday cake!”
Jayme
Ingredient Notes

- Milk: you can use regular milk or a dairy free milk to make the recipe completely dairy free (of course be sure to use dairy free chocolate chips too).
- Butter: regular dairy (salted is my preference), or dairy free butter works great here. I have tested the recipe both ways!
- Mini Chocolate Chips: When I tested this recipe, mini chocolate chips worked best because regular sized chocolate chips can be too hard to bite down on in frosting or cookie dough.
How To Make This Cake
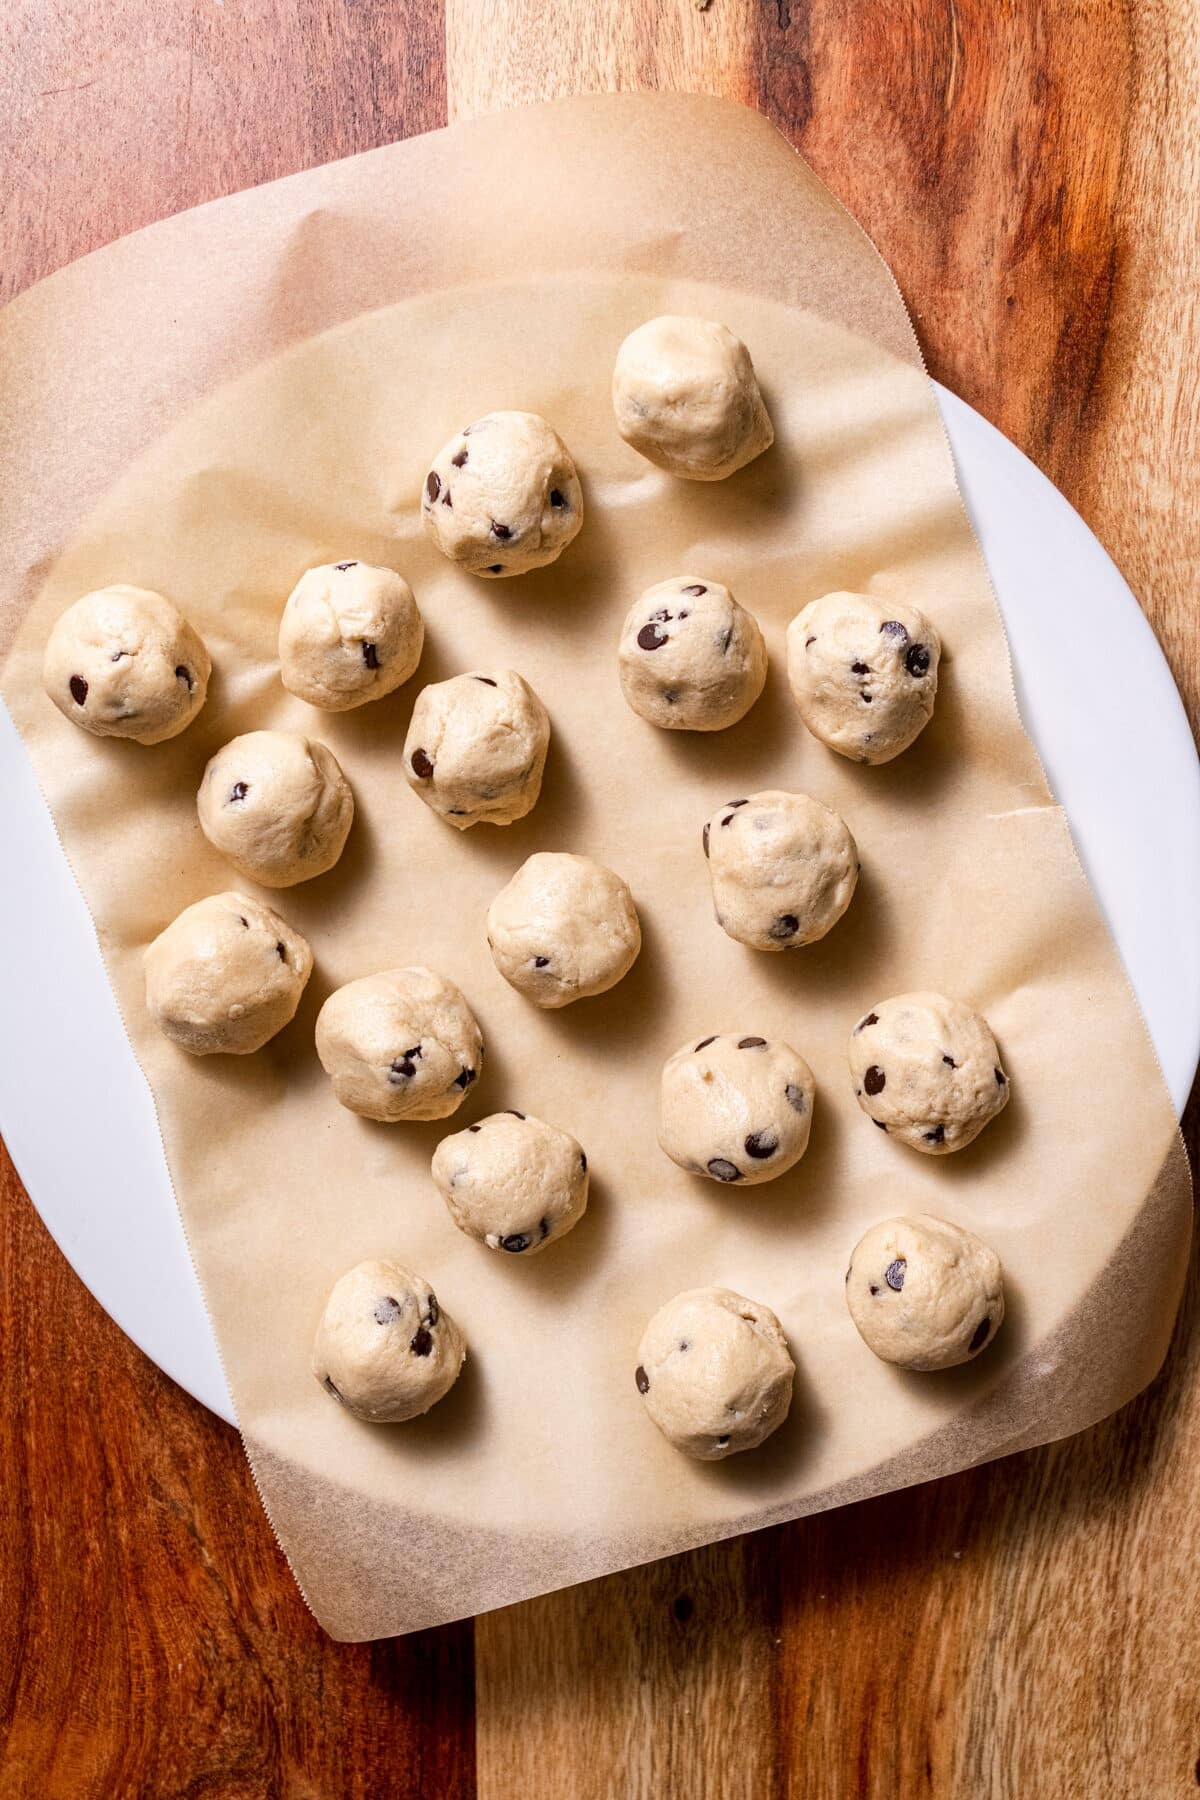
Make the cookie dough balls!
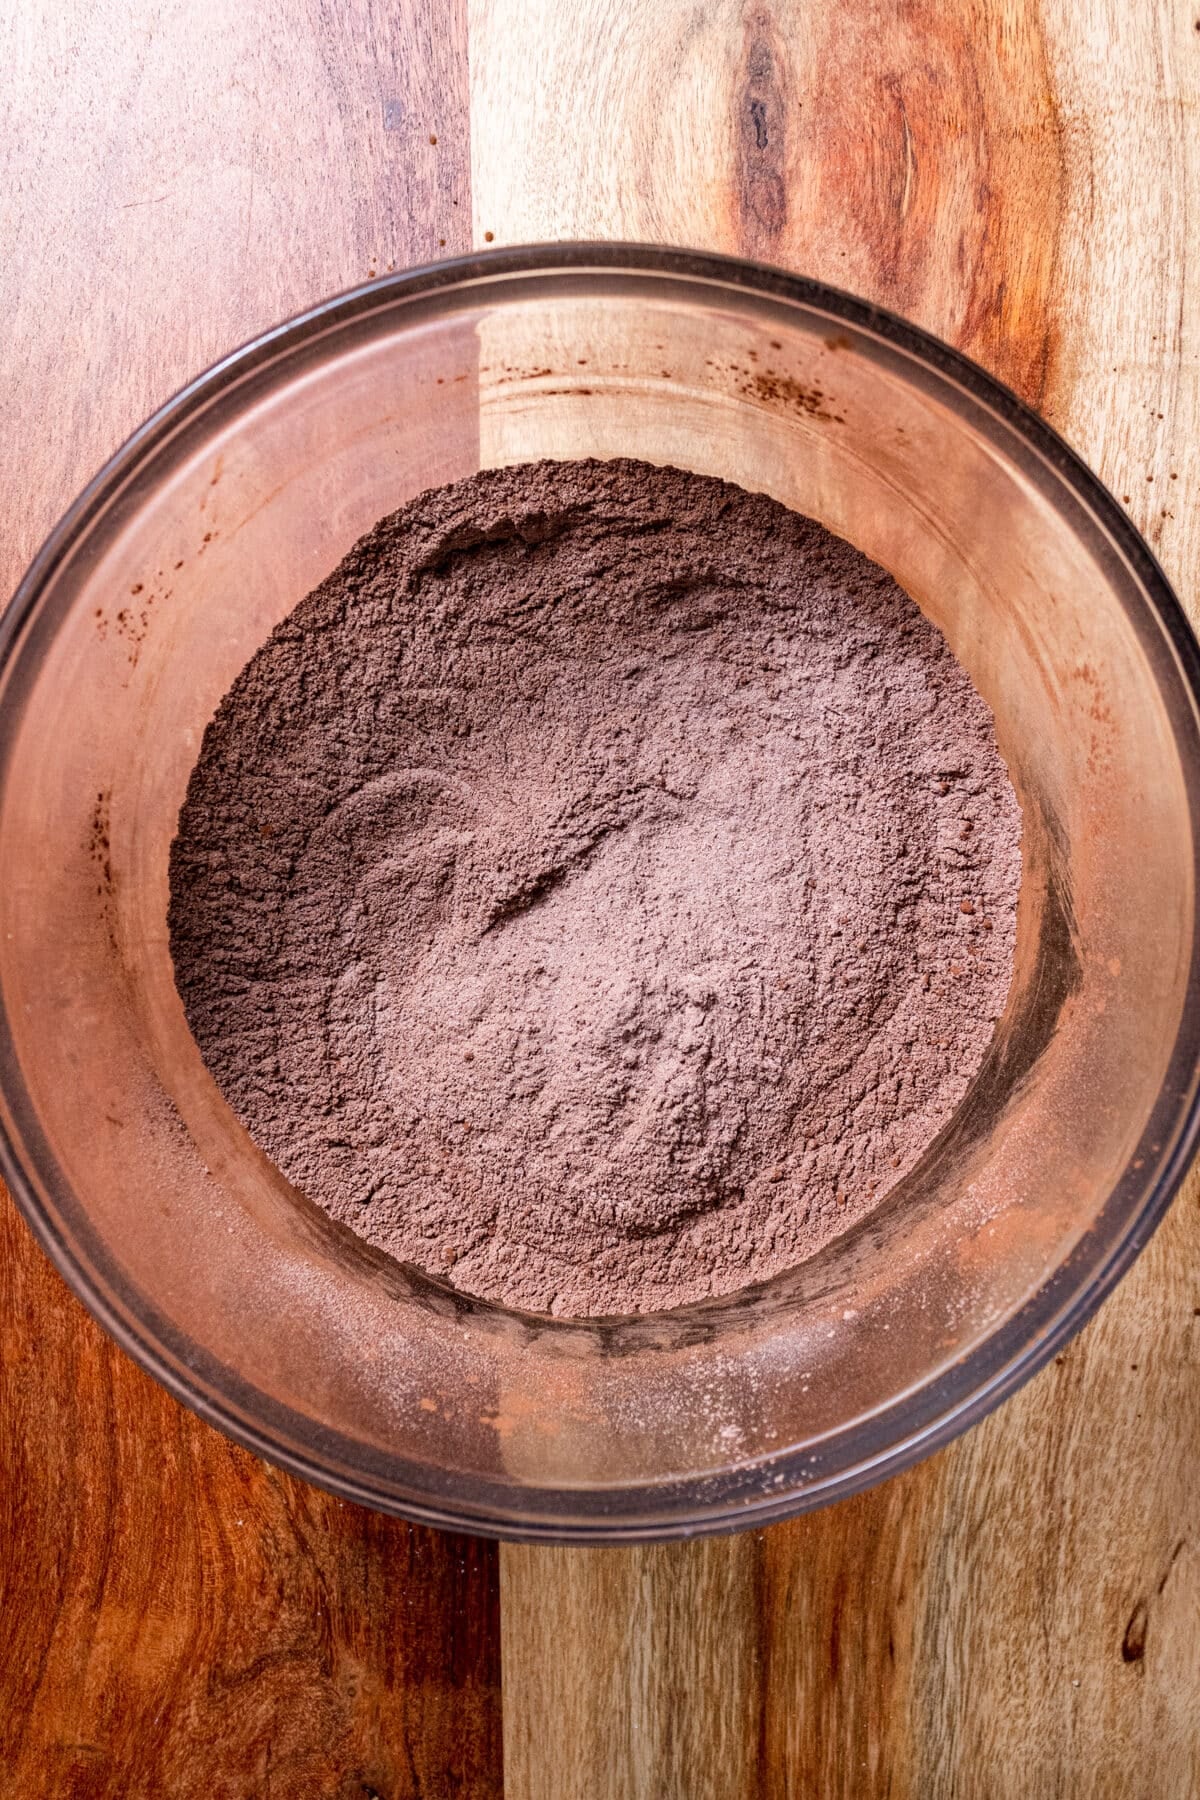
Whisk the dry ingredients for the cake.
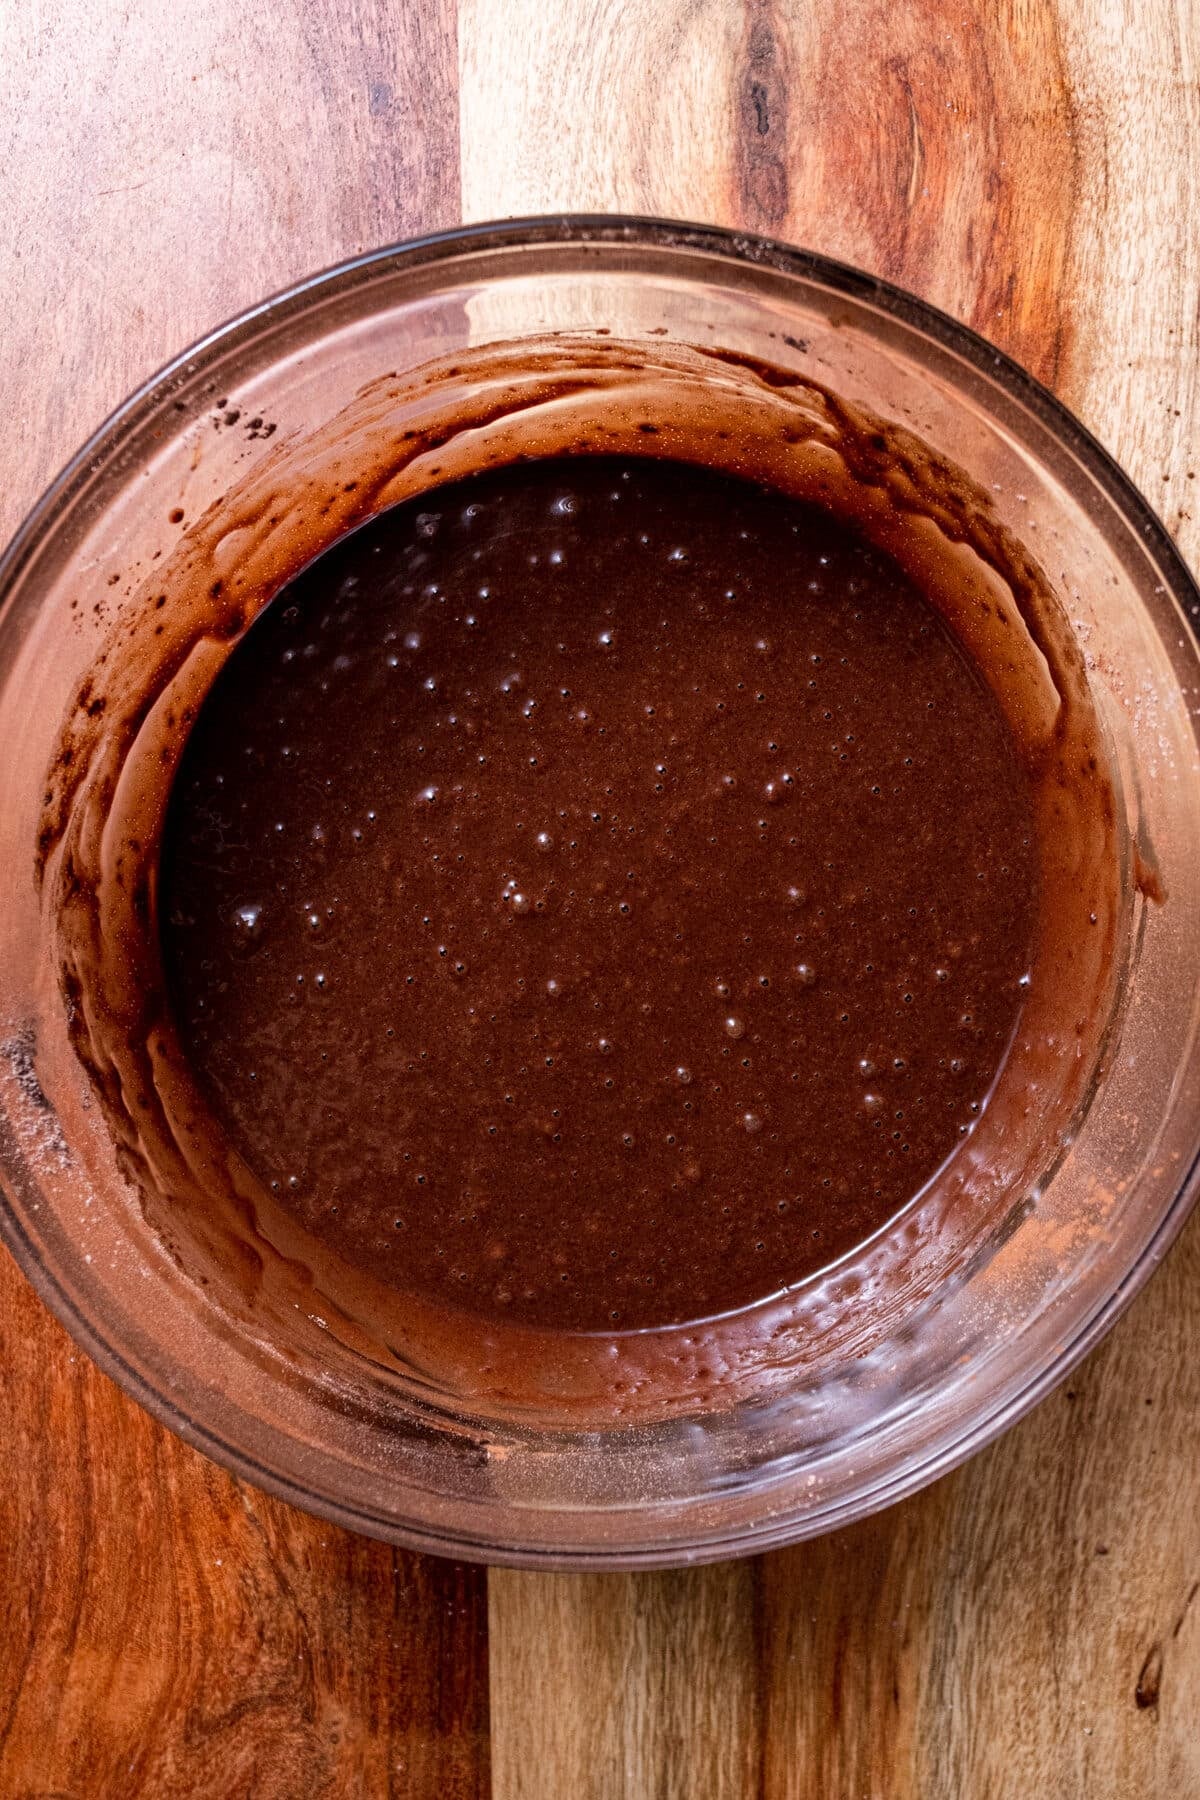
Add wet ingredients.
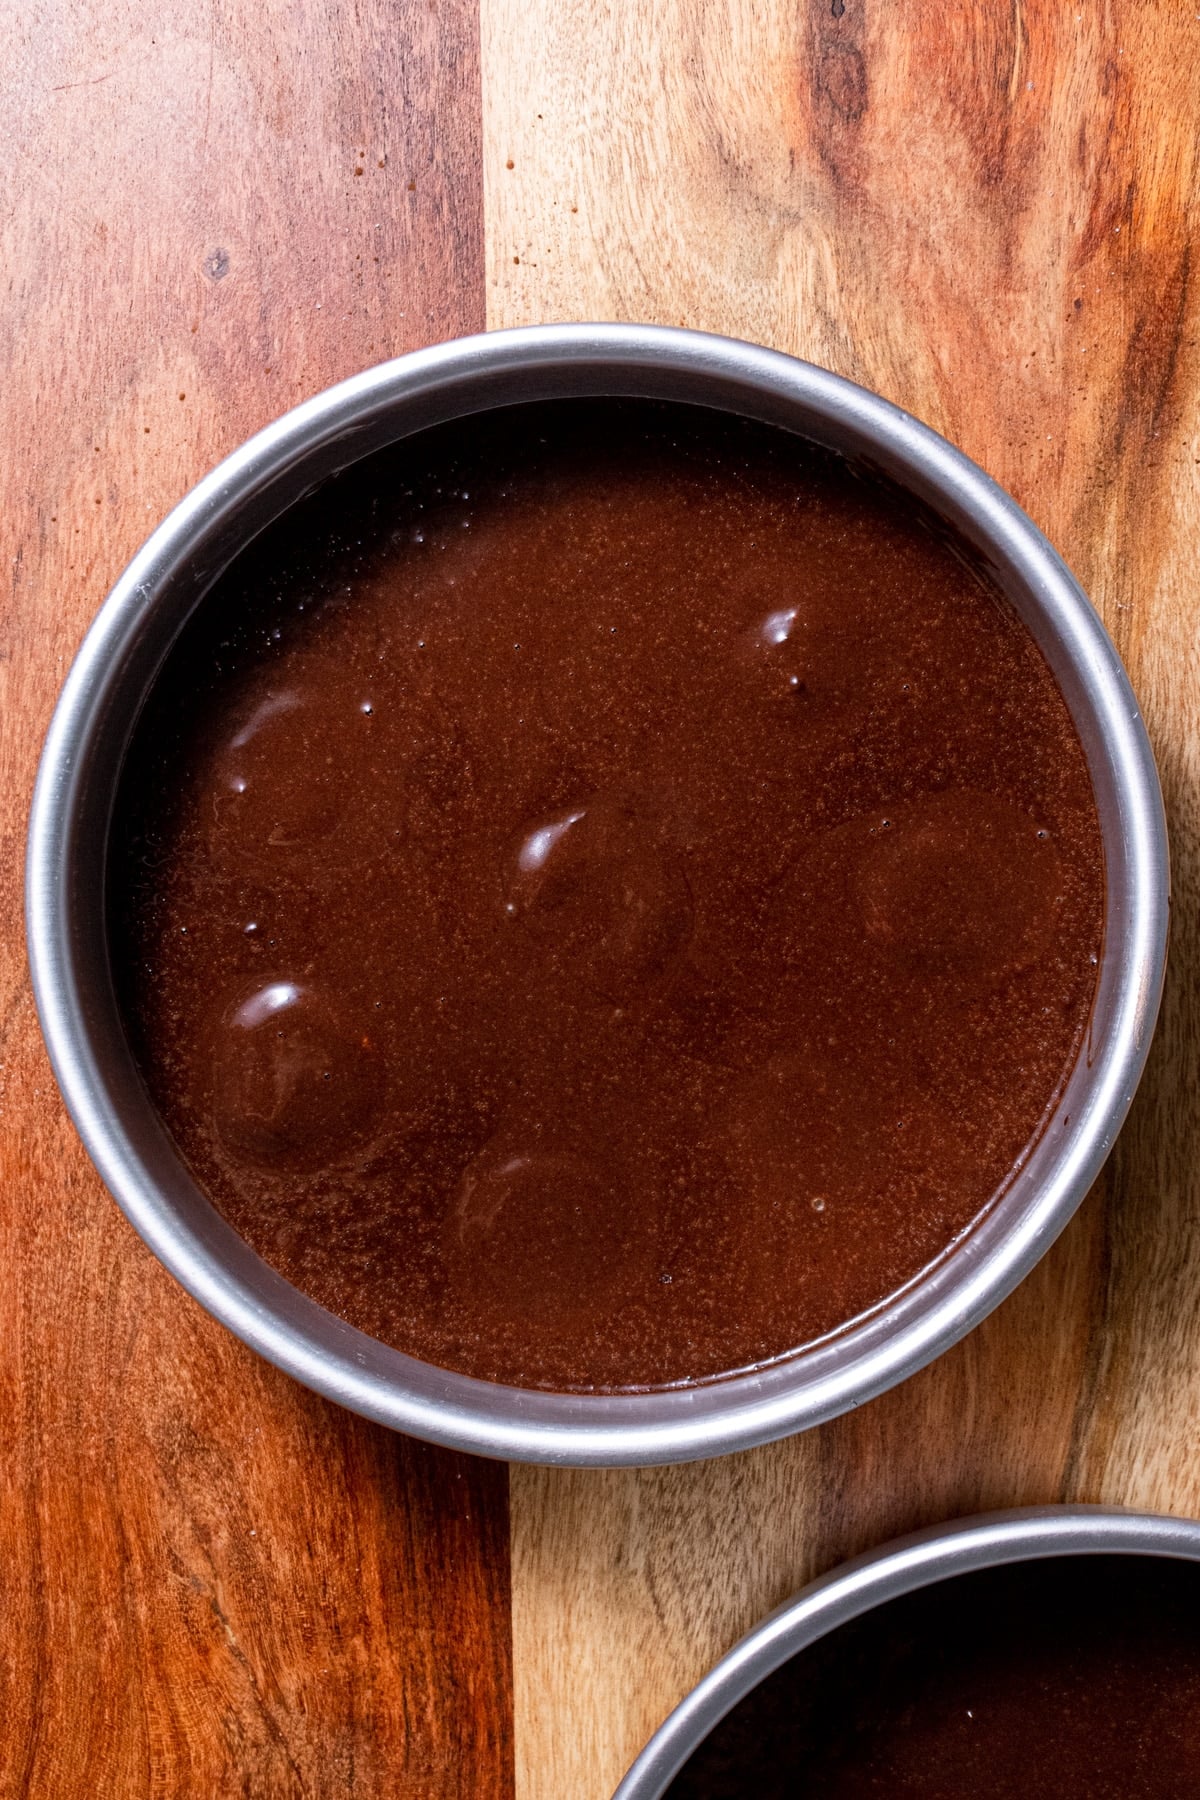
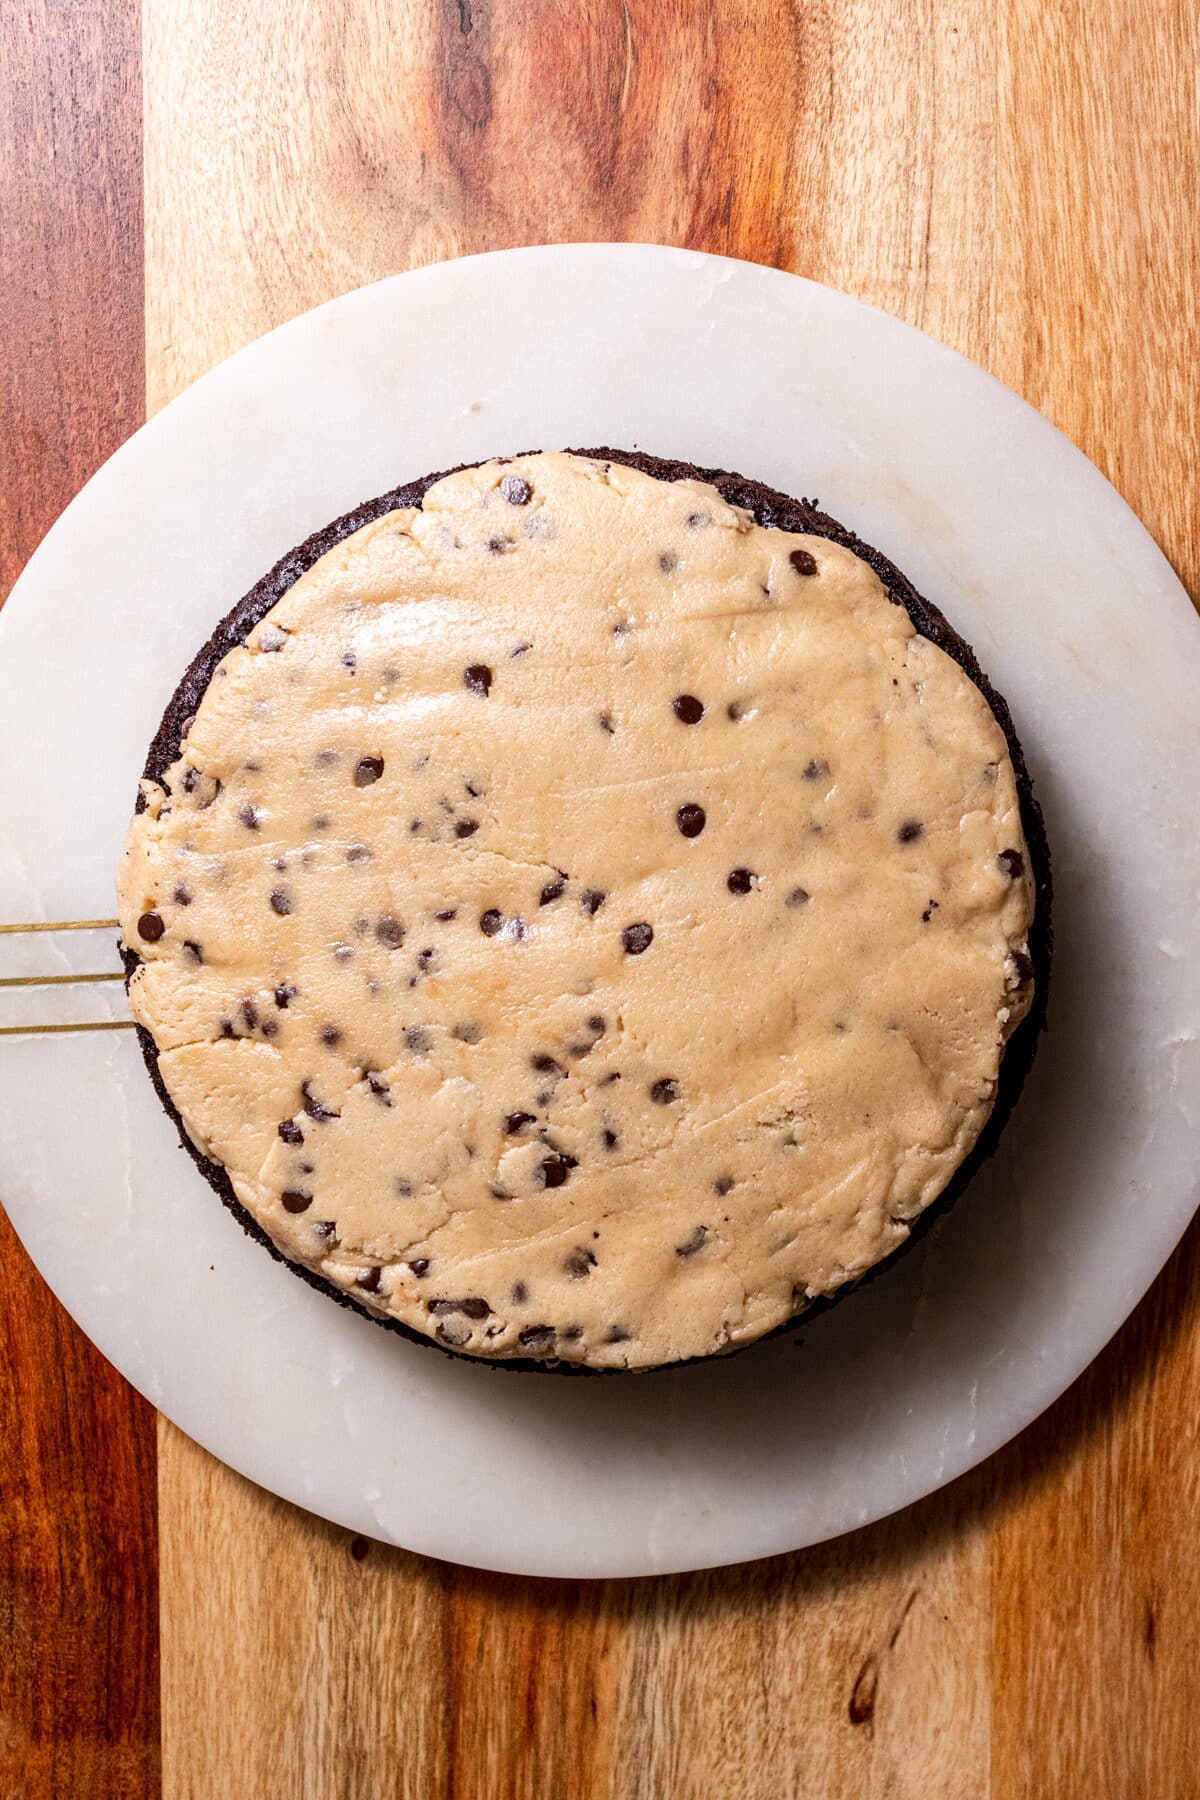
Press the cookie dough pieces into the cake batter then bake!
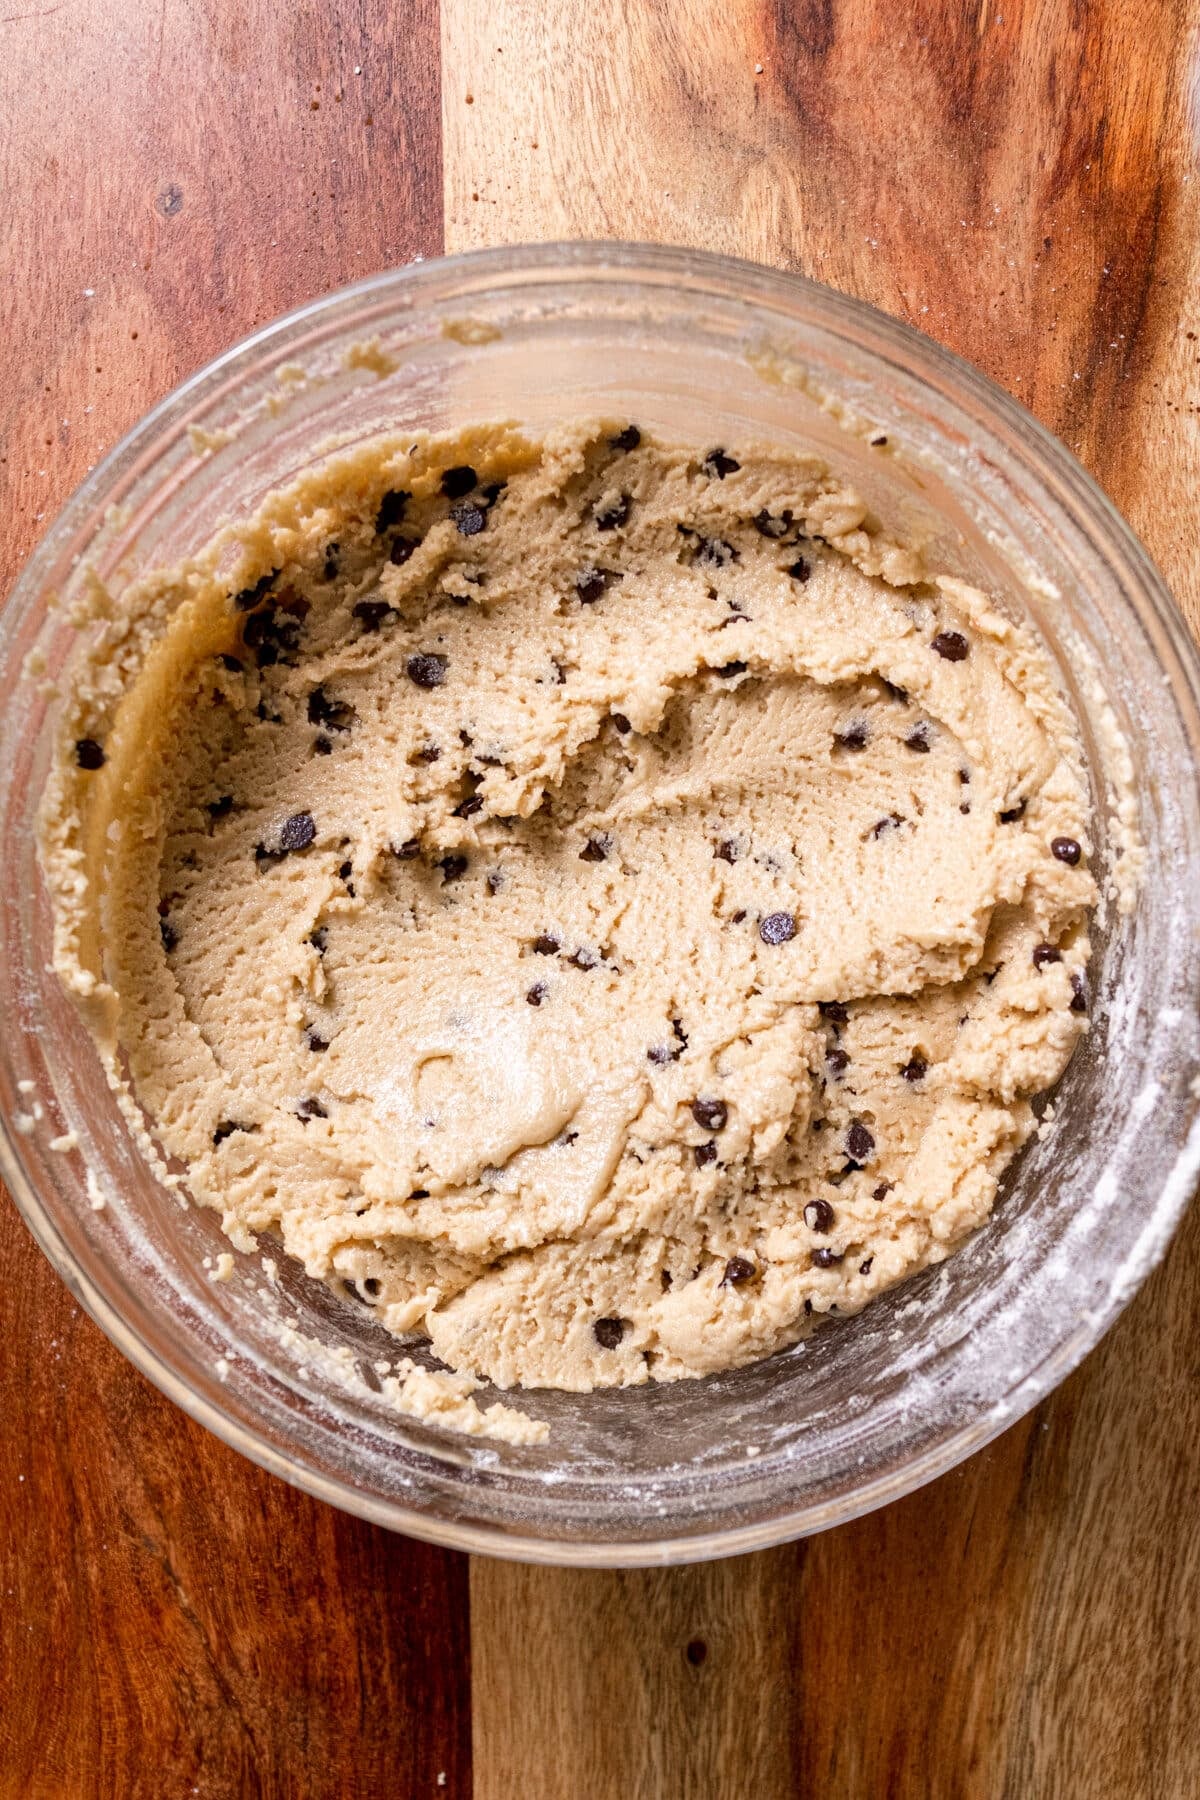
Make the cookie dough frosting.
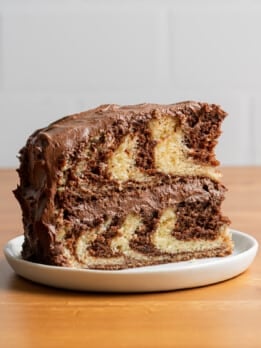
Assemble the cake!

Recipe Developer Tips
- Don’t skip heat treating the flour for the frosting! If you don’t heat treat the frosting it won’t not be safe to eat since bacteria can grow on raw flour.
- Use a spatula to scoop cake batter and cover up the cookie dough balls when baking the cake layers.
More Recipes You’ll Love


If you make this recipe, let me know how it went in the comments below, I’d love to hear from you! You can also tag me on Instagram or Facebook so I can check it out!
Baking FAQ
These are the topics I’m asked about most frequently:
You can get these answers and more in my frequently asked questions post!

Cookie Dough Cake
Video
Ingredients
Cookie Dough Pieces
- 6 Tablespoons (79) butter, softened, (regular or dairy free)
- ¼ cup (50 g) light brown sugar
- ¼ cup (50 g) granulated sugar
- ½ Tablespoon vanilla extract
- ¼ teaspoon salt
- ¾ cup +3 Tablespoons (117 g) all-purpose flour
- ½-1 Tablespoon milk of choice, (regular or dairy free)
- ¼ cup (45 g) semisweet mini chocolate chips
Chocolate Cake
- 1½ cups (188 g) all-purpose flour
- 1½ cups (250 g) granulated sugar
- ½ teaspoon salt
- 1½ teaspoon baking soda
- ½ teaspoon baking powder
- ¾ cup (65 g) unsweetened cocoa powder
- 2 eggs
- 1 cup (225 g) water, hot
- ½ cup (107 ml) canola oil, grapeseed oil, or sunflower oil
- ½ cup (125 g) milk of choice, (regular or dairy free)
- 1 teaspoon vanilla extract
Cookie Dough Frosting
- 1¼ cup + 2 Tablespoons (263 g) butter, softened
- ¾ cup (150 g) sugar
- ¾ cup (150 g) light brown sugar
- 1½ Tablespoon vanilla extract
- 1¼ teaspoon salt
- 2¼ cup (281 g) all-purpose flour, heat treated, SEE NOTES
- 1-4 Tablespoons milk of choice (as needed), (regular or dairy free)
- ¾ cup (135 g) mini chocolate chips, (regular or dairy free)
Instructions
Cookie Dough Pieces
- Start by making the cookie dough for the chocolate cake. In a large bowl with a handheld mixer, or in a stand mixer, beat room temperature butter with light brown sugar and white sugar until light and fluffy.
- Add the milk and vanilla extract and mix until everything is combined.
- Add in the salt and flour and mix until you have a dough. Stir in the chocolate chips.
- Scoop into 18 small cookie dough balls (about 1 tablespoon) and place on a parchment lined plate. Flatten the top of each one just slightly and then place in the fridge.
Chocolate Cake
- Make the chocolate cake, start by preheating the oven to 350°Fahrenheit/175°Celsius. Grease and line two 8-inch round cake pans by spraying with non-stick spray and lining with parchment paper. Set aside.
- In a bowl, whisk together the cocoa powder, flour, sugar, salt, baking powder and baking soda.
- Add in the vanilla extract, oil, eggs, and milk. Pour in the hot water and mix until the cake batter is smooth.
- Divide the batter evenly between the two pans and gently push 9 pieces of cookie dough into each cake pan.
- Make sure the cake batter completely covers the cookie dough pieces and bake for 20-26 minutes. A toothpick inserted in the middle should come out clean.
- Let the cakes cool in the pans for 20 minutes before removing and letting them cool on a wire cooling rack.
Cookie Dough Frosting
- While the cake is cooling, make the frosting. Start by heat treating your flour. Microwave the flour for 1-2 minutes or until it reaches 165°Fahrenheit. You can also bake it on a baking sheet in an oven preheated to 350°Fahrenheit for 5 minutes. Let cool.
- In a large bowl with a handheld mixer or in a stand mixer, combine the room temperature butter with vanilla extract, granulated sugar, light brown sugar and 1 tablespoon of milk.
- Add the heat treated flour and salt and combine. Add more milk if needed until the desired consistency is reached. Finally, stir in the chocolate chips.
Assembling The Cake
- Place one chocolate cake layer down and cover it with some of the frosting. Place the second layer on top and frost the top and side if desired! Crumble any remaining cookie dough on top for decoration.
Equipment
Notes
The calorie information provided for this recipe is an estimate. The accuracy of the calories listed is not guaranteed.
Could I use any cookie dough recipe for this cake as well?
Hi Ellie, yep! Any cookie dough should work great! Let us know how it turns out!
Could you put a conversion sheet for farehit to Celsius fan forced on?????? its ok if you cant
Hi Charlie, for forced fan I would do around 155°-160° Celsius. Keep an eye on the cake as it may bake faster than the time listed in the recipe.
Only thing I would recommend, if frosting the sides reserve some of the frosting before adding the chips. The chips make the sides very awkward. Just use the cookie dough plain for the sides and if you want to decorate with chips after frosting.
Thanks so much for your feedback Jen!!
I made this and it’s delicious. Worth the effort and I was proud to serve it.
Thank you Colleen!
Is it possible to make this but with a vanilla instead of chocolate cake? I fear the chocolate cake would just be a dense mass of chocolate which I’m not a fan of. Would I just follow the same “pressing the dough into the cake” procedure but with a vanilla cake?
You could absolutely replace the chocolate cake with vanilla cake, yep! Enjoy!
Crowd please for sure! For my son’s 18th birthday I wanted to make a unique cake. He LOVES cookie dough, more so than baked cookies. This recipe did not disappoint. I was short on time for the frosting, so I ran to the local bakery and bought their chocolate buttercream frosting. Then picked up edible cookie dough to place as garnish.
Everyone loved it and my step mother who needs to monitor her blood sugar levels said “I’ll check it tomorrow”.
I will definitely be making this cake again.
So happy to hear everyone enjoyed this cake! Thank you for reviewing it!
hi, how do you think I could adapt this recipe to make a 3 layer 6-inch cake?
To make as a 3 layer cake: The easiest way is to divide the batter between 3 8 inch cake pans (you’ll have thinner cake layers). If you want big layers, you can also multiply the ingredients in the recipe by 0.5.
My daughter found this recipe and requested it for her birthday. Quite possibly the best chocolate cake I’ve ever made! The cookies gave the cake a different texture and it was great. I used a fluff-buttercream frosting because it’s our favorite. Was a perfect birthday cake!
Hi Jayme! Thank you so much for your kind review! I hope your daughter had a great birthday 🩵
This is a wonderful recipe for all of us cookie dough lovers. It is excellent! I made it a year ago for my daughter’s birthday cake and as I was multitasking I forgot to put the cookie dough into the cake batter. So we ate that raw, being true cookie dough lovers! At least it had no raw eggs but we risked it with the flour. The recipe makes a fair amount of icing so we had extra that she enjoyed eating at another time. This year she asked for the same cake And to save me time she said just leave out that cookie dough and double the icing! It’s phenomenal!
So happy you and your daughter enjoyed this cake! Thank you for your review 😊
Do you think that would work with your 4″ vanilla cake recipe? I realize that’s a lot of changes, but basically use the cookie dough in that batter and the cookie dough icing?
You could do that! You won’t need as much frosting and cookie dough though, probably around 1/2 to 2/3 of the amount!
Hi, thanks for the receipe. Can I use 2 x 7 inch cake tins as this is all I have? Thanks 🙂
Hi Claire! That will be fine, the cakes will just be quite thick and take a bit longer to bake.
Can I make the cookie dough a day ahead of time? And if I do, should I just keep it in the fridge? Thanks!
Hi Lauren! Yes you can refrigerate any cookie dough you’re not ready to bake right away 😊 Be sure to bake them within 2-4 days, or you can freeze them if you want to store it for longer.
Hi can I just buy cookie dough
Sure!
OMG Never thought this would be such a hit – my daughter and hubby loved it and so did I. Haven’t had such a good cake in a long time. As we love cookie dough ice cream this was a must try and huge success. Thank you so much for this great recipe. Will definitely do it again, Jenny from Germany ☺️ ps. Thanks for the metric info/conversion 👍👏
Hi Jenny! I am so happy to hear that the cake was such a hit! Cookie dough is my favorite too! Thanks so much for the review 😀
Made this today with King Arthur Measure 4 Measure and plant based butter. This was a huge hit with the kids! Just waiting for hubby to try it!
I’m so happy to hear that Ginna! Thanks for taking the time to leave a review!
Can I buy cookie dough instead of make it
Wondering if I make the cookie dough frosting 2 days before decorating will it still frost the same after being left in the fridge for those 2 days. Im already planning on freezing the 2 tiers the way you suggested but not wanting the frosting to be an issue after refrigeration
You can make the frosting 2 days before but you would just need to make sure to let it soften at room temperature until it is soft enough to re-whip and then work with!
I will be trying this recipe in a few days. And I noticed after clicking on the metric measures tab all of the weights show except for the cake ingredients.
Hi Lauren, thanks for catching that! It’s been updated now. Enjoy!
Do I have to use dairy free milk or is lactaid okay?
Any type of milk will work fine!
The cookie dough pieces and cookie dough frosting take any type of milk, but does the chocolate cake require dairy free milk or are you saying any type of milk will work throughout the recipe? I just want to get it right as I’m going to buy the ingredients tomorrow!
Any milk will work in the cake! Enjoy!
made this for my nephews 8th birthday and i he loved it. Thank you so much for this recipe Gabby!
You’re so welcome Lisa, I’m so glad it was a hit!