Date Scones
This post contains affiliate links. Read the full disclosure here.
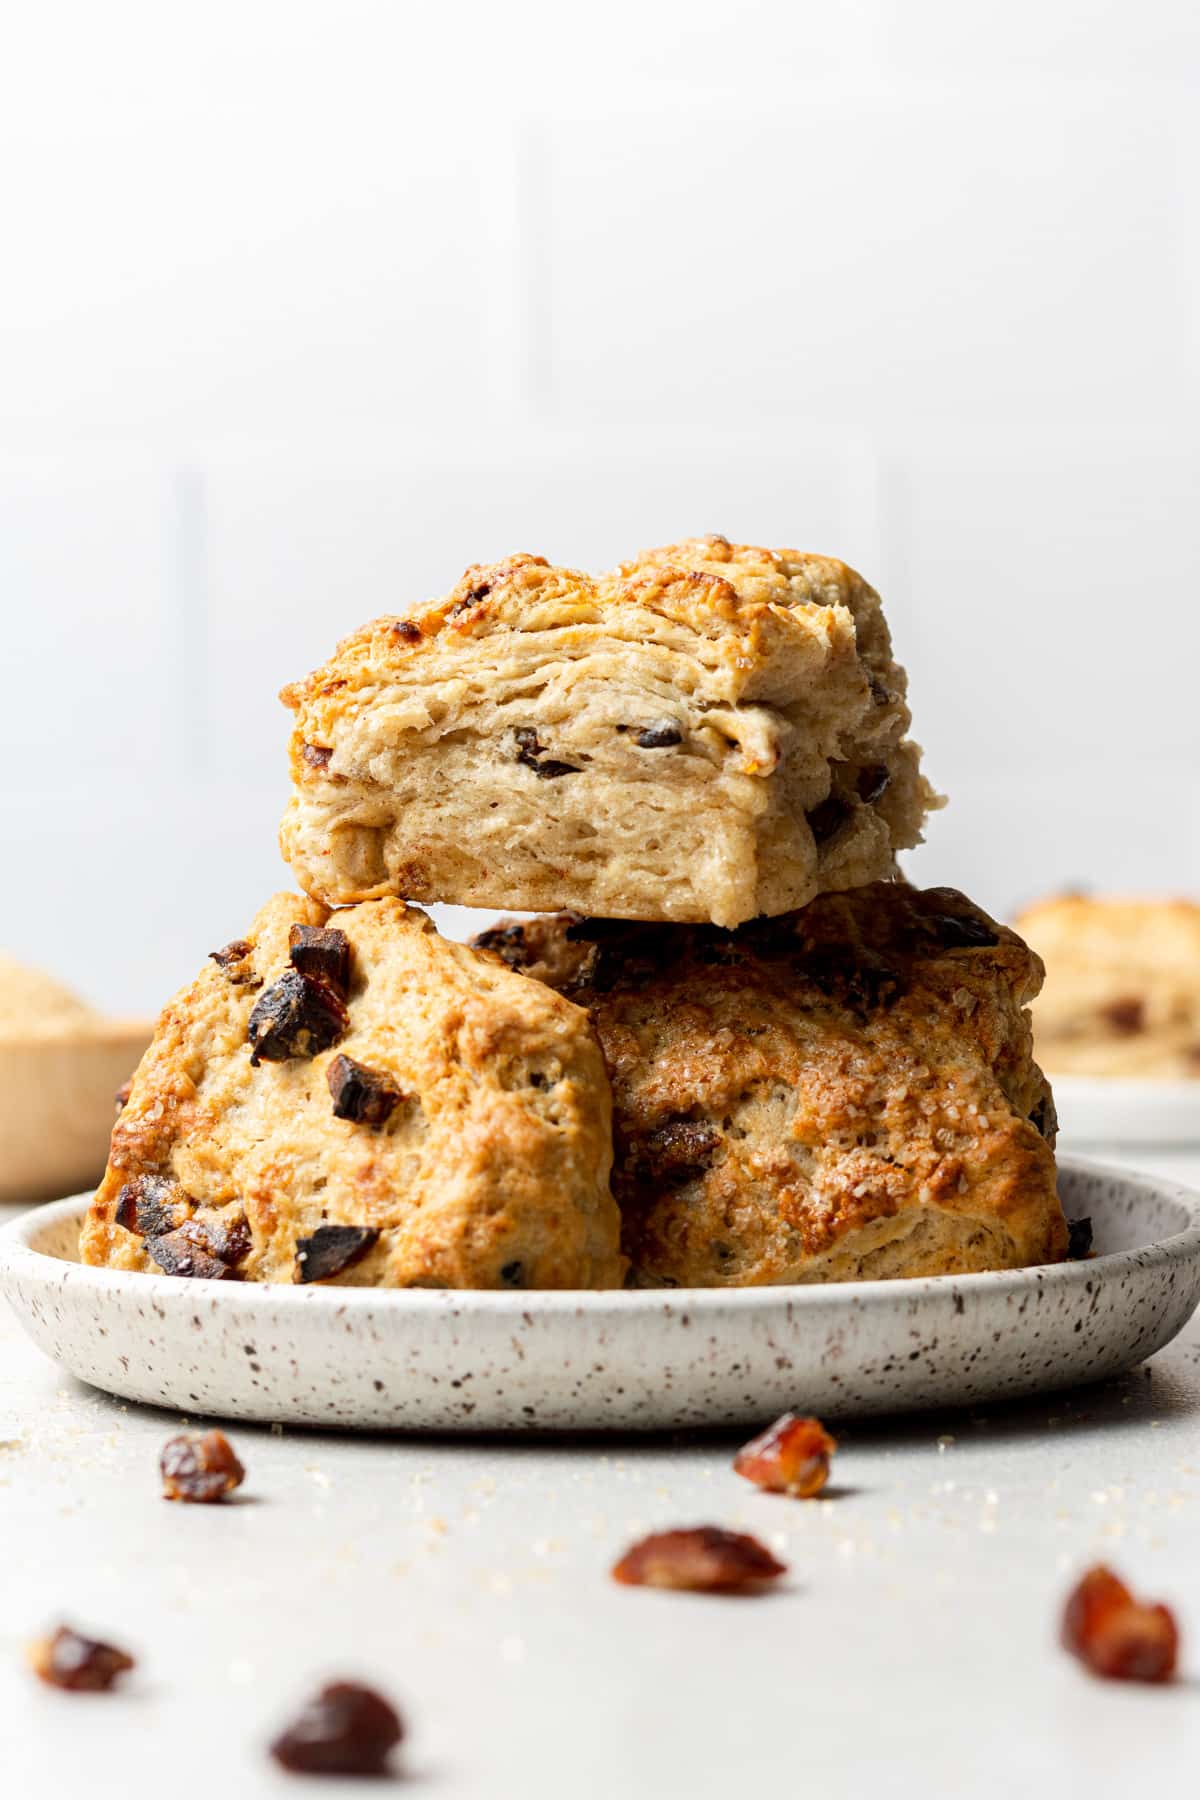
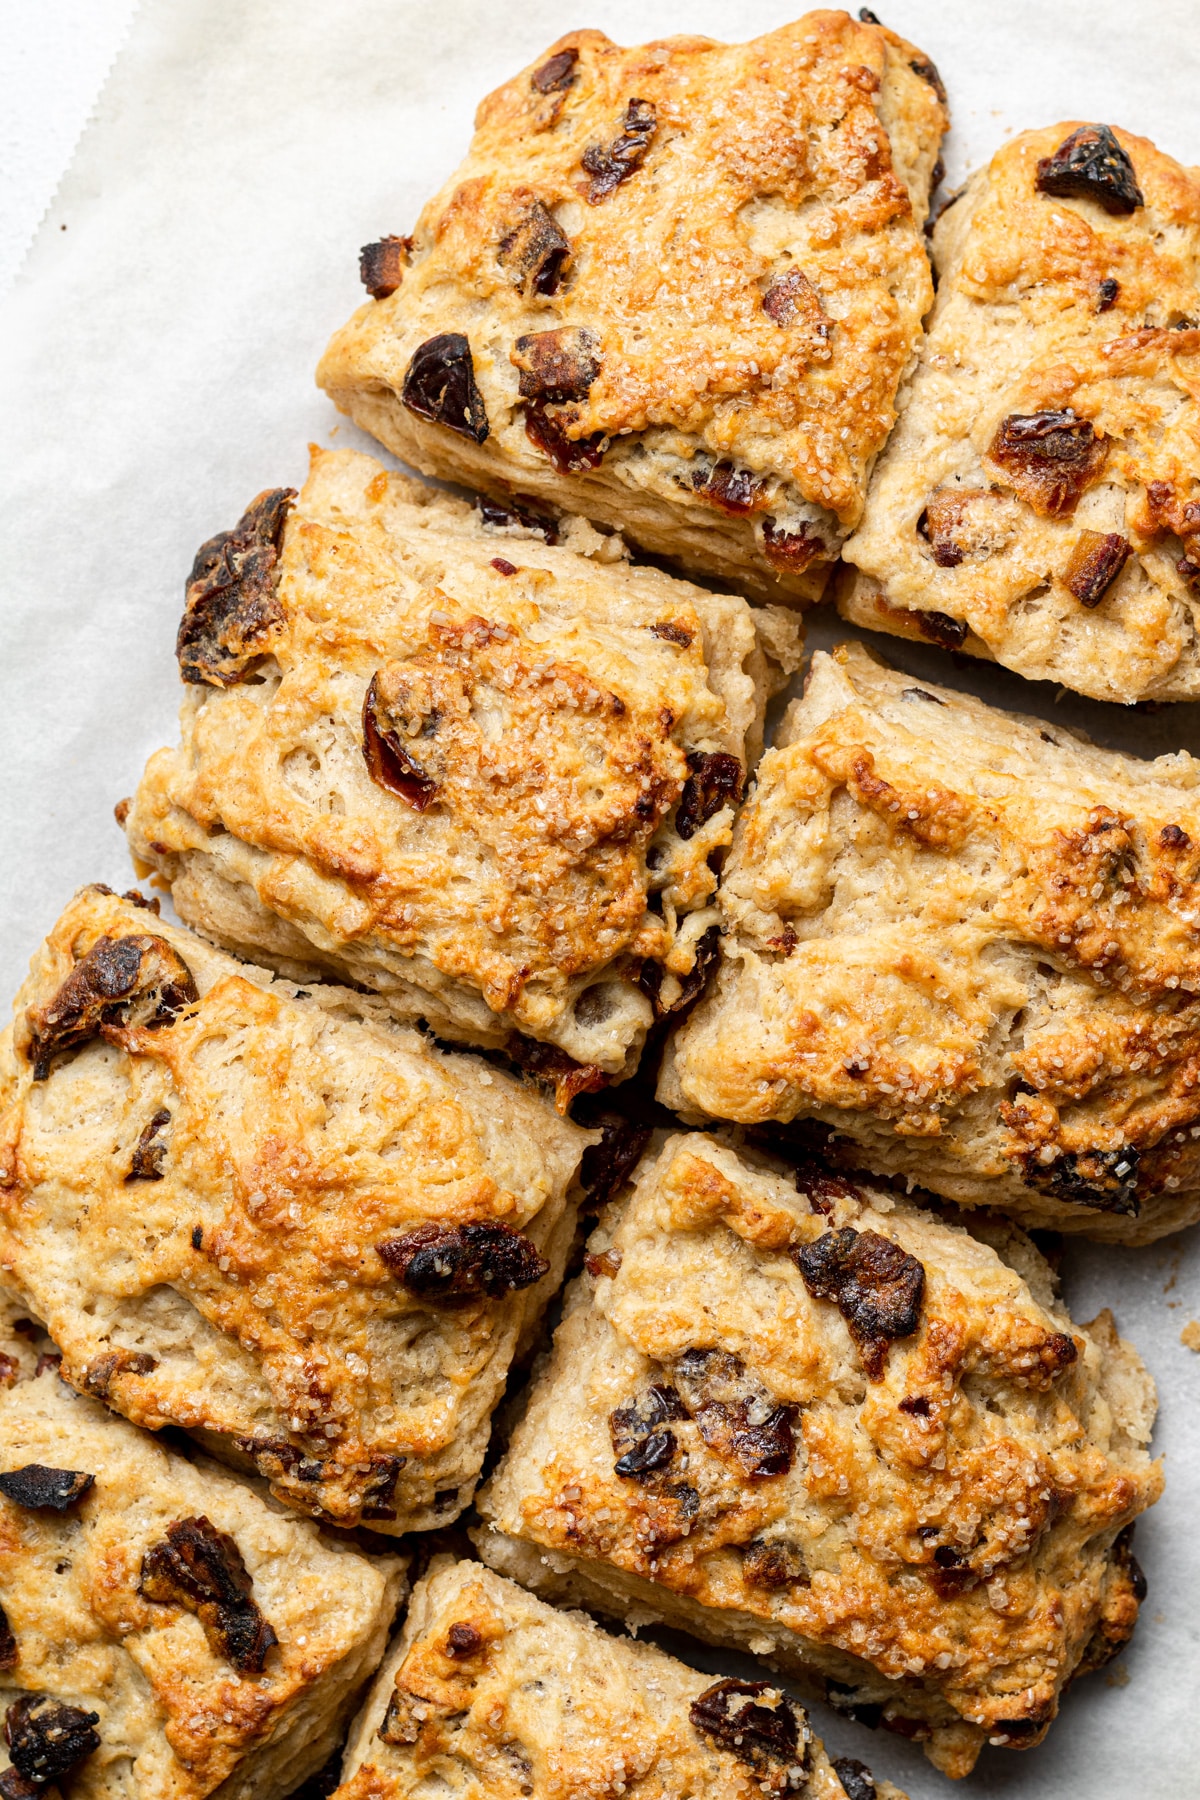
Get ready for the best flaky and buttery date scones! You only need 9 simple ingredients to make these scones plus they’re made in just one bowl and freezer friendly! They pair perfectly with a big cup of tea or coffee!
These tender date scones are based off my popular dairy free biscuits, but you can make these scones dairy free or with regular dairy ingredients!
I love that these are so simple to make, and I’m always ready to whip up a batch for breakfast, brunch or an afternoon snack.
Featured Reader Review
“These were so delicious, and eaten within minutes! The recipe is perfect and so tasty. I’m about to make the second batch.”
Hollie
Why You’ll Love My Date Scones
- Forget everything you know about dry scones – these date scones are buttery, soft and flaky!
- You can make these with regular ingredients or use dairy free ingredients. They are made without eggs so if you use vegan butter and milk, they are also vegan!
- These scones are packed with chopped dates, so you get a bit of sweetness in every bite.
- It takes under 30 minutes to make date scones!
Ingredients Needed
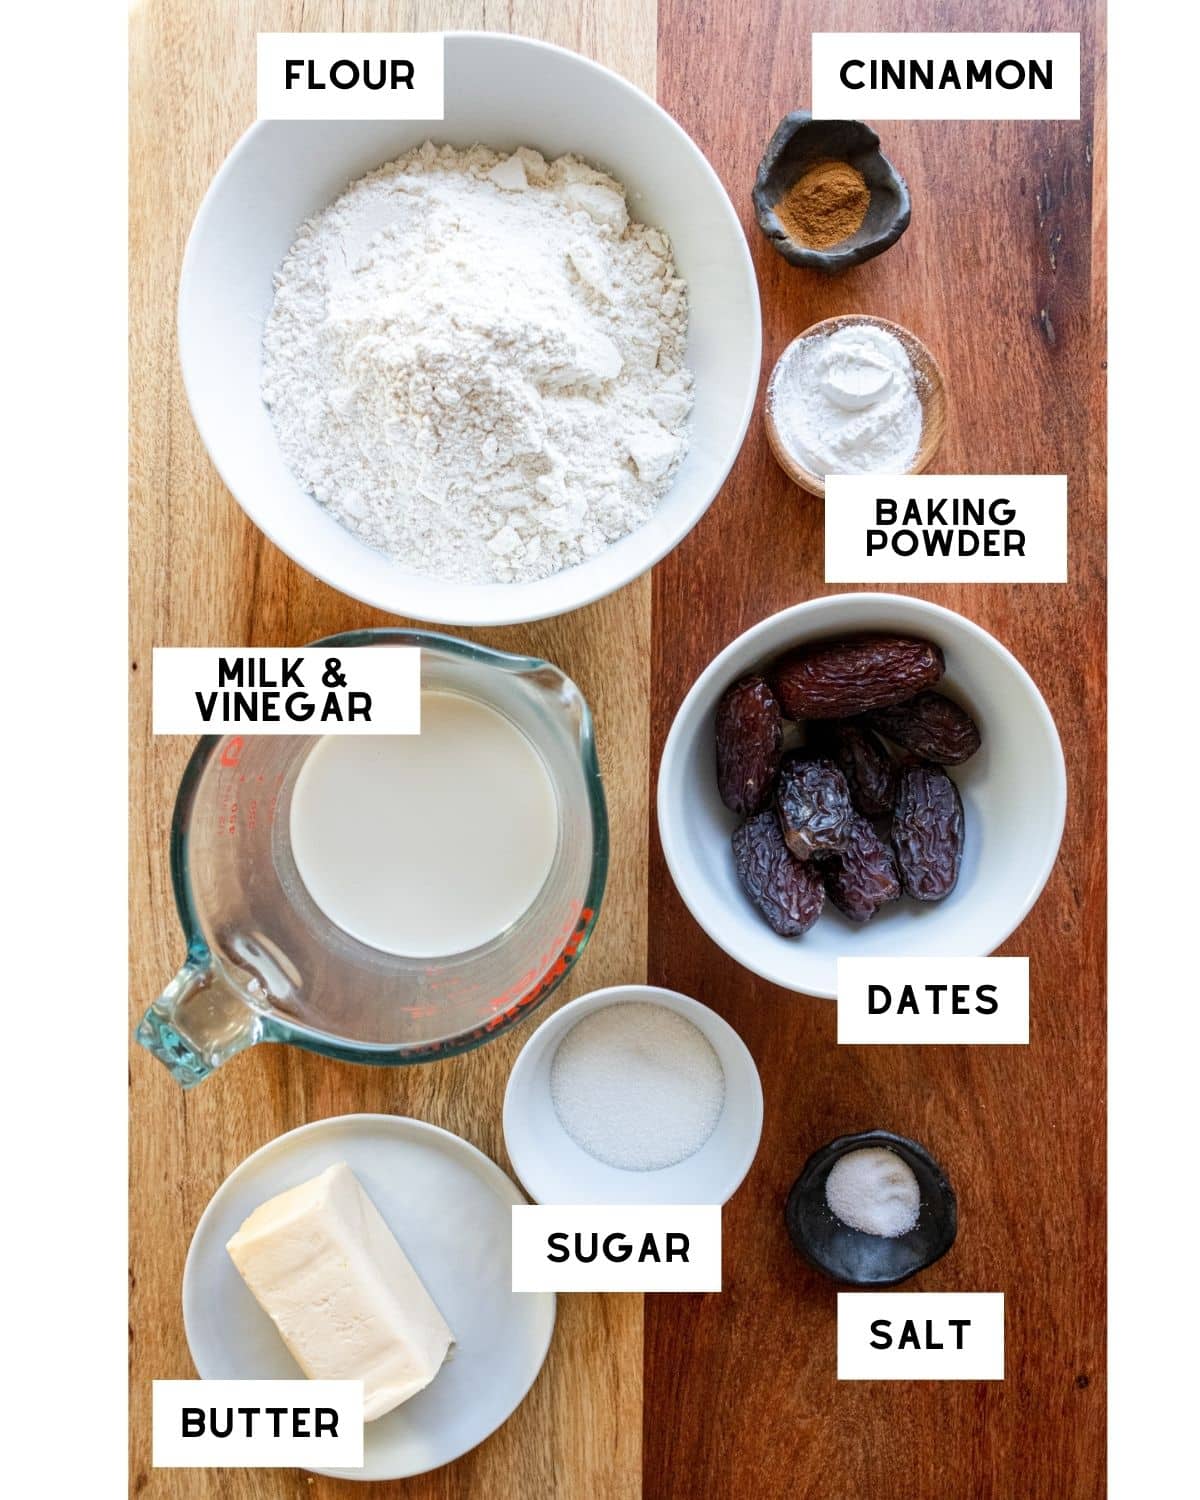
- Milk: you can use regular milk or vegan milk. If you’re using vegan milk I recommend using soy milk as it’ll make the best buttermilk!
- Vinegar: I use white vinegar to make homemade buttermilk, but in a pinch you can use fresh lemon juice!
- Dates: feel free to use regular dates or Medjool dates.
- Flour: I’ve tested this recipe with all purpose flour.
- Cinnamon: ground cinnamon pairs well with the dates! It’ll give you all the cozy vibes.
Step By Step Instructions
Note: Full ingredient measurements and instructions can be found in the recipe card at the bottom of this page.
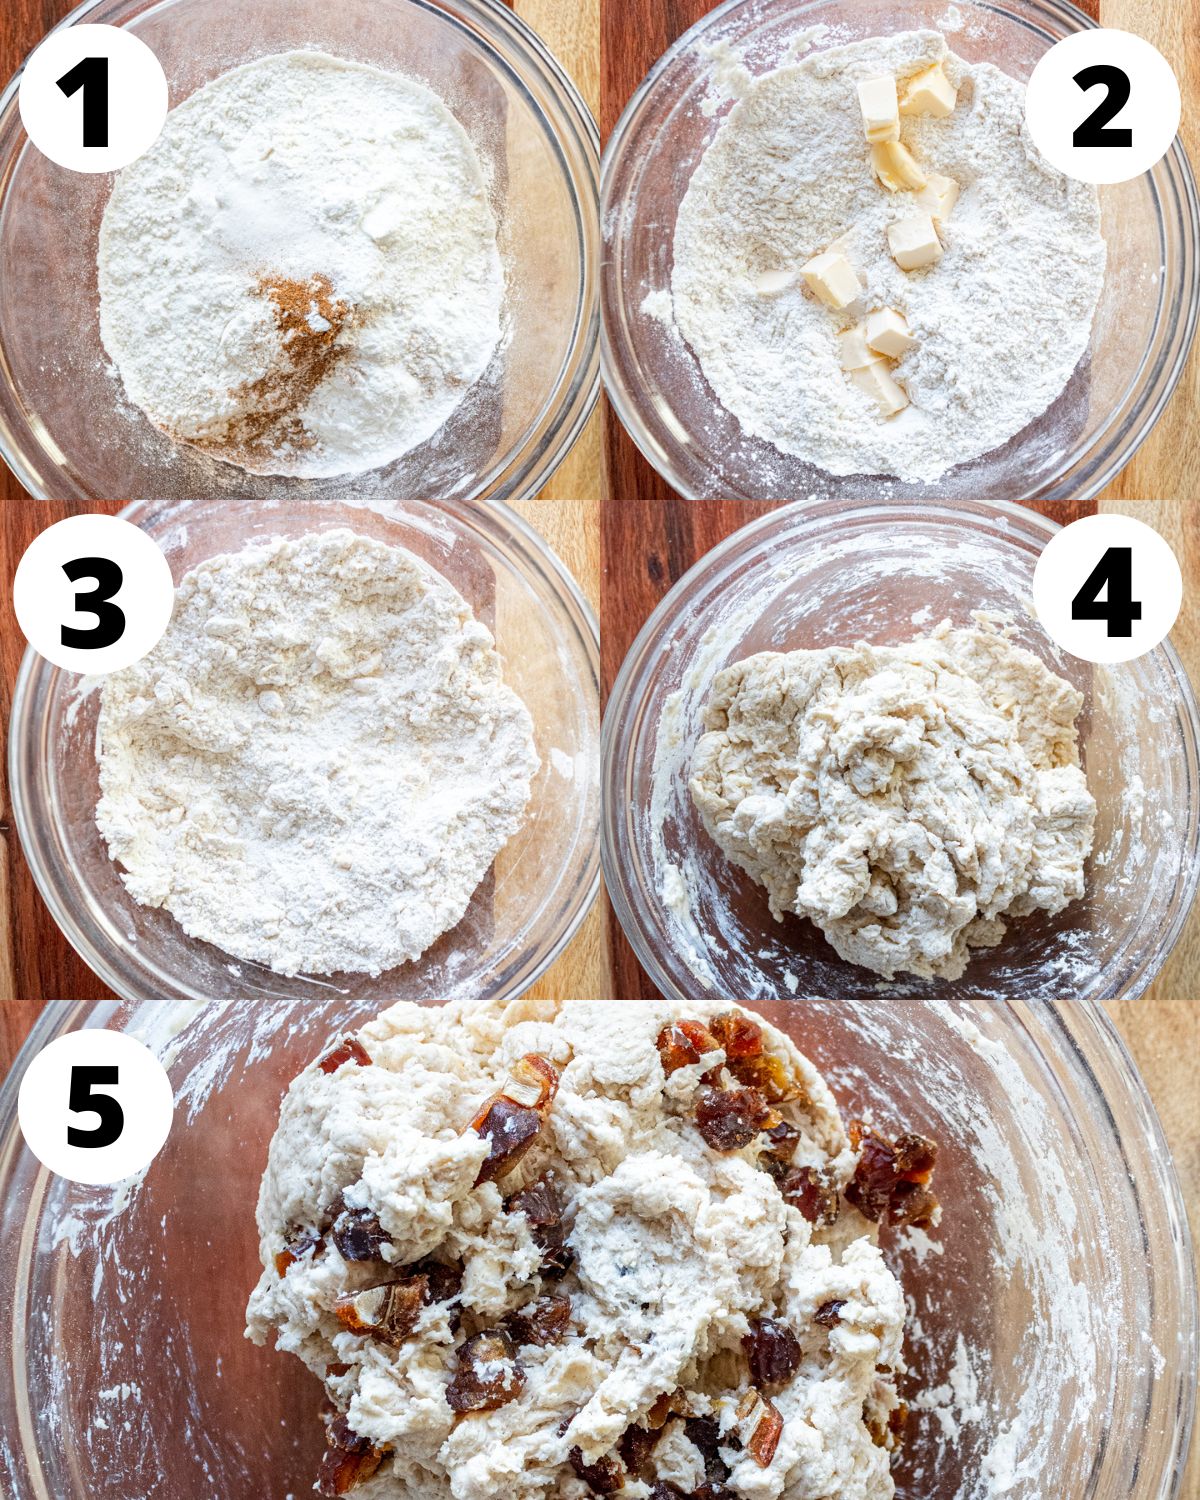
Step 1: Cut your butter into small cubes and place in the freezer for at least 15 minutes. In a liquid measuring cup, mix ½ tablespoon of white vinegar with ¾ cup of milk. Set aside until it looks curdled.
Step 2: Preheat the oven to 450°Fahrenheit and line a baking sheet with parchment paper.
Step 3: In a large bowl, mix together the flour, sugar, salt, cinnamon and baking powder with a whisk until combined.
Step 4: Add the cold butter cubes and use two forks or a pastry cutter to cut the butter into the dry mixture. Do this until it looks crumbly and sort of like sand.
Step 5: Pour in the buttermilk and use a wooden spoon to mix the dough until just combined. It should be fluffy and sticky. Chop the dates into small pieces and stir them into the dough.
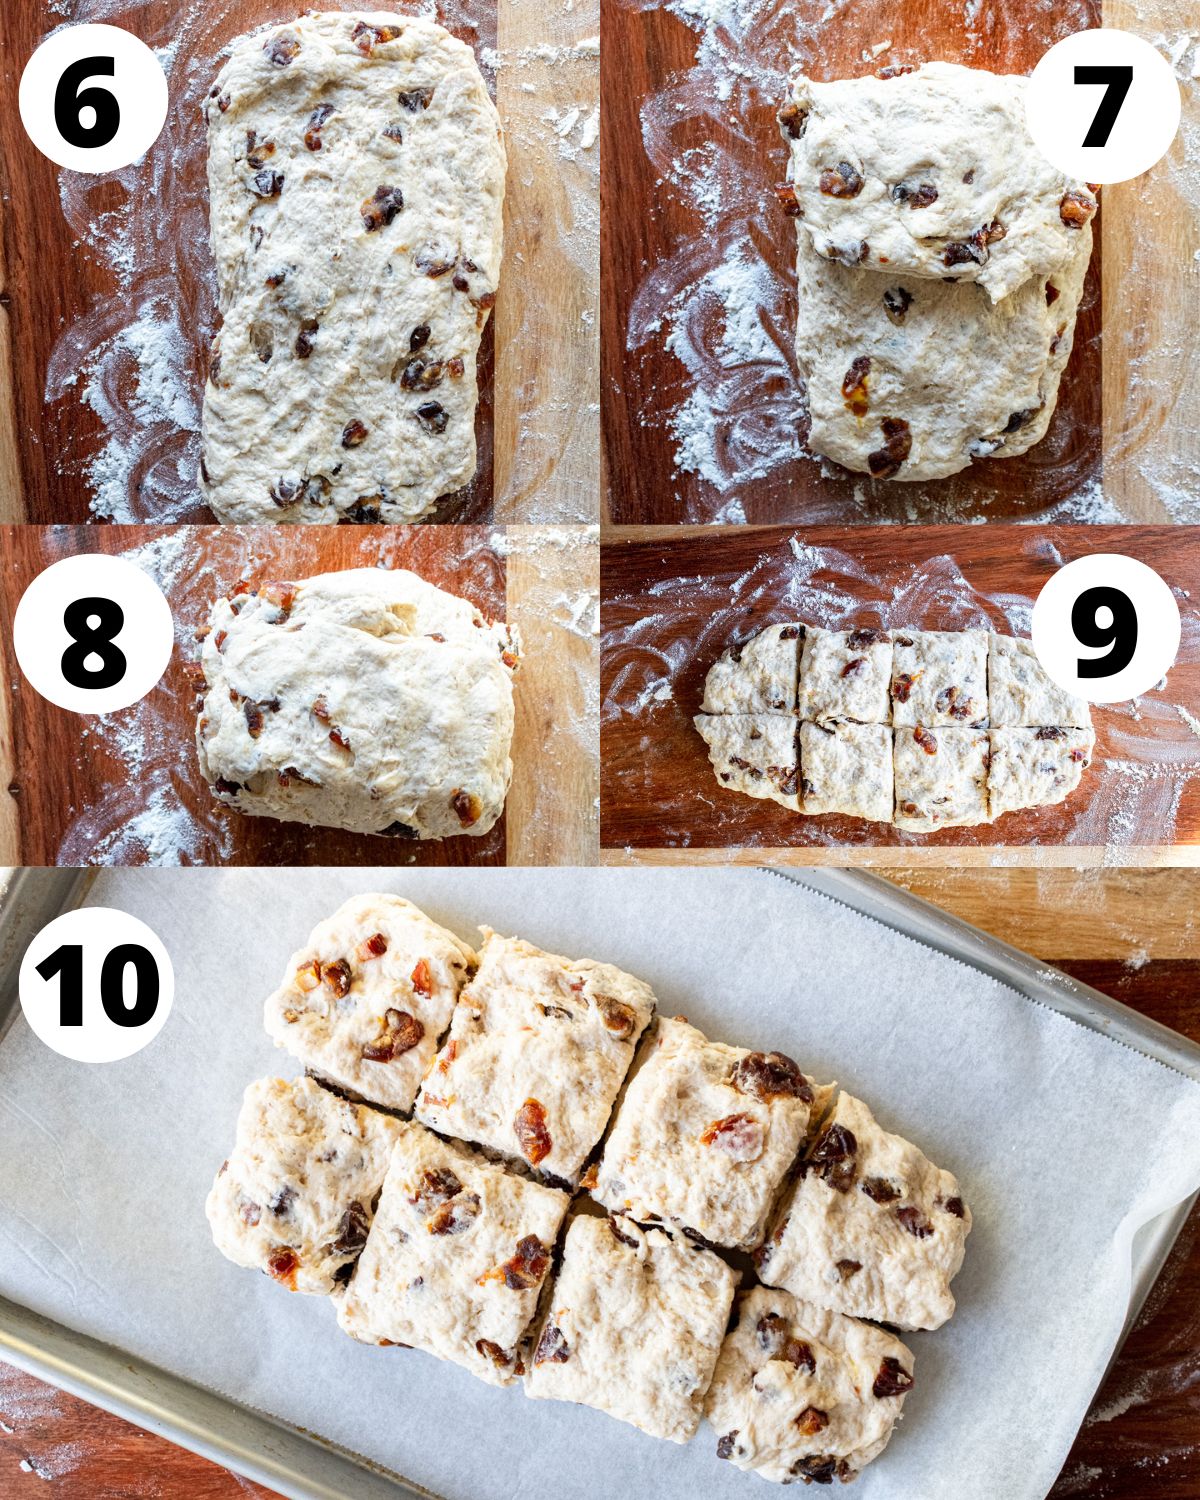
Step 6: Flour your work surface and transfer the dough onto the surface. Dust your hands with flour and form the dough into a rectangle, it should be ¾ inch thick.
Step 7: Fold one short side of the rectangle to the middle, then fold the other side – you should have a square. Flatten this until it is ¾ inch thick, and repeat this twice more. Work fast as you don’t want to handle the dough too much or for it to get warm!
Step 8: After the final fold, form the dough into a ¾ inch thick rectangle. Cut into 8 pieces or use a biscuit cutter to cut circles into the dough.
Step 10: Place the scones onto the prepared baking sheet. Brush each scone with milk and sprinkle with some coarse sugar.
Step 11: Bake for 13-17 minutes, they should be golden brown. Enjoy!
Expert Tips
- Use cold butter – make sure you place your cubed butter in the freezer for 10-15 minutes before adding to the dry ingredients. Using super cold butter prevents the butter from melting immediately in the oven, giving you extra flaky layers!
- Work quickly – once you’ve added the buttermilk to the dry ingredients try to work quickly. You don’t want to warm up the dough too much with your hands or overwork the dough, which would lead to a dry scone!
- Cutting the scones – if you’re using a biscuit cutter to cut the scones, don’t twist it when cutting out the dough! This can seal the sides of the scone and then it might not rise much in the oven.
- Flouring – make sure to lightly flour your surface and your hands before working with the dough as it will be slightly sticky!
- Sprinkle of sugar – sprinkling the top of each date scone with coarse sugar will give you that bakery style scone!
Storage Instructions
I recommend eating these scones while they’re still warm from the oven! They do dry out fairly quickly as most scones do, but you can store them in an airtight container and reheat them in a toaster oven or toaster the next day.
To freeze these date scones, wrap each one tightly in plastic wrap and place in a freezer safe ziploc bag for up to 2 months.
More Recipes You’ll Love


If you make this recipe, let me know how it went in the comments below, I’d love to hear from you! You can also tag me on Instagram or Facebook so I can check it out!
Baking FAQ
These are the topics I’m asked about most frequently:
You can get these answers and more in my frequently asked questions post!

Date Scones
Video
Ingredients
- ¾ cup (188 ml) milk of choice, (regular or vegan)
- ½ Tablespoon white vinegar
- ½ cup (105 g) very cold butter, (regular or vegan)
- 2¼ cup (281 g) all-purpose flour
- 1 Tablespoon + 1 teaspoon baking powder
- 2 Tablespoons (25 g) granulated sugar
- ½ teaspoon ground cinnamon
- ½ teaspoon salt
- 1 cup (180 g) dates, pitted and chopped into small pieces
- course sugar, for sprinkling
Instructions
- Cut your butter into small cubes and place in the freezer for at least 15 minutes. In a liquid measuring cup, mix ½ tablespoon of white vinegar with ¾ cup of milk. Set aside until it looks curdled.
- Preheat the oven to 450°Fahrenheit and line a baking sheet with parchment paper.
- In a large bowl, mix together the flour, sugar, salt, cinnamon and baking powder with a whisk until combined.
- Add the cold butter cubes and use two forks or a pastry cutter to cut the butter into the dry mixture. Do this until it looks like sand.
- Pour in the buttermilk and use a wooden spoon to mix the dough until just combined. It should be fluffy and sticky. Chop the dates into small pieces and stir them into the dough.
- Flour your work surface and transfer the dough onto the surface. Dust your hands with flour and form the dough into a rectangle, it should be ¾ inch thick.
- Fold one short side of the rectangle to the middle, then fold the other side – you should have a square. Flatten this until it is ¾ inch thick, and repeat this twice more. Work fast as you don’t want to handle the dough too much or for it to get warm!
- After the final fold, form the dough into a ¾ inch thick rectangle. Cut into 8 pieces or use a biscuit cutter to cut circles into the dough.
- Place the scones onto the prepared baking sheet. Brush each scone with milk and sprinkle with some coarse sugar.
- Bake for 13-17 minutes, they should be golden brown. Enjoy!
Equipment
Notes
The calorie information provided for this recipe is an estimate. The accuracy of the calories listed is not guaranteed.
these were delightful. not too sweet. thank you
I’m so happy you loved them Maggie!
These were so delicious, and eaten within minutes! The recipe is perfect and so tasty. I’m about to make the second batch.
Hi Hollie! Thank you so much for your kind review 🩵
These are sooo delicious. I just had one today with my coffee. Perfect! Thank-you for this wonderful treat!
I am so happy that you loved the scones! Thanks so much for the review Linda!