Cookie Dough Brownie Bites(No Bake!)
This post contains affiliate links. Read the full disclosure here.
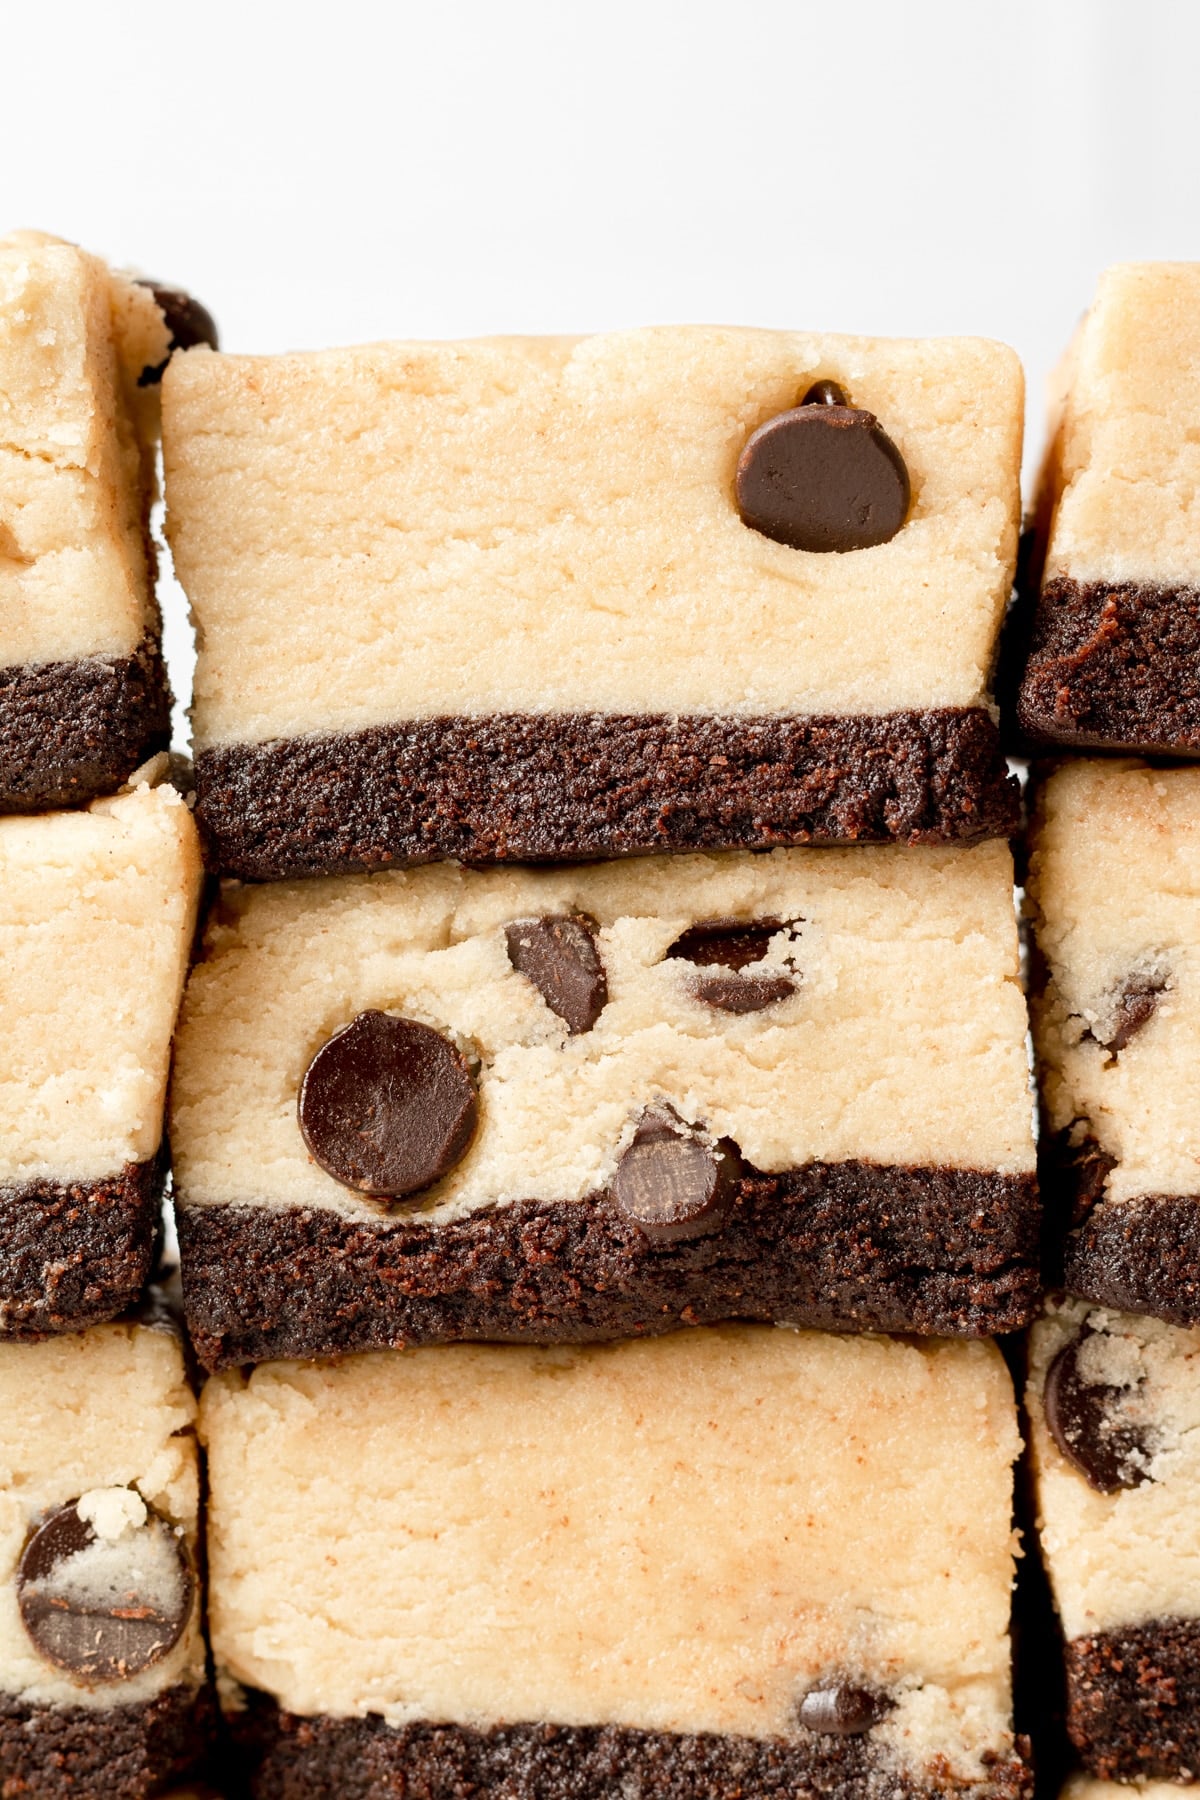
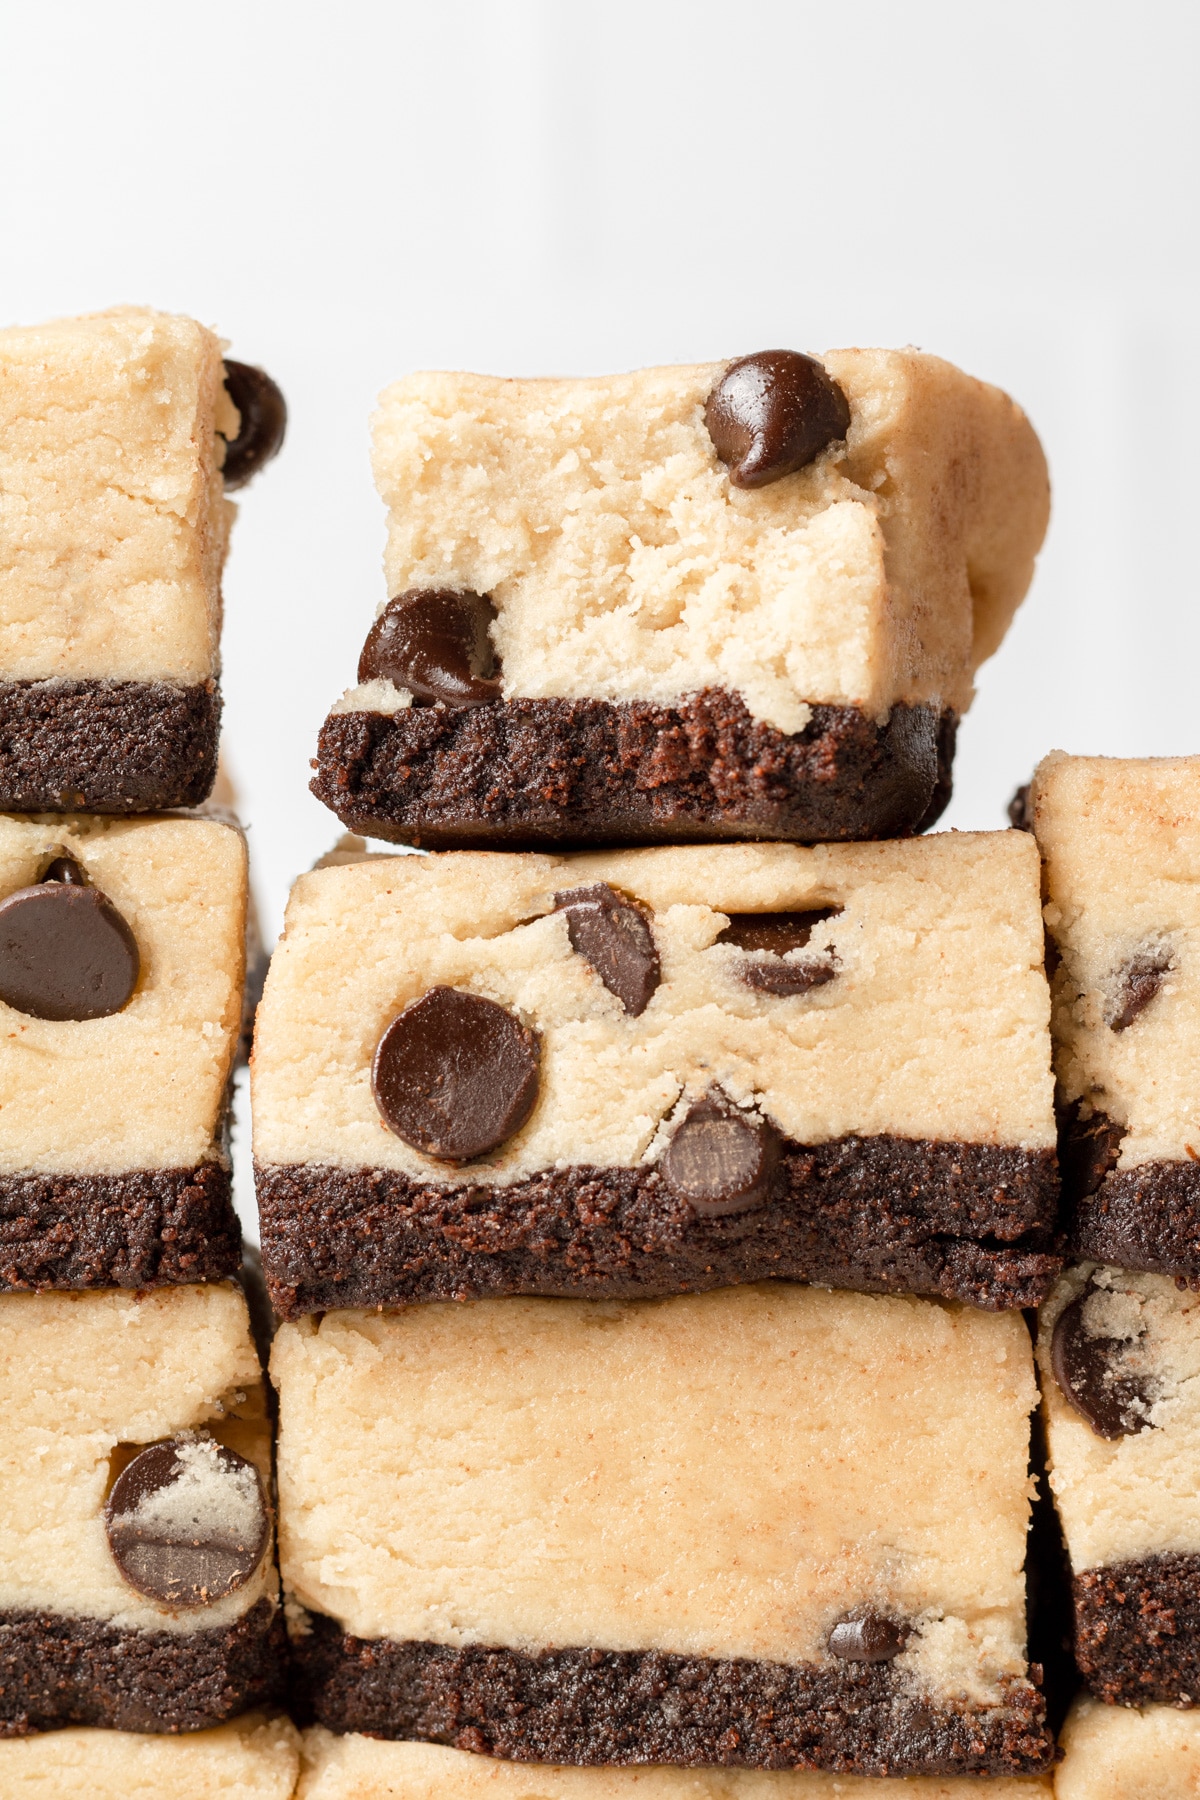
These cookie dough brownie bites are so easy to make, require simple ingredients, and are freezer friendly! The combination of edible cookie dough on top of a thick layer of brownie dough is the best of both worlds, and every cookie dough lover’s dream.
If you’re looking for a cookie dough bar that takes minutes to throw together and tastes like heaven, you will love this recipe. These bars are great for birthday parties, or for when you just get a hankering for cookie dough.
I love cookie dough (obviously), and I always keep a stash of my cookie dough bites in the freezer. You know, for “emergencies” 😉 So I currently can’t get enough of these! They are egg-free and can be made as vegan cookie dough brownie bites, or you can use regular dairy ingredients.
Why You’ll Love These Cookie Dough Brownie Bites
- The raw cookie dough is layered on top of an edible brownie dough base, which brings these bars to the next level.
- You can easily make your own customized cookie dough bites by adding in peanut butter chips, peanut butter cups, white chocolate, nuts, or any other mix-ins!
- The recipe is easy, and you don’t even need an oven!
- The cookie dough uses all the same ingredients as a classic chocolate chip cookie – which is how you KNOW they’re going to taste exactly like the cookie dough dessert you came here for.
Ingredients Needed
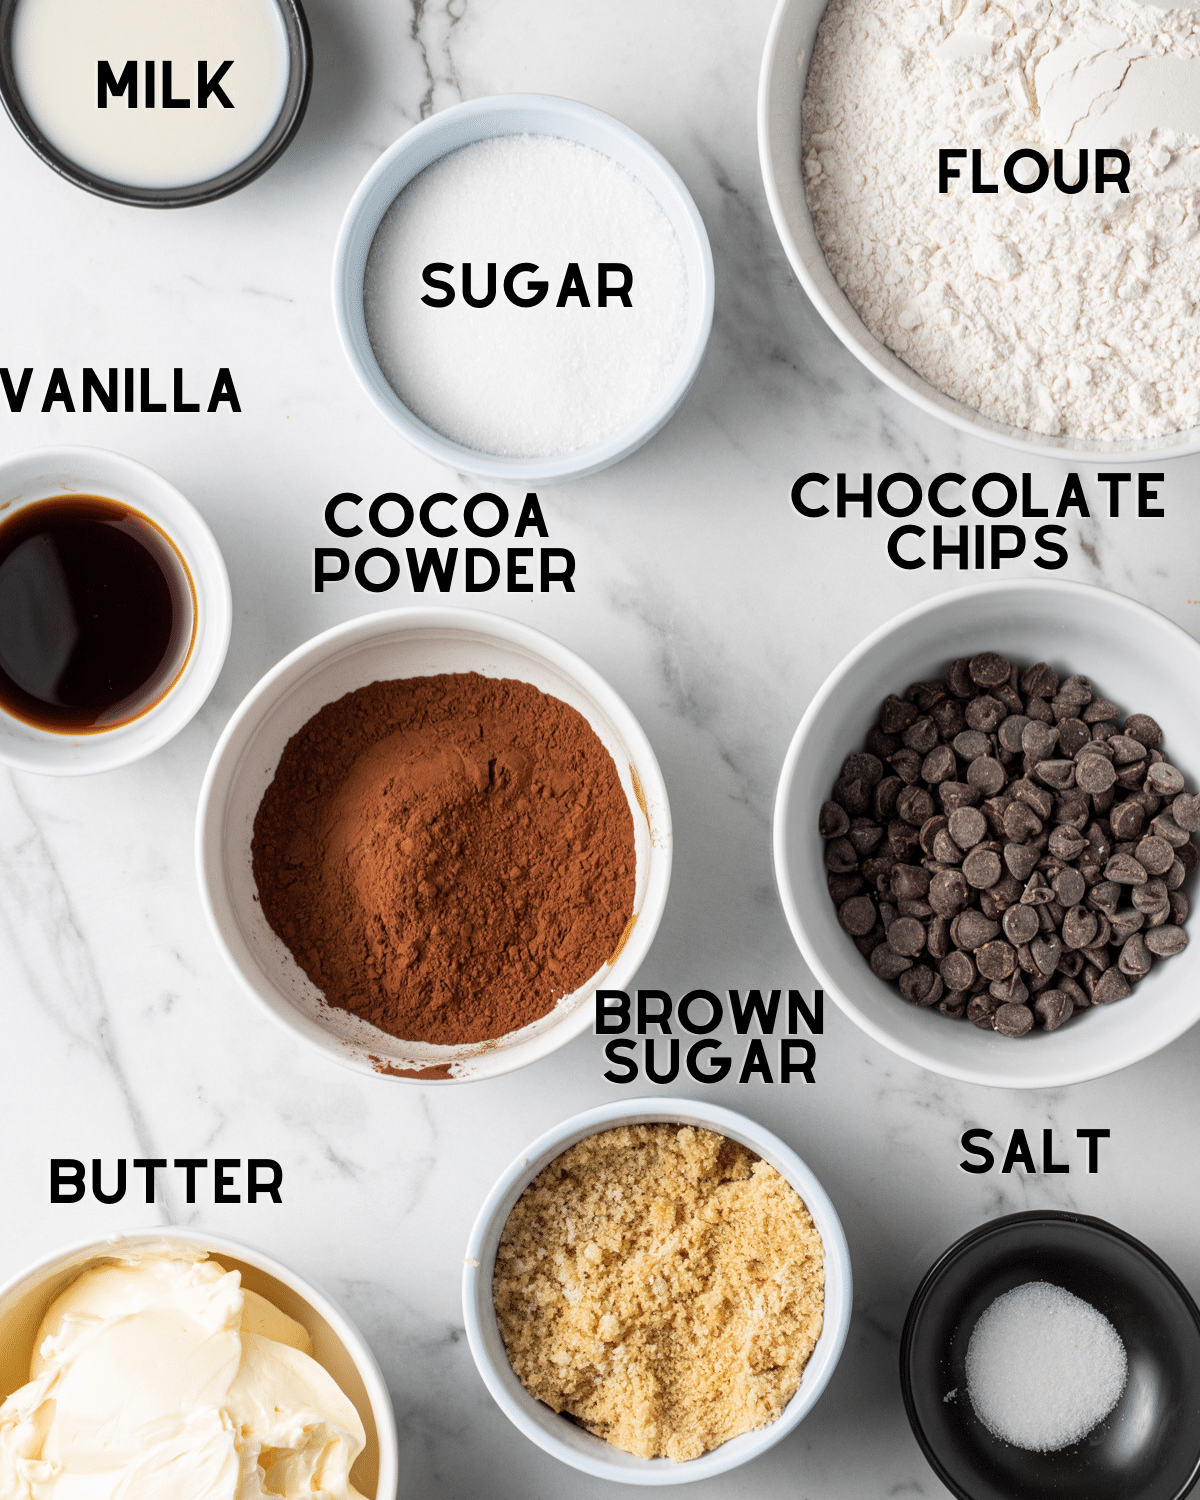
Both the cookie dough and the brownie layer both use simple ingredients that you probably already have on hand! A few notes about the ingredients:
- Flour: Flour is technically not safe to eat raw. In order to make sure that these cookie dough bars are 100% safe, you’ll need to heat treat the flour to kill any bacteria that could potentially have grown in it – but the good news is that this takes less than 5 minutes!
- Chocolate chips: Feel free to get creative here! I used dairy free dark chocolate chips, but you can also use mini chocolate chips, white chocolate, m&m’s, or any other mix-ins you’d like.
- Butter: you can use dairy free/vegan butter or regular butter.
- Milk: you can use any dairy free milk, or you can use regular dairy milk.
Step By Step Instructions
Note: Full ingredient measurements and instructions can be found in the recipe card at the bottom of this page.
Note: Full ingredient measurements and instructions can be found in the recipe card at the bottom of this page.
STEP ONE: Line an 8×8 square pan with parchment paper and set aside. Heat treat your flour either by microwaving it in a bowl or pouring it on a baking tray and baking at 350°F for 5 minutes.

STEP TWO: Start by making the brownie dough batter. In a microwave safe bowl, melt half a cup of butter. Whisk in the sugars until the mixture resembles a paste.
STEP THREE: Add in the vanilla extract, then whisk in the cocoa powder and flour.
STEP FOUR: Pour the batter into the prepared pan. Use the back of a measuring cup to press the dough down until it covers the bottom of the pan in an even layer. Refrigerate while you make the cookie dough.

STEP FIVE: To make the cookie dough layer, beat the butter, white sugar, and brown sugar together in a bowl until combined. Add in the milk and vanilla then mix.
STEP SIX: Pour in the flour and salt and mix until combined, then fold in chocolate chips.
STEP SEVEN: Remove the pan with the brownie batter from the fridge and layer the cookie dough over the brownie layer, once again using the back of a measuring cup to flatten and press down the dough.
STEP EIGHT: Cover with plastic wrap or tin foil and refrigerate for 1 1/2 – 2 hours. Slice into bite sized pieces or whichever size you’d like and enjoy!

How to make Holiday Cookie Dough Brownie Bites
These are so fun to make for any occasion, so here are a few fun ways you could jazz them up for various holidays!:
- Add chopped up peanut butter cups
- Melt chocolate chips and drizzle them over top of the bars once they’ve set
- Add sprinkles! Sprinkles make everything more fun! Add rainbow sprinkles, Christmas sprinkles, Halloween sprinkles, the options are endless!
- If you are not dairy free/vegan, you can add in m&m’s or Reese’s pieces!
- Chop your favorite chocolate bar into small pieces and use those in place of chocolate chips
Expert Tips
- Don’t skip the parchment lining in your pan! Because the dough isn’t baked, it can easily crumble if you try to take it out of the pan without parchment. Leave some parchment hanging over the sides so that you can just lift the bars out.
- Pack the cookie dough down firmly on top of the brownie layer using the back of a cup (or measuring cup). This will help the layers to stick together.
- The cookie dough layer is thick, which makes these treats pretty rich, so I like to cut them into small squares.
- If the dough seems a bit dry before you pour it into the baking pan, you may have over-measured the flour. Just mix in 1/2 tbsp more milk until you reach the right cookie dough consistency.
- 90 minutes is enough time for the bars to chill and set, but if you can leave them in the fridge for 2-3 hours that’s even better.
Storage Instructions
The cookie dough brownie bites will get fairly soft at room temperature, so they need to be stored covered in the fridge until you’re ready to serve them. You can eat them right out of the fridge but I recommend letting them sit out for 5-10 minutes for a softer texture. They will last about a week in the fridge.
These bars freeze really well. Slice them up and then put them in a ziploc bag. Then it’s easy to just grab one and let it thaw either in the fridge or at room temperature. Voila! A cookie dough bar on demand whenever you want it!
More Recipes You’ll Love


If you make this recipe, let me know how it went in the comments below, I’d love to hear from you! You can also tag me on Instagram or Facebook so I can check it out!
Baking FAQ
These are the topics I’m asked about most frequently:
You can get these answers and more in my frequently asked questions post!

Cookie Dough Brownie Bites (No Bake!)
Video
Ingredients
Brownie Batter Dough
- ½ cup butter, melted (regular or vegan)*
- ½ cup (105 g) light brown sugar
- ½ cup (100 g) granulated sugar
- 1 tsp vanilla extract
- ½ cup (50 g) unsweetened cocoa powder
- ½ cup + 2 tbsp (80 g) all-purpose flour
Cookie Dough
- 1 cup butter, softened (regular or vegan)
- ⅓ cup +2 tbsp (97 g) granulated sugar
- ¾ cup (150 g) light brown sugar
- 3 tbsp milk (regular or non-dairy)
- 3/4 tbsp vanilla extract
- 3 cups (375 g) all-purpose flour
- ¾ tsp salt
- ½ cup semisweet chocolate chips (regular or vegan), or mini chocolate chips*
Instructions
- Heat treat your flour by microwaving it in a bowl for around 1 minute and 30 seconds or pouring it on a baking sheet and baking it in a preheated oven (350°F) for 5 minutes*
- Prepare an 8×8 square pan by lining it with parchment paper, leaving some hanging over the sides.
Brownie Layer
- Melt the butter in the microwave or over the stove. Whisk in the sugars until the mixture is combined and looks like a paste. Add in the vanilla extract.
- Mix in the flour and cocoa powder, then pour the batter into your prepared pan. Spread it around to cover the bottom of the pan. Use the bottom of a cup (or measuring cup) to press down the batter into an even layer. Place the pan in the fridge while you make the cookie dough.
Cookie Dough Layer
- In the bowl of a handheld mixer or standing mixer, beat the butter, brown sugar, and granulated sugars together until combined. Mix in the milk and vanilla extract.
- Add in the flour and salt, then stir in the chocolate chips. If the dough is too crumbly, add 1/2 tbsp more milk to soften it.
- Scoop the cookie dough into the baking pan, layering it over top of the brownie layer. Once again, use the bottom of a cup to press the dough into the pan in an even layer.
- Cover the pan with plastic wrap or tinfoil and refrigerate for at least 90 minutes, ideally 2-3 hours or overnight.
- Slice into bite sized pieces ore regular brownie sized pieces and enjoy!


Notes
Storage and Freezing Instructions: The bars get really soft at room temperature, so store them covered in the fridge until ready to eat. Let them soften for 10-15 minutes after taking them out of the fridge for a perfect soft texture. You can also freeze them for up to 2-3 months in a ziploc bag, then let them thaw in the fridge when you’re ready to eat them.
The calorie information provided for this recipe is an estimate. The accuracy of the calories listed is not guaranteed.
So good! Exactly what I was looking for today. I used browned butter in the brownie batter portion and highly recommend.
I’m so happy you loved them! Thanks for taking the time to leave a review!
As soon as I saw this recipe I knew I had to make them. I am glad that I did! Cookie dough, and any sweet for that matter, gets my attention pretty quickly. These cookie dough bites are so addicting. I try to just have a little and end up going back for more and more. I will definitely make these again. Thank you!
Hi Susan! Yay! I am so happy to hear that you loved the recipe! Thank you so much for taking the time to come back and leave a review! ?
Okay I’m not even exaggerating when I say these cookie dough bars are the BEST things I’ve put into my mouth in a very long time. They were devoured within literal minutes between my fiancé and I. We’ve been big fans of CDD since she started and recipes like this (let’s be honest – all her recipes, really) are why we will forever be loyal. They are easy to make, soft, packed with flavour, and unbelievably addicting. I KNOW the recipe says these bars are freezer friendly but I don’t think that will ever happen in this house. Self-control is low when it comes to these!
Hi Chloe! Thank you so much for the amazing review! I am so happy to hear that you love my recipes and thank you so much for making the cookie dough bars 🙂
Greetings from Canada and thats for this great recipe idea. I made it, and it was so easy and delicious (and it’s addictive!!)
Hello fellow Canadian 🙂 I’m so happy to hear that you loved the cookie dough bars! Thank you so much for trying out the recipe and for coming back to leave a review!