Christmas Cakesicles (Cake Popsicles)
This post contains affiliate links. Read the full disclosure here.
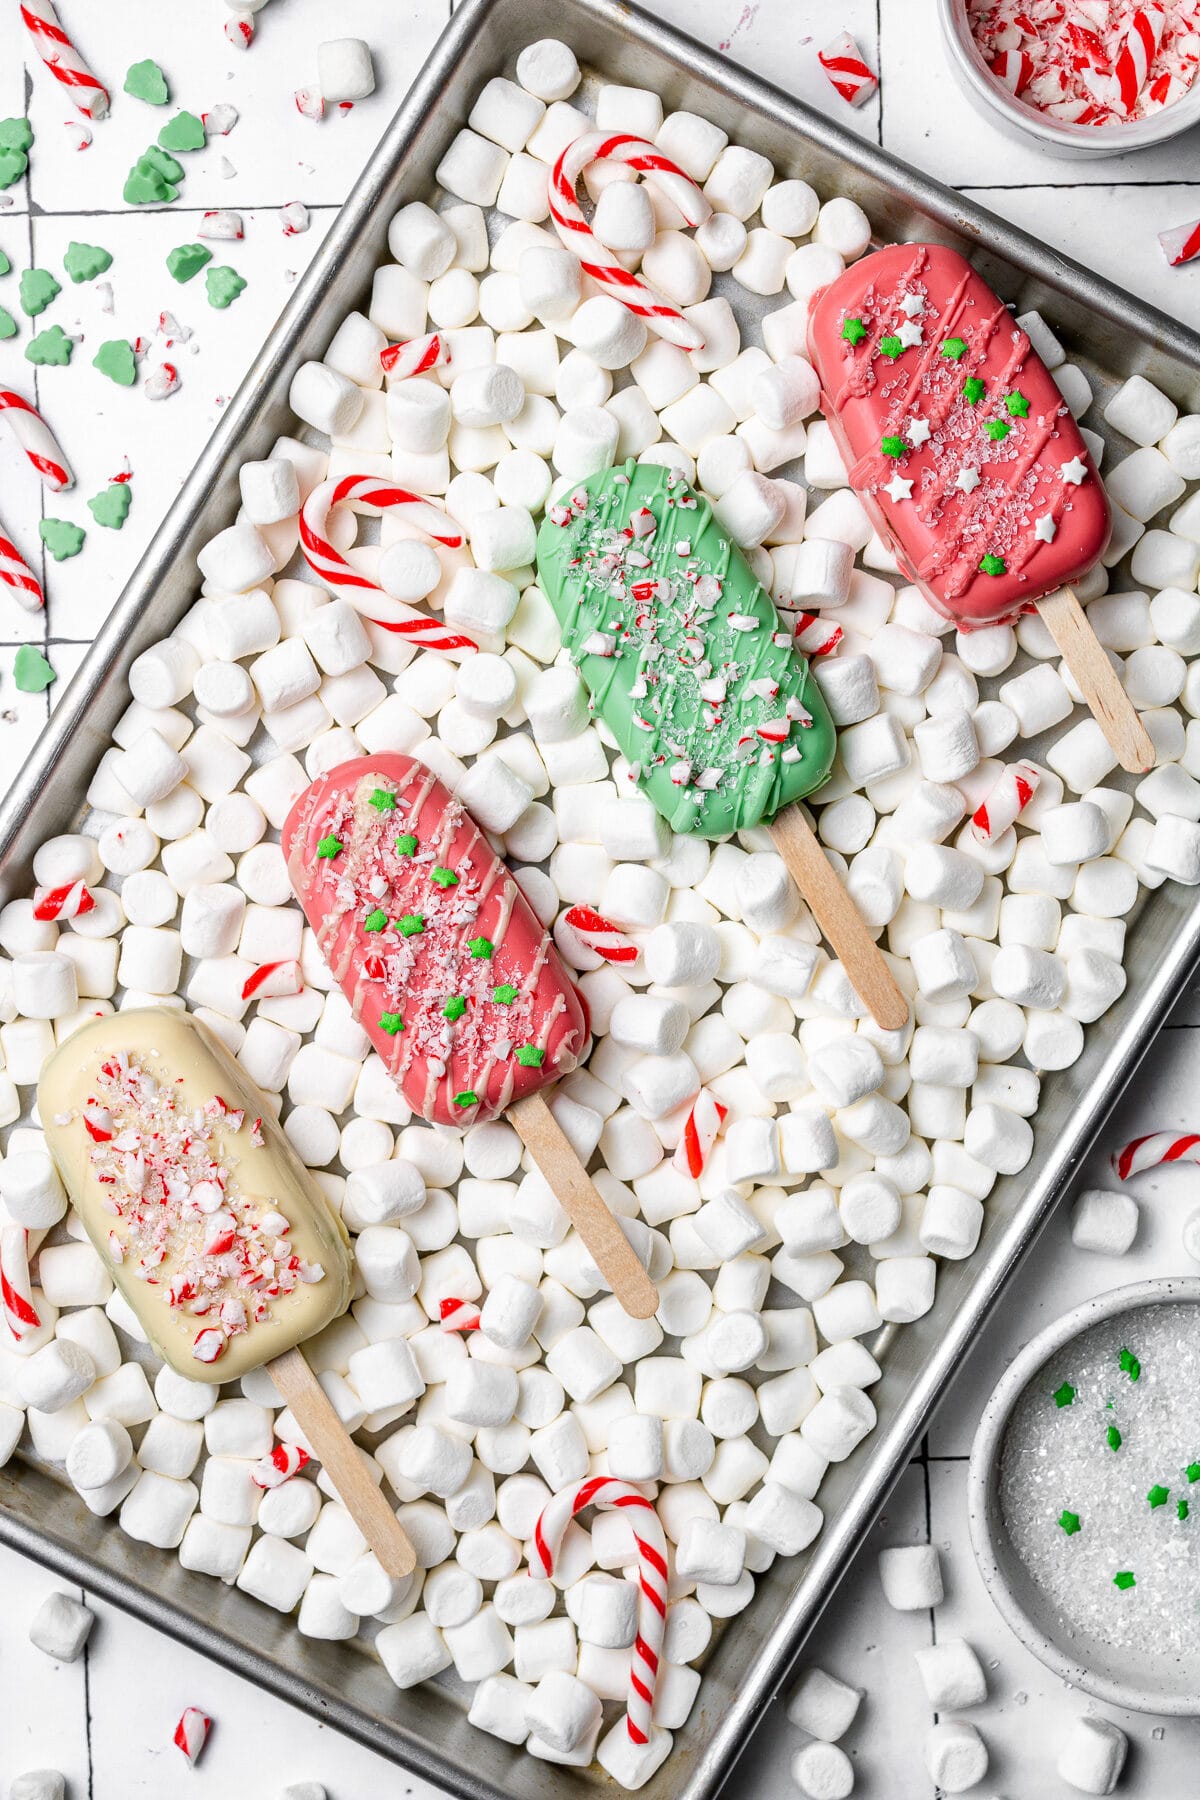
These Christmas Cakesicles are a fun and festive treat for the holiday season! The Christmas decorating ideas are endless and they can even be given as gifts! I’ve provided options for making cake popsicles completely from scratch or using a box cake mix and store-bought frosting.
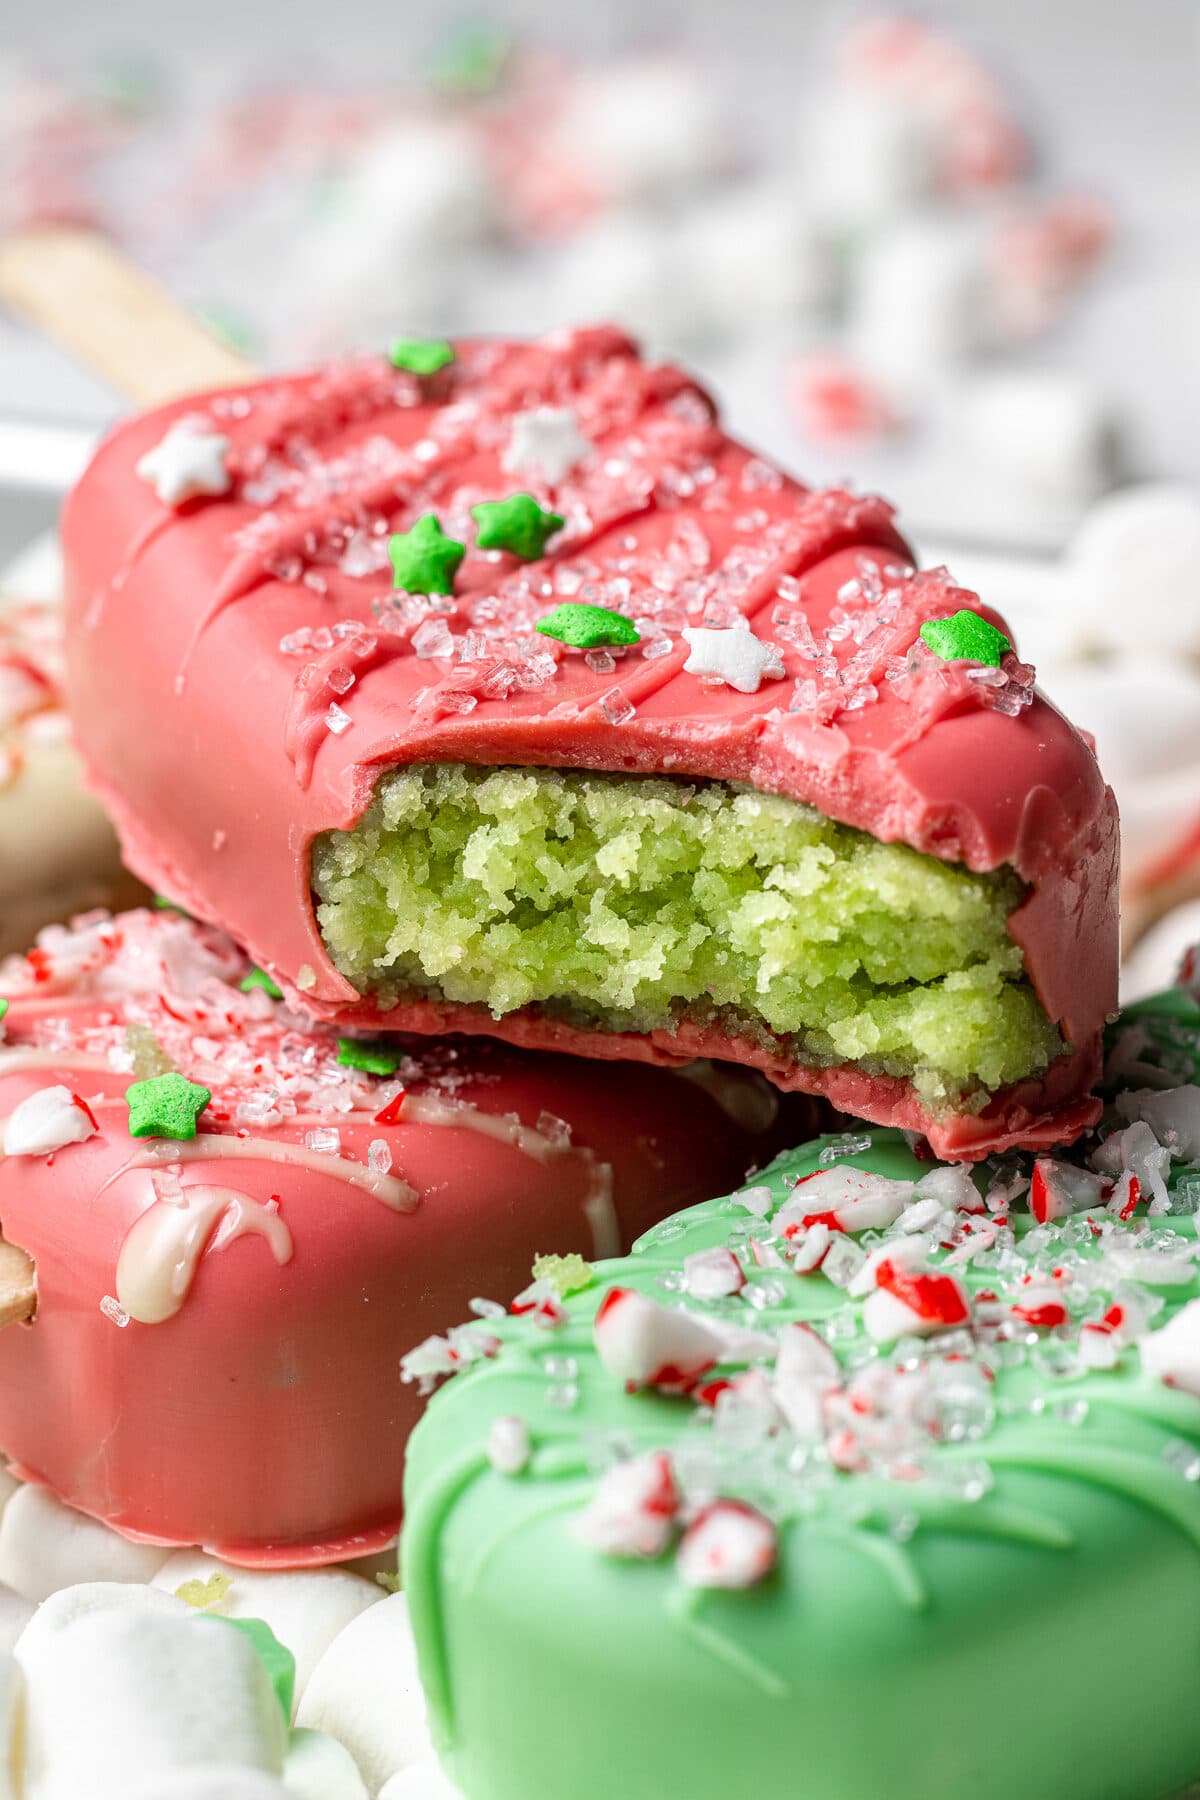
Christmas cakesicles are like cake pops but a lot bigger – which means more room to decorate! These are fun to make for holiday parties, gifts, or as a fun activity to do with kids!
These cake popsicles can be made using regular dairy ingredients, dairy free, vegan, or even gluten free. They are super customizable and so delicious!
Why You’ll Love these Christmas Cakesicles
- Christmas cake popsicles cake be made using any kind of cake you’d like! If you’re a chocolate fan, use this Chocolate Cake recipe, or even this Chocolate Orange Cake! Note that they make two round cakes and this recipe only requires one cake for 8 cakesicles, so you can halve the layer cake recipes. To make these cakesicles vegan, use this Vegan Chocolate Cake.
- If you prefer to use a boxed cake mix, you can use your favorite store-bought cake mix of any flavor. The same goes for frosting – if you prefer to use store-bought frosting that will work great, or you can make these completely from scratch!
- This recipe can be entirely vegan by using vegan dark chocolate melts (or chocolate chips), or vegan white chocolate!
- If you’re using white chocolate or a white cake, you can use food coloring to make the cakesicles any color you’d like!
- Cakesicles are a labor of love – there are a few tricks, but I’ll walk you through it so we can do it together!
- You can make these in a popsicle shape using standard cakesicle molds, christmas tree molds, or stocking and santa molds
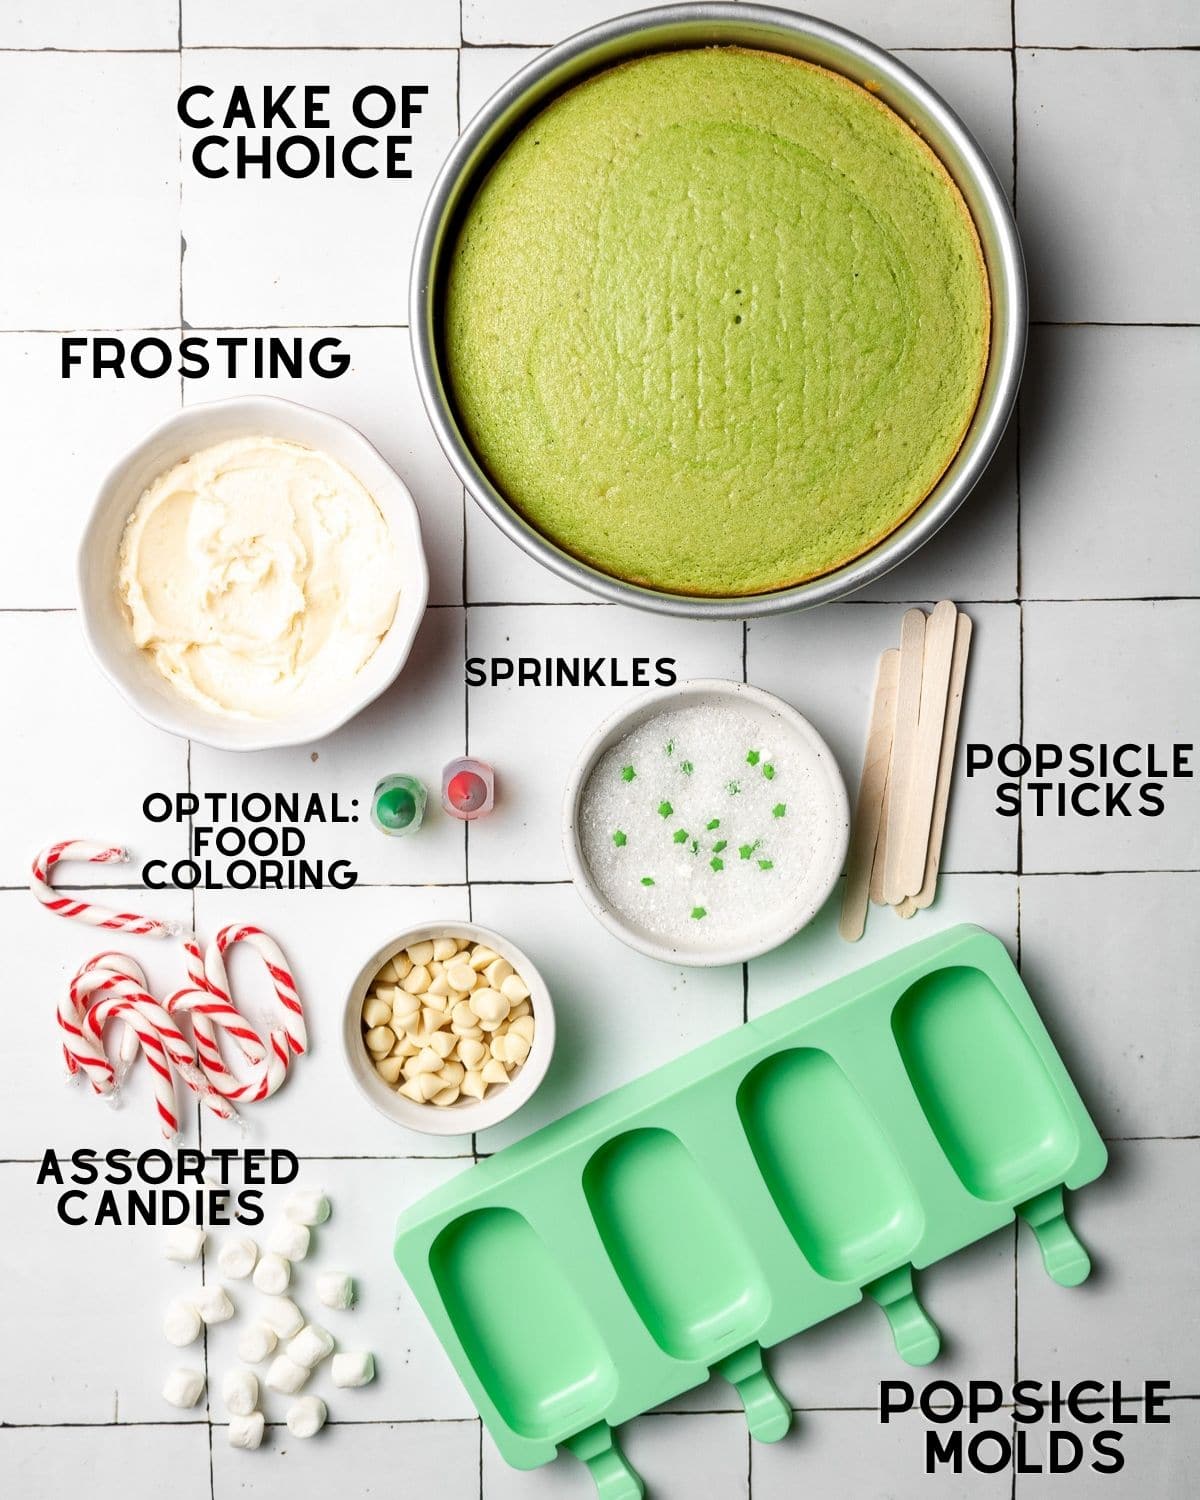
Ingredients Needed
- Chocolate Melts: You can use melted chocolate chips (white, dark, or milk), or you can use candy melts. They can be regular or dairy free, and I’ve tested these with colored candy melts as well. If you can’t find colored ones, you can add a few drops of food coloring into your melted white chocolate.
- Cake: I’ve provided an easy vanilla cake recipe if you want to make your cake from scratch! You can also use this chocolate cake recipe from scratch (you’ll want to halve the recipe for 8 cake popsicles). You can also use a box cake mix of any flavor, or your favorite cake recipe.
- Frosting: The frosting used can be store-bought or made from scratch with the recipe I’ve provided. If you’re using a chocolate cake to make the cakesicles, you can use vanilla or chocolate frosting.
- Decorations: The options are truly endless when it comes to decorating your cake popsicles! I’ve provided a list further down in this post with decorating ideas.
Recipe Modifications
This recipe can be made to fit various dietary needs! To make it dairy free, use dairy free ingredients in the recipe provided (milk, butter, chocolate)
To make Vegan Cakesicles:
To make vegan christmas cake popsicles, use this vegan chocolate cake recipe, a vegan boxed cake mix, (or your favorite vegan vanilla cake), and use vegan butter and milk in the buttercream. For the chocolate coating, use vegan chocolate melts or chocolate chips.
To make Gluten Free Cakesicles:
To make a gluten free version of cakesicles, swap out the chocolate cake for your favorite gluten free chocolate cake from scratch or use a gluten free box mix cake. Be sure to check your chocolate and candies to make sure they are also gluten free.
A Note on Frosting
The amount of frosting required will vary depending on how moist the cake you use is. The cake recipe provided below works well with around 3 tablespoons of frosting, but you may need more or less. The mixture shouldn’t be wet but you don’t want to have it be dry and crumbly either!
Step By Step Instructions
Note: Full ingredient measurements and instructions can be found in the recipe card at the bottom of this page.
STEP ONE: Bake your cake. If using a box mix, make the cake using the instructions written on the box. If making this cake recipe from scratch, follow the instructions here. Preheat the oven to 350°F and prepare an 8 inch round cake pan or 8×8 square baking pan.
STEP TWO: In a large bowl, whisk flour, salt, sugar, baking soda, and baking powder together, then set aside. In a mixing bowl bowl, beat butter, oil, and sugar together. Add in the egg and vanilla then mix again, scraping down the sides of the bowl. In three additions, add in the buttermilk and dry ingredients until combined. Add a few drops of red or green food coloring if you’d like to dye the cake.
STEP THREE: Bake the cake for 18-23 minutes, or until a toothpick inserted in the middle of the cake comes out clean. Meanwhile, make the frosting. Mix butter and powdered sugar in a large bowl, then add in vanilla. Add milk if required for better consistency.
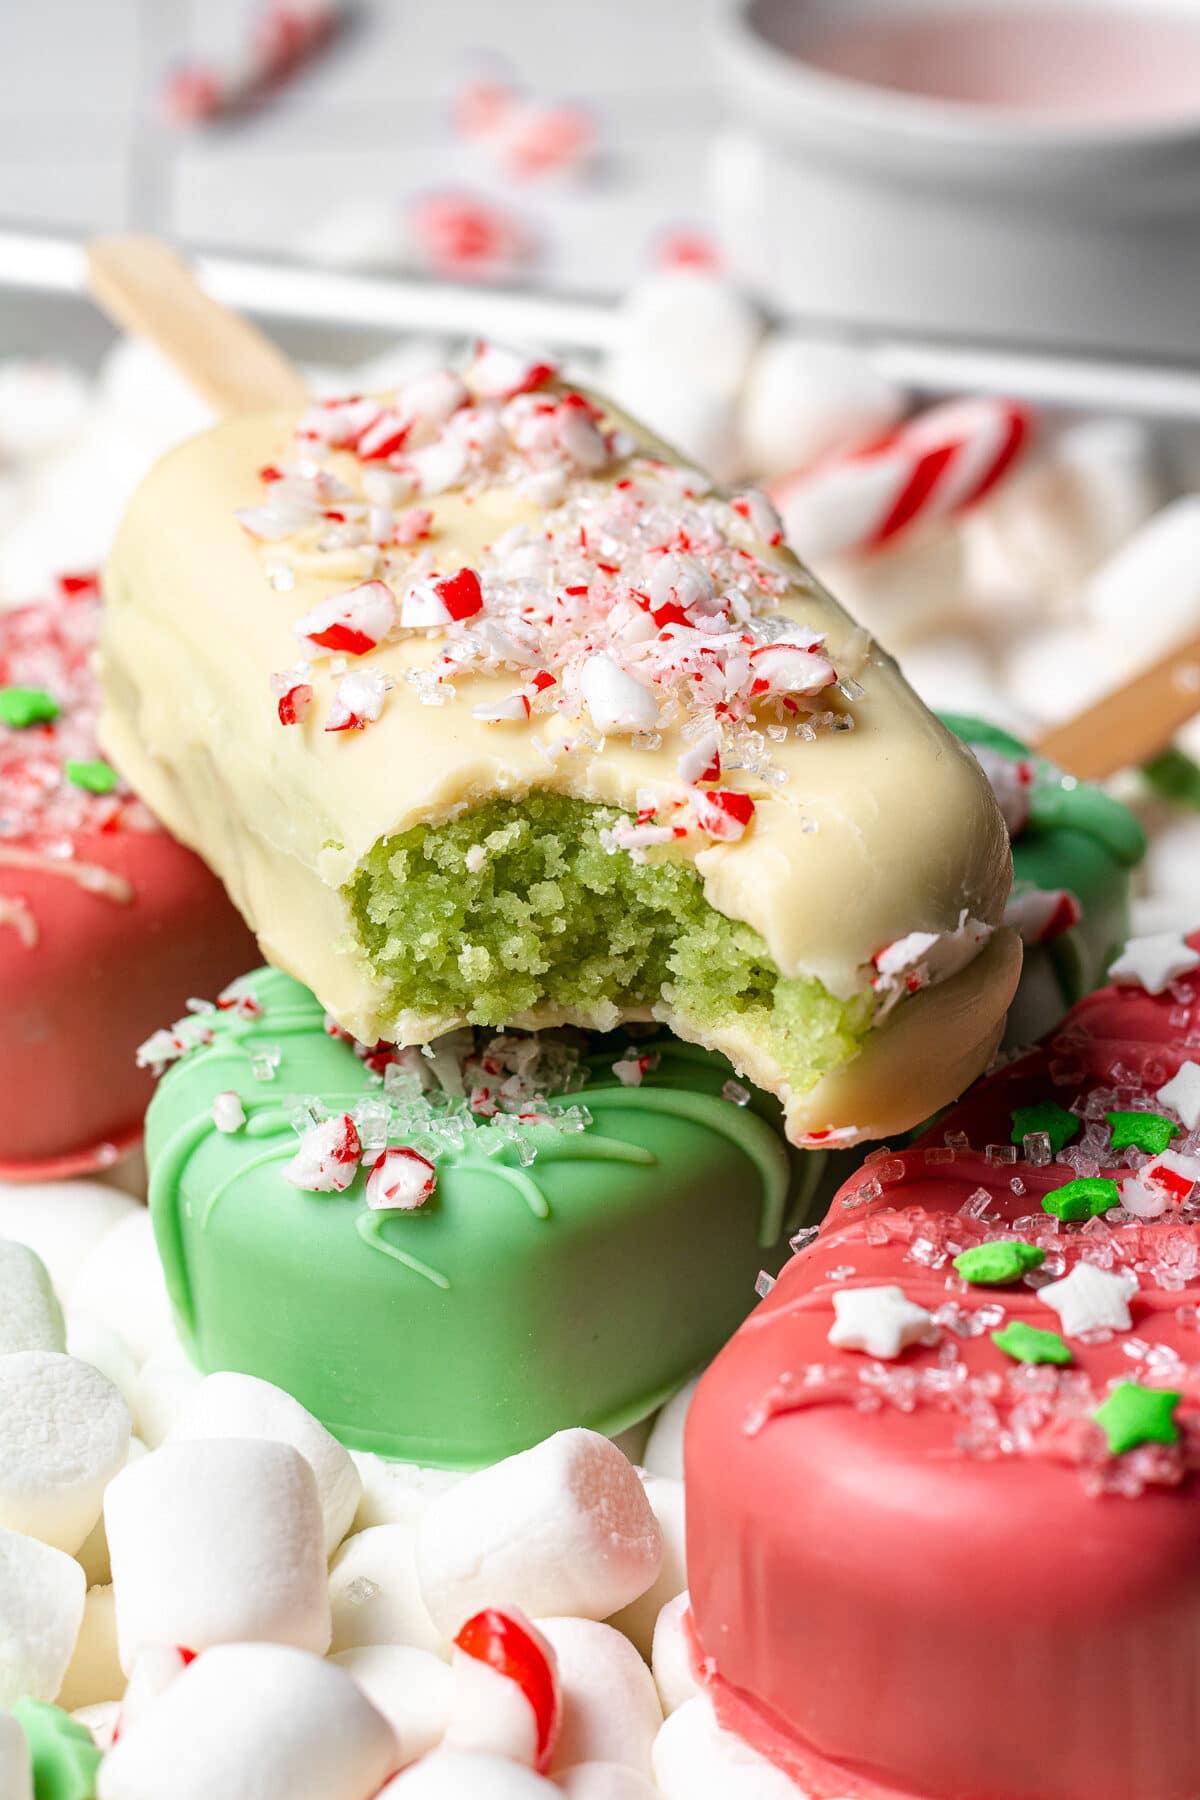
STEP FOUR: Once the cake has cooled completely, crumble it up into the bowl with the frosting, using your hands or a large spoon to mix them together until combined. Set aside. If your cakesicle molds are new, the holes for the stick might be covered, so poke a stick through to make sure before you begin.
STEP FIVE: In the microwave, melt the chocolate for 30 seconds at a time, stirring between each time. Or melt over low heat in a double boiler or pan on the stove. Add 1 tablespoon of melted chocolate into each cakesicle mold cavity, using a spoon to spread it up the sides of the mold. Stick a popsicle stick into each one then remove it, just to make sure the chocolate doesn’t harden over the hole. Refrigerate for 5-10 minutes or until chocolate has set.
STEP SIX: Remove the cakesicles from the fridge and fill each one with cake, flattening and smoothing the top and leaving a little bit of room on top. Insert a popsicle stick through each cakesicle hole. Top with more melted chocolate until the cake is no longer visible. If you want to make it really smooth, use an offset spatula to scrape off the excess chocolate. Refrigerate for 10 minutes, or until chocolate has set.
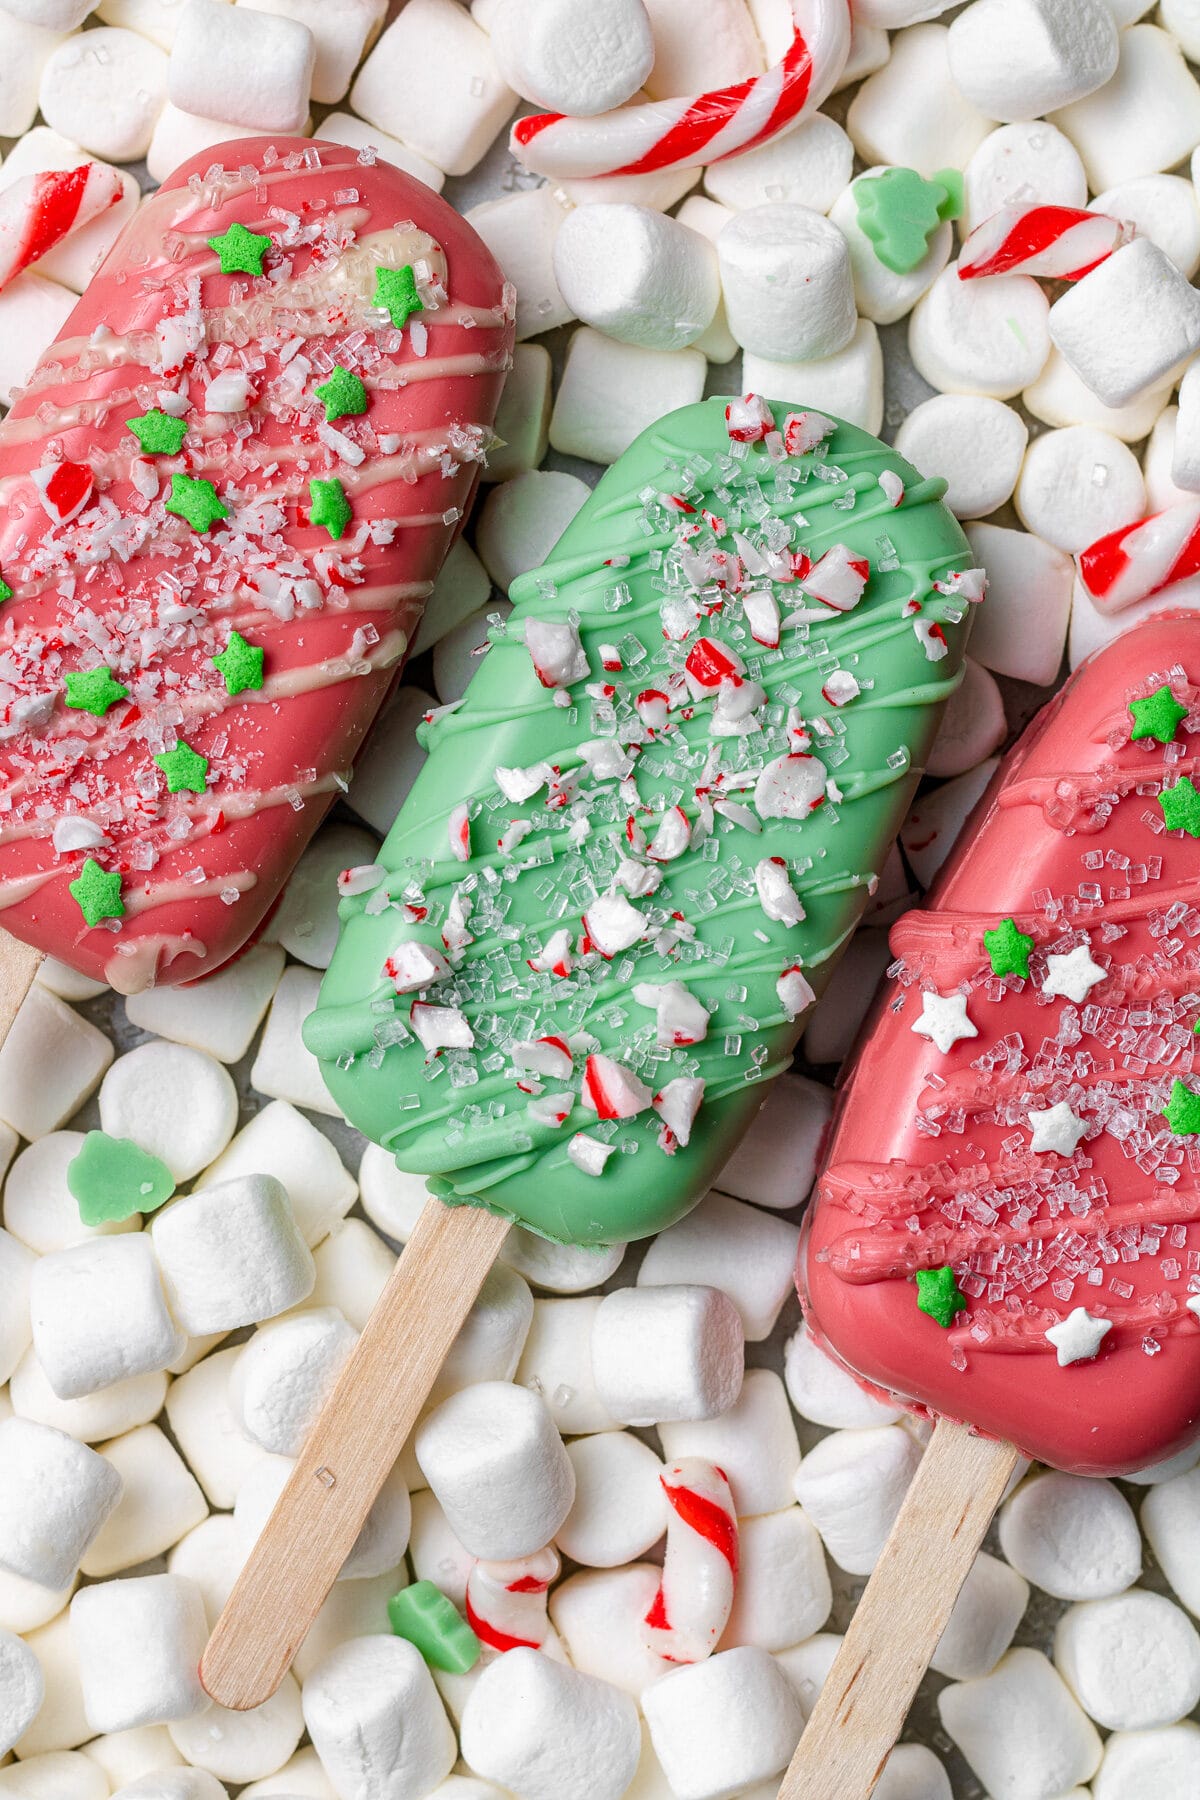
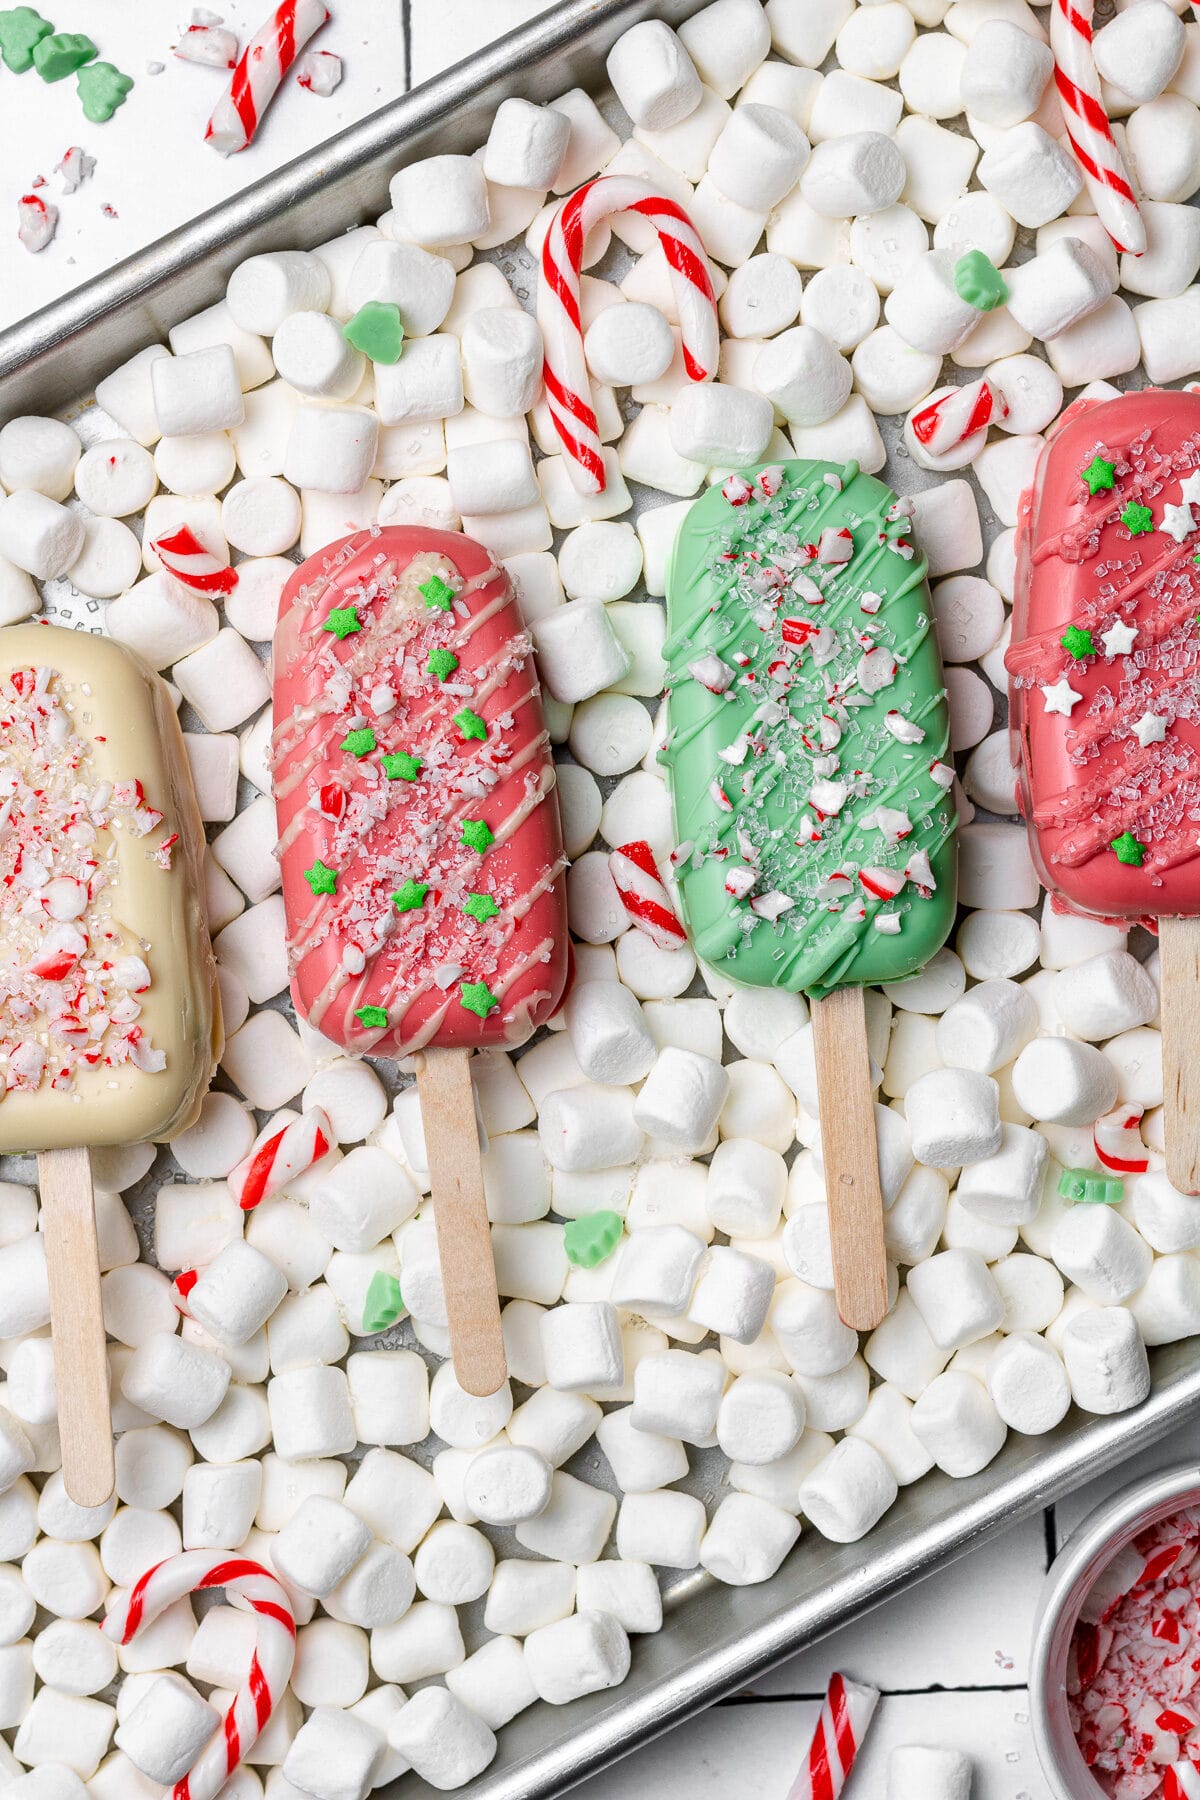
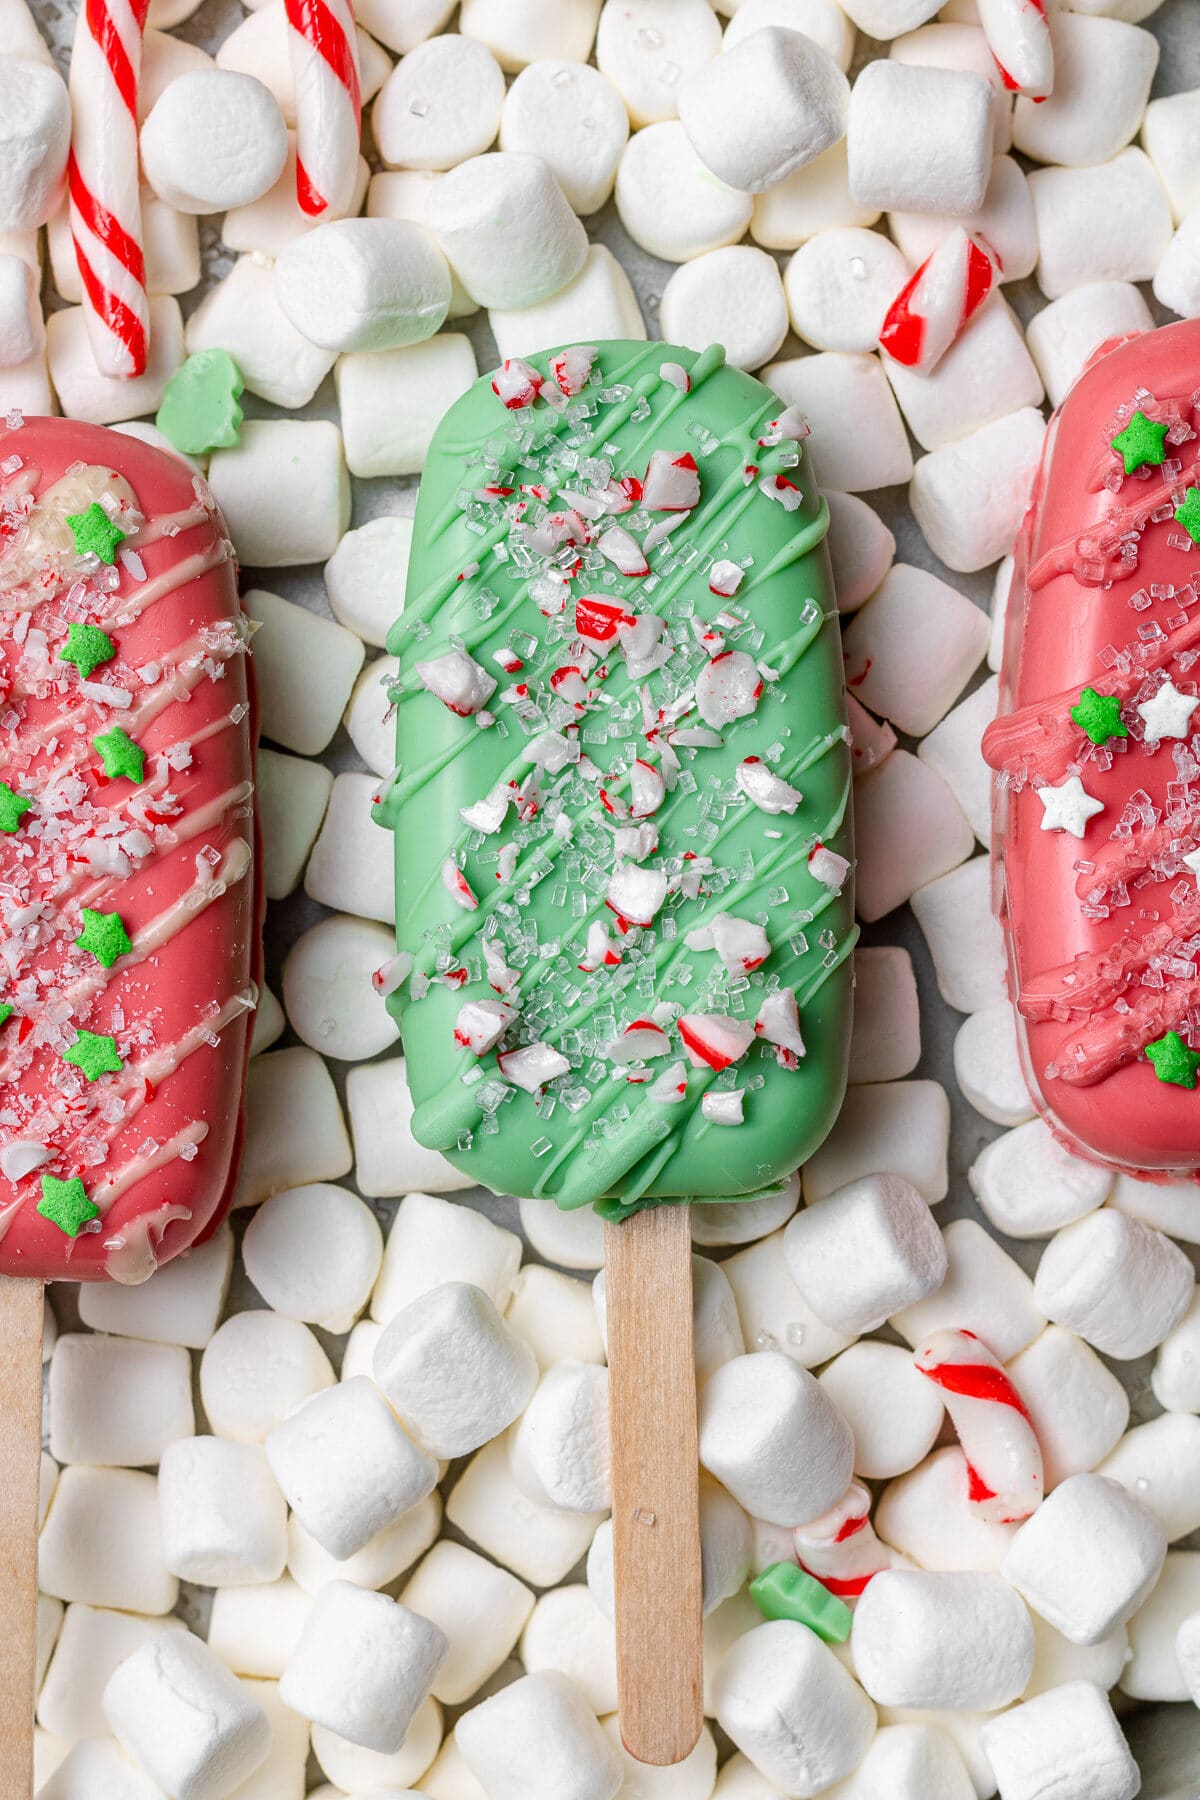
STEP SEVEN: Remove any hardened extra chocolate around the molds then gently pop the cake popsicles out and place them onto a parchment lined baking sheet. Drizzle more chocolate in a zig zag pattern over each one and add crushed candies or sprinkles, or decorate as desired!

Decoration Ideas
The decoration possibilities are seriously ENDLESS!
I chose to add a few drops of green food coloring to my cake batter to make the cake green, which is a fun surprise (Grinch cakesicles, anyone?!). If you can’t find colorful chocolate candy melts for the cakesicle coating, you can add a few drops of food coloring into melted white chocolate!
Here are a few candy ideas:
- Crushed up candy canes
- Break up pretzel pieces to make reindeer antlers
- Edible mini googly eyes to make Santa, reindeer, the Grinch, or snowmen!
- Coconut flakes look like snow for snowmen!
- Assorted Christmas sprinkles
- Drizzle different colors of melted chocolate in patterns across the tops of the cakesicles
- Use an edible pen to draw fine details on the cakesicles!
You can really make these cakesicles as elaborate or as simple as you’d like – that’s what makes them so fun!
Gifting the Cakesicles
Cakesicles make great gifts or party favors! You can use individual bags to package them and tie the bags with a pretty ribbon or twist tie.
Expert Tips
- If you are baking your cake from scratch, be sure to properly measure your flour using a kitchen scale or using the proper scoop and level method.
- Adjust the amount of frosting that you add to the crumbled cake – the mixture shouldn’t be crumbly and falling apart. You want to cake to stick together but be sure to not make it too wet.
- Before adding the cake into the molds, check the sides to make sure the coating looks thick enough. If it looks thin, “paint” another layer of melted chocolate onto the sides and let it set in the fridge again before filling the molds with cake.
- When removing the cakesicles from the molds, try not to push the popsicle sticks too hard – you don’t want them to pop out of the top of the cakesicles!
- To get your decorations to stick to the cakesicles, you can melt more chocolate and drizzle it over the cakesicles, adding decorations while the chocolate is still wet.
Storage Instructions
The cakesicles can be stored at a cool, room temperature (provided you don’t live in a very hot climate, or the chocolate will start to “sweat”) for 3-5 days. You can also store them in the fridge for up to 2 weeks.
More Holiday Recipes You’ll Love


If you make this recipe, let me know how it went in the comments below, I’d love to hear from you! You can also tag me on Instagram or Facebook so I can check it out!
Baking FAQ
These are the topics I’m asked about most frequently:
You can get these answers and more in my frequently asked questions post!

Christmas Cakesicles (Cake Popsicles)
Ingredients
Cake (Boxed Mix Option)
- 1 boxed mix cake (1x 8 inch round cake
Cake (Made From Scratch)
- 2 Tbsp butter, softened, (regular or vegan)
- 3 Tbsp sunflower oil (or other neutral oil, like canola or vegetable oil)
- ⅔ cup (133.33 g) granulated sugar
- 1 egg
- 1 Tbsp real vanilla extract
- ¼ tsp baking soda
- 1 tsp baking powder
- 1½ cup (187.5 g) all-purpose flour
- ½ tsp salt
- 1 cup milk of choice (for dairy free, I like unsweetened soy milk), (regular or vegan)
- a few drops of liquid food coloring if desired, (optional)
Frosting (Store-Bought)
- 2-3 Tbsp store-bought frosting of choice
Frosting (Made from Scratch)
- 2½ Tbsp butter, softened, (regular or vegan)
- ½ cup (60 g) powdered sugar (icing sugar)
- ⅛ tsp real vanilla extract
- ½ Tbsp milk of choice (for dairy free, I like unsweetened soy milk), (regular or vegan)
Cakesicle Coating
- 2-2½ cups chocolate candy melts or chocolate chips (white, dark, milk, or assorted colors), (regular or vegan)
- assorted Christmas sprinkles, crushed candy canes, or any decorations you'd like
Instructions
- Note that step by step photos of the instructions can be found in the post above.
Make the Cake
- If using a box mix, follow the instructions on the box to make your cake. If making this recipe from scratch, follow the instructions here. Preheat the oven to 350°F and prepare an 8 inch round cake pan or 8×8 square baking pan (the shape of the pan won't matter much since the cake will be crumbled up later), lining it with parchment paper on the bottom and a light coating of cooking spray on the sides.
- In a large bowl, whisk flour, salt, sugar, baking soda, and baking powder together, then set aside. In the bowl of a standing mixer or handheld mixer, beat butter, oil, and sugar together. Add in the egg and vanilla then mix again, scraping down the sides of the bowl.
- Alternate adding in the milk, then dry ingredients in three additions. Mix until combined, again scraping down the sides of the bowl. If you'd like to make a colorful cake, mix in a couple drops of red or green food coloring until your desired color is achieved.
- Bake the cake for 18-23 minutes, or until a toothpick inserted in the middle comes out clean. Leave it in the pan on a cooling rack to cool.
Make the Buttercream Frosting
- If using store-bought frosting, skip this step.
- Mix butter and powdered sugar together in a large bowl. Slowly add vanilla extract. Add the milk only if the buttercream seems too thick.
Assembling the Cake Popsicles
- Crumble the cooled cake into the bowl with the buttercream. Use your hands or a standing mixer to mix it all together until fully combined. If using store-bought frosting, begin by using 2 tablespoons, then add one more if the mixture seems dry. The amount of frosting will vary depending on the type of cake you are using. Set aside.
- If your cakesicle molds are new, the holes for the stick might be covered, so poke a stick through them before beginning to assemble the cakesicles.
- Melt the chocolate. You can melt it in the microwave for 30 seconds at a time, stirring between each time. You can also melt the chocolate over low heat in a double boiler or pan on the stove.
- Add 1 tablespoon of melted chocolate into each cakesicle mold cavity, using a spoon to spread it up the sides of the mold. Stick a popsicle stick into each one then remove it – this is to make sure the chocolate doesn't set and harden over top of the hole. Refrigerate the molds for 5-10 minutes or until chocolate has set.
- Remove the cakesicle molds from the fridge. Check along the sides of each mold to make sure the chocolate coating doesn't look too thin. If it's too thin, add another layer of melted chocolate onto the sides and refrigerate for another 5 minutes or until set. Next, fill each cakesicle mold with your cake mixture, flattening and smoothing the top. Don't fill them all the way to the top – leave a little bit of room on top of the cake for the melted chocolate.
- Insert a popsicle stick through each cakesicle hole. Top with more melted chocolate to cover the cake. If you want to make it really smooth, use an offset spatula to scrape off the excess chocolate and clean up where it has spilled over. Refrigerate the molds for 10 minutes, or until chocolate has set.
- Line a large baking sheet with parchment paper. Once the cake popsicles have set, remove any hardened extra chocolate around the molds then gently pop the cakesicles out of the molds. Try not to push the popsicle sticks too hard – you don't want them to pop out of the top of the cakesicles. Instead, gently peel back the silicone around the cake pop to get it out.
- Place the cakesicles onto the baking sheet. Drizzle more chocolate in a zig zag pattern over each one and add crushed candies or sprinkles, or decorate as desired! There are decoration tips further up in this post for some fun ideas!
Equipment
Notes
- Adjust the amount of frosting that you add to the crumbled cake – the mixture shouldn’t be crumbly and falling apart. You want to cake to stick together but not be too wet.
- Before adding the cake into the molds, check the sides to make sure the coating looks thick enough. If it looks thin, “paint” another layer of melted chocolate onto the sides and let it set in the fridge again before filling the molds with cake.
- Careful when removing the cakesicles from the molds!
- To get your decorations to stick to the cakesicles, you can melt more chocolate and drizzle it over the cakesicles, and add decorations while the chocolate is still wet.
The calorie information provided for this recipe is an estimate. The accuracy of the calories listed is not guaranteed.
Delicious and fun holiday treats! the recipe and directions worked perfectly thanks Gaby!
Hi Donna! I’m so happy that you loved them and found the directions easy to follow! Happy Holidays!
I just whipped these up for a holiday party and they were such a hit! I got so many compliments- thanks for the recipe!
Hi Phil! I’m so happy to hear that the cakesicles were a hit! Thanks so much for the review 😀