Chocolate Orange Cake
This post contains affiliate links. Read the full disclosure here.
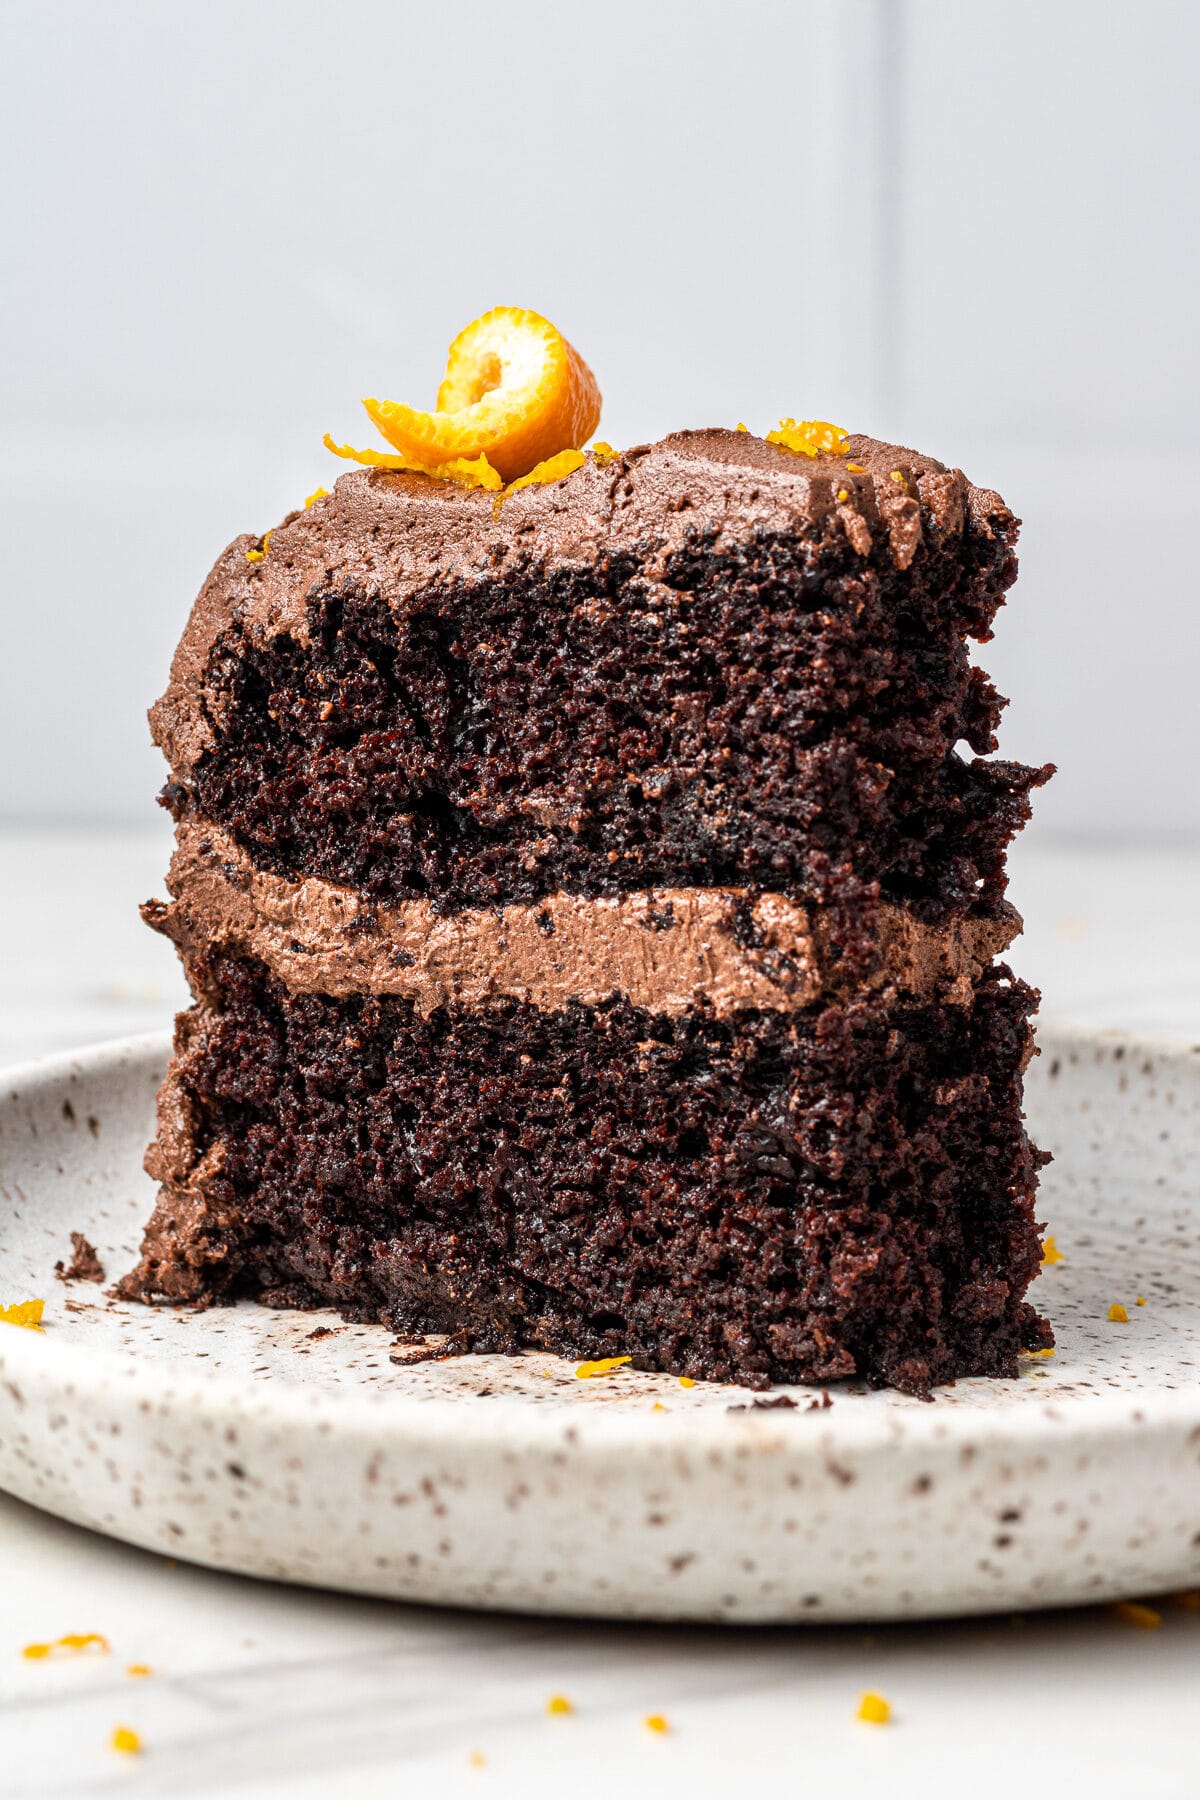
This is the BEST chocolate orange cake ever. It’s moist, decadent, and bursting with chocolate and natural orange flavor in the cake and in the chocolate orange buttercream. It’s so easy to make too!
Chocolate and orange are always a winning flavor combination to me. Chocolate orange cupcakes are one of my favorite desserts to make when I’m craving something decadent – so I’ve tweaked the recipe a little and adapted it for chocolate orange cakes!
This chocolate orange cake is perfect for impressing your guests at the holidays, or enjoying year-round! I could literally sit down and eat this entire cake to myself with a fork. It’s so rich and delicious and the buttercream frosting is just perfect!
Featured Reader Review
“The perfect chocolate orange cake – easy, moist and delicious. It’s a firm favourite in our home.”
Michelle
Why you’ll love this Chocolate Orange Cake
- This cake is naturally flavored with real oranges. It uses orange zest and orange juice, so you don’t need to run out and buy any fancy ingredients (although that is an option – more on that in the ingredient notes below).
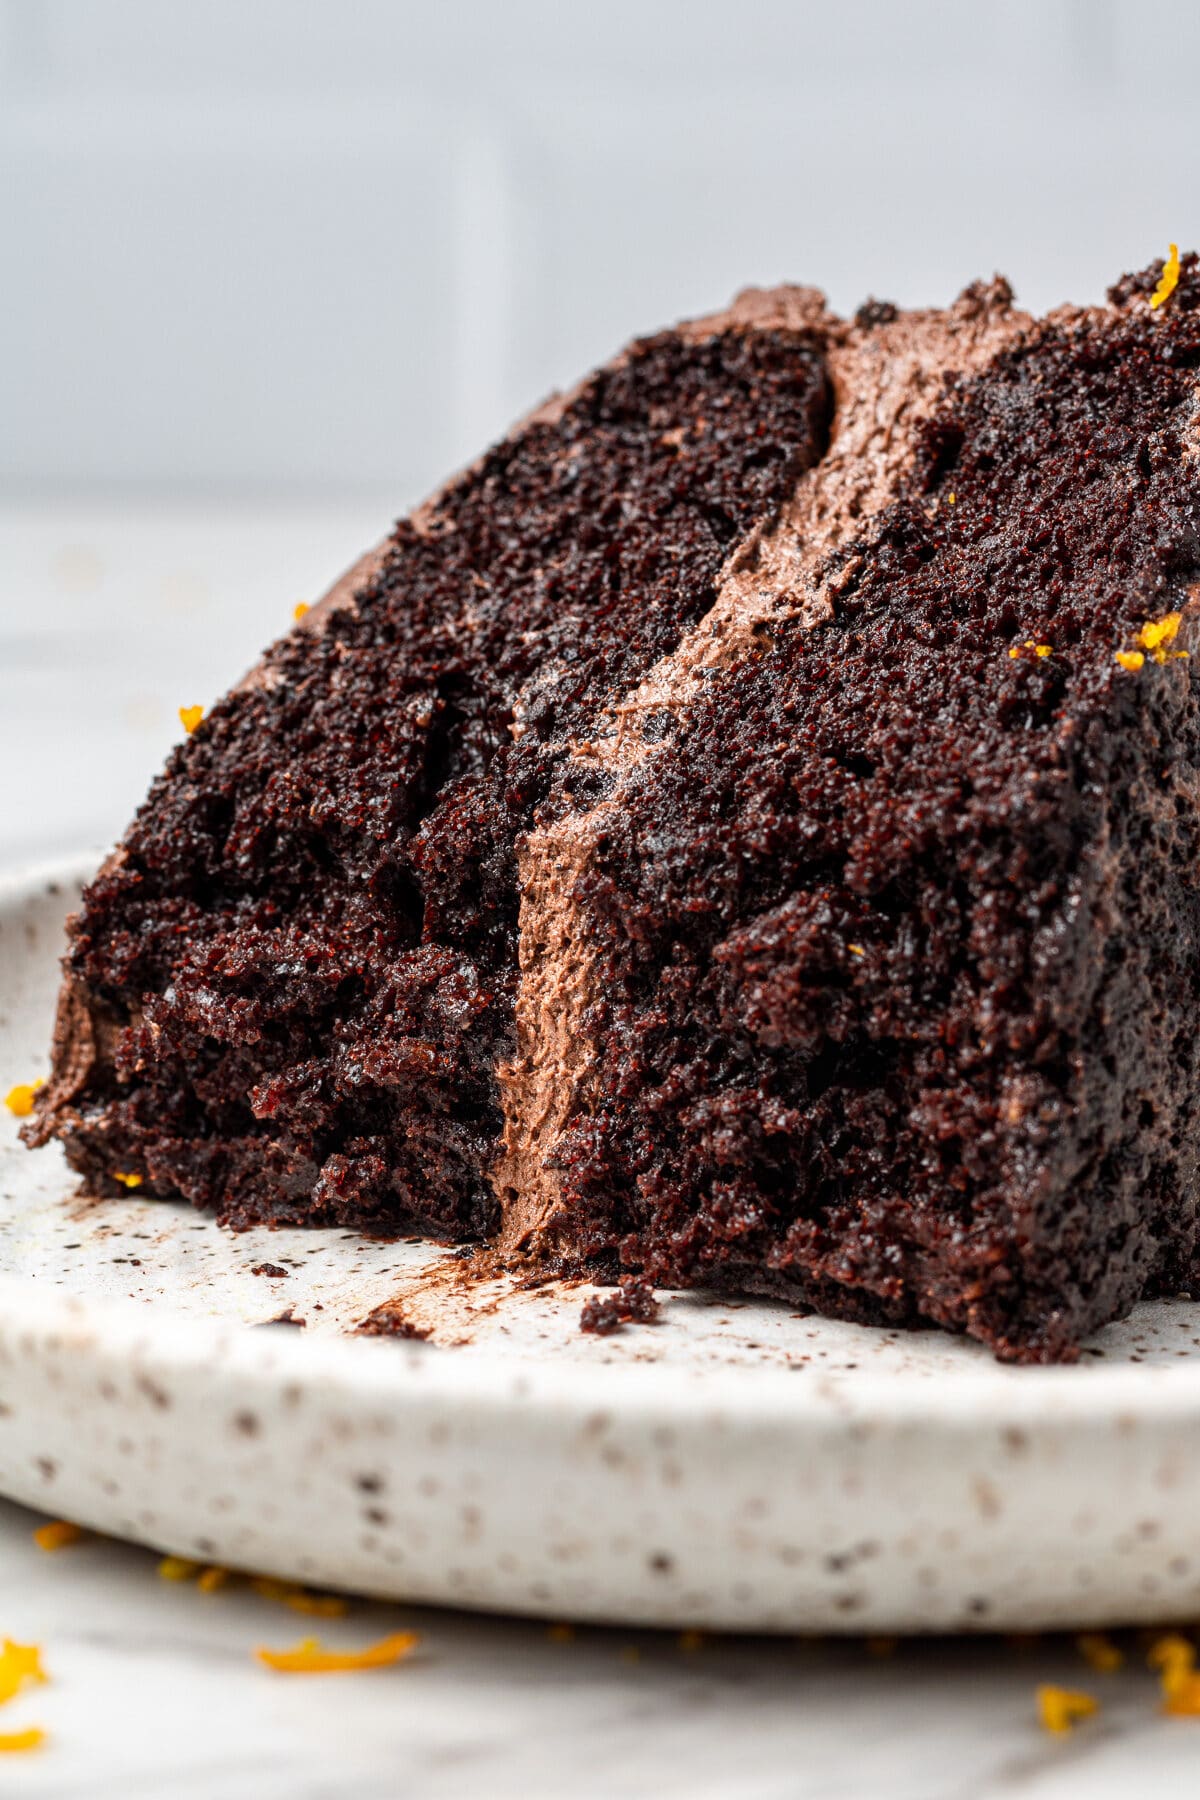
- This is a two layer cake recipe that is made using an 8 inch cake pan, but you can easily make it into a 3 layer cake and use different sized pans (I’ve provided instructions in the recipe card at the bottom of this post).
- The chocolate orange cakes use oil instead of butter, making the cake so light and fluffy it almost melts in your mouth!
- This cake is perfect for the holiday season and Christmas, but since oranges are usually available all year, you don’t have to wait for the holidays to make it!

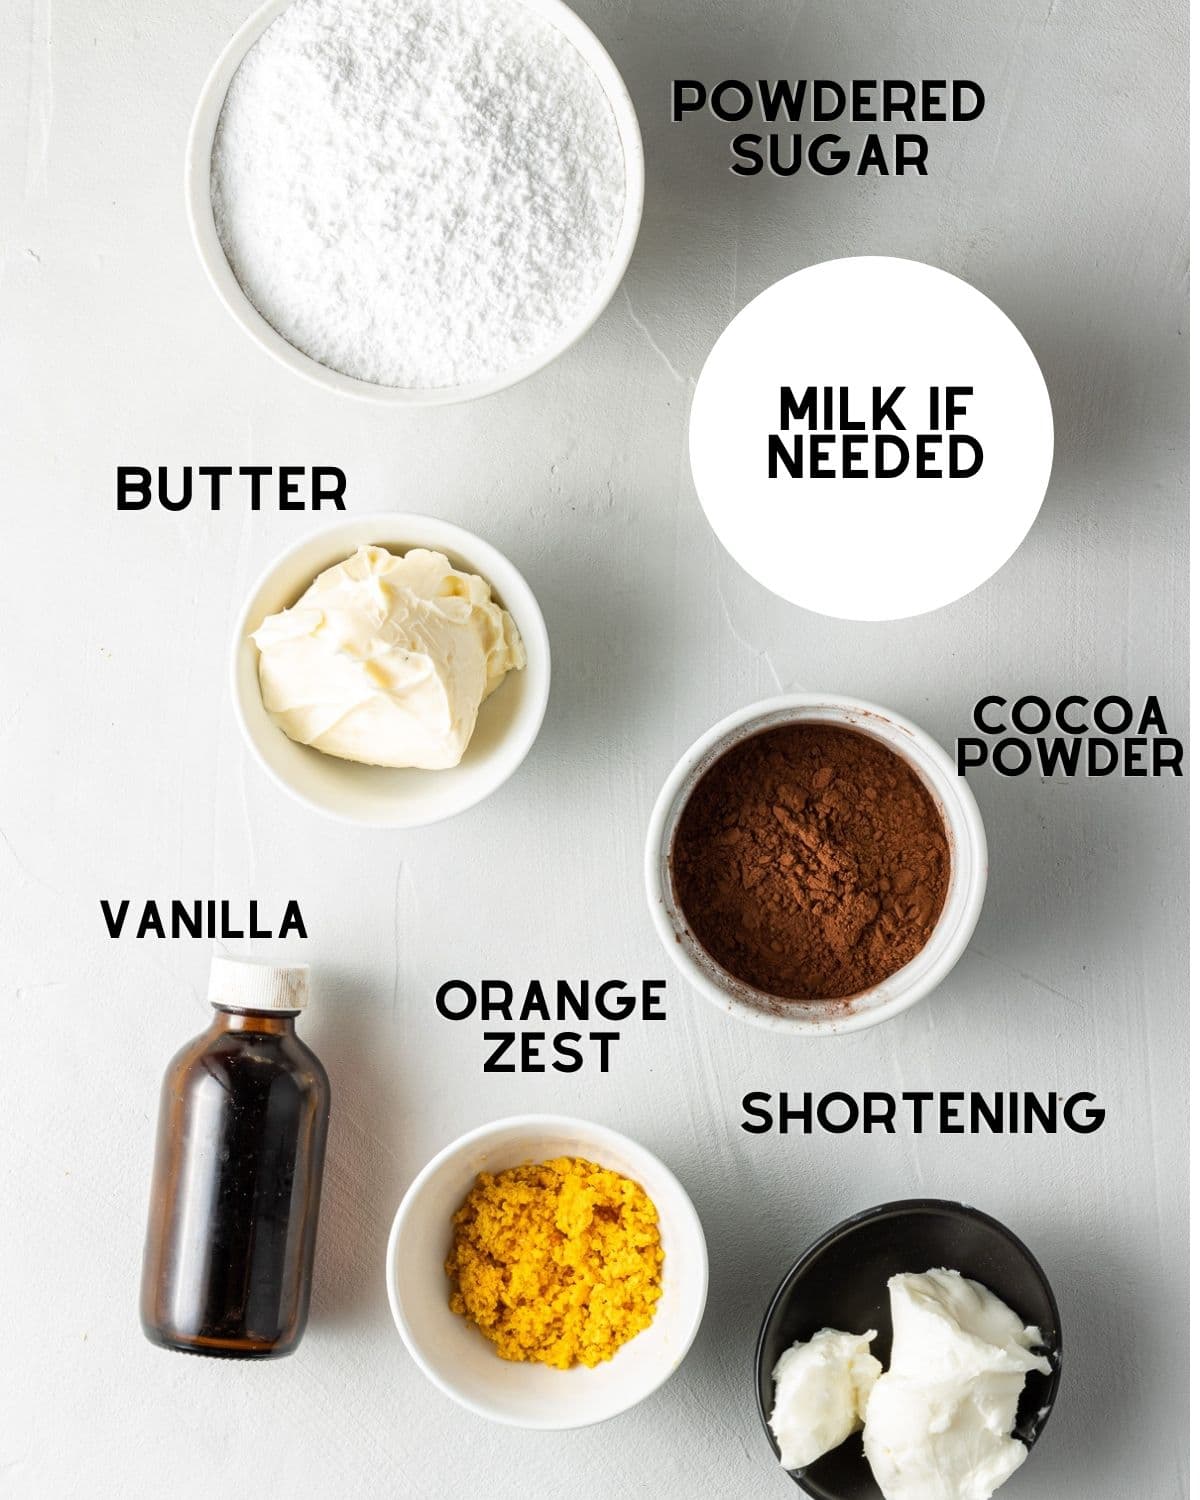
Ingredients Needed
- Milk: you can use regular milk or unsweetened dairy free milk. I personally like to use soy milk, but any milk will work great!
- Orange zest: You’ll need 3 ½ tablespoons of orange zest, which is about two oranges. If your oranges are small and you don’t have enough, you can also use a little orange extract.
- Hot water: Many chocolate cake recipes use hot water because it helps dissolve the cocoa powder, causing it to “bloom”. Blooming helps bring out the chocolate flavor. No need to boil water, it just needs to be hot.
- Orange juice: you can use store-bought orange juice (no pulp), or the juice from the fresh oranges that were zested. Store bought juice is often made from concentrate, so the flavor is a bit stronger.
- Flour: I recommend all-purpose flour. In order to achieve a soft, fluffy cake, you MUST properly measure your flour!
- Vegetable oil: you can use any neutral oil in this recipe, like canola oil or sunflower oil.

- Cocoa powder: I have the best results using unsweetened dutch-process cocoa powder, so that’s what I recommend. If you only have natural, that will still work fine.
- Sugar: this recipe is made using granulated/white sugar. I don’t recommend replacing this as it will affect the texture of the cake.
- Butter: you can use softened regular butter or dairy free butter for the buttercream.
- Vegetable shortening: I like to use a little vegetable shortening because it helps the buttercream hold its shape well, but you can also substitute this for butter if you’d prefer.
Step By Step Instructions
Note: Full ingredient measurements and instructions can be found in the recipe card at the bottom of this page.
Step One: Preheat the oven to 350°F. Prepare two 8 inch round cake pans. Spray the inside of each pan with cooking spray, then cut round pieces of parchment paper out in the shape of the pans and place one into each pan. Set the pans aside.
Step Two: To make the orange chocolate cakes, whisk together the flour, sugar, salt, baking soda, baking powder, and cocoa powder in a large mixing bowl. Add in the eggs, vanilla extract, orange zest, milk, orange juice, and oil and mix until combined. Lastly, add in the hot water and whisk until smooth.
Step Three: Divide the cake batter between the two cake pans and bake for 20-26 minutes, or until a toothpick inserted in the middle of the cakes comes out clean. Let the cakes cool in the pans then remove them from the pans upside down onto a cooling rack.
Step Four: While the chocolate orange cakes cool, make the buttercream. Combine the butter and shortening together in a large bowl using a handheld mixer or standing mixer. Mix in the orange zest. Add in the cocoa powder, vanilla extract, powdered sugar, and salt. Add milk to thin out the buttercream if needed. Store the buttercream in the fridge until the cakes have cooled completely and it’s time to assemble the cakes!

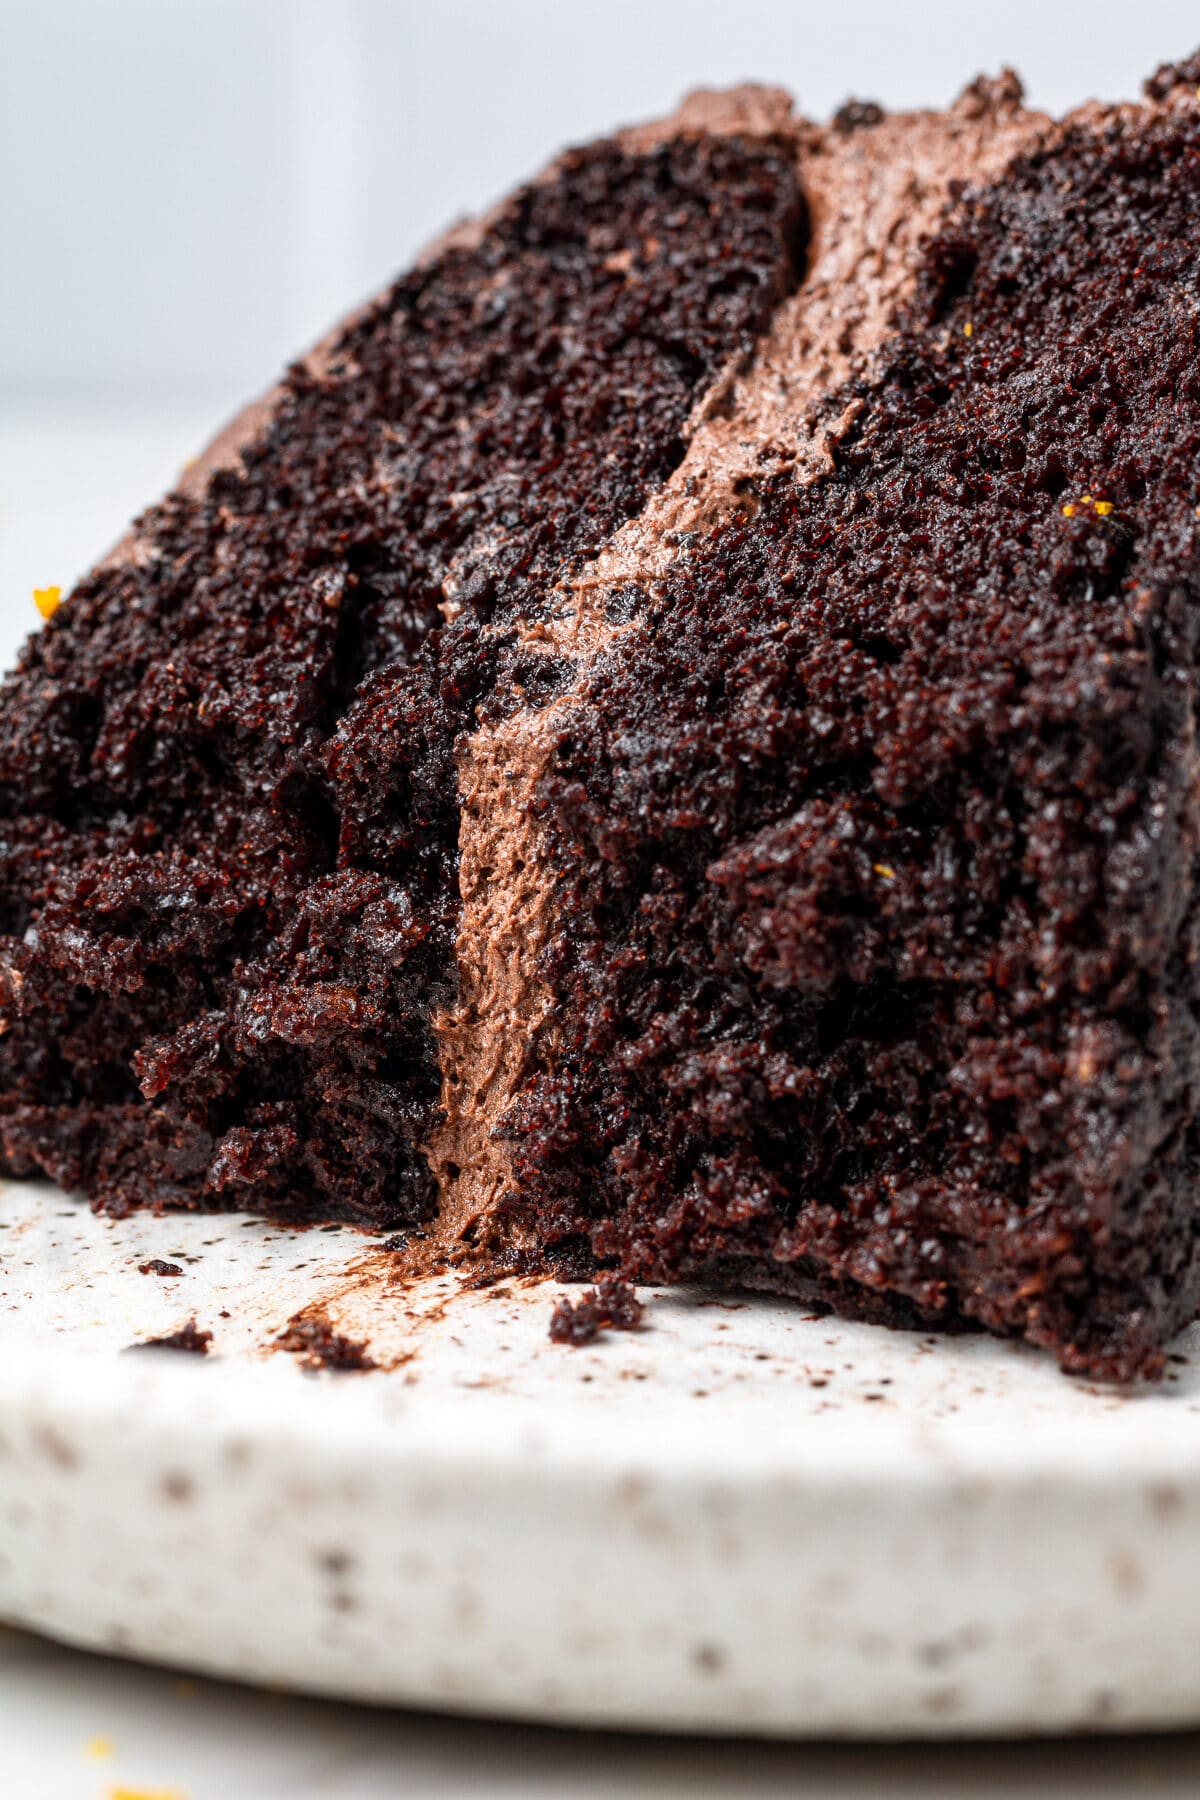
How to Assemble the Cake
Flipping the cakes upside down and letting it cool that way on the cooling rack helps to flatten out the top of the cake, because we don’t want to try to stack domed cake layers. If it still looks rounded on top, flatten the top of each cake layer. To do this, remove the cakes from the pan and use a serrated knife to level them out.
Next, place the thickest cake layer onto your cake plate, cake stand, or cake board. Add a large scoop of buttercream onto the cake and spread it around, but leave about an inch of unfrosted cake around the edges.
Add the second layer of cake on top, then freeze the cake for about 15 minutes. I like to do a crumb coat on this cake, which basically helps you get a smoother frosting, but it’s optional. After 15 minutes, remove the cake from the freezer and use an offset spatula to frost the cake with a small amount of frosting. Smooth it out using a bench scraper, scraping the crumb filled frosting into a separate bowl so that the crumbs don’t mix into the rest of the frosting. Don’t worry about making it pretty, this layer will be covered.
Freeze the cake again for 15 minutes, then add the remaining frosting to the cake and smooth it out, then decorate!

Decorating the Cake
There are so many fun ways to decorate this cake! You can make an easy chocolate ganache by melting chocolate chip and coconut milk (or regular milk) over the stove and then drizzling it over the buttercream, or you can use any of the ideas below!
- Sprinkle extra orange zest over the frosted cake.
- Pipe buttercream along the top and bottom edges of the cake.
- Decorate the frosted cake with a few orange peel twists, like I did!
- Terry’s chocolate orange slices would look lovely on this cake (note that if you are making this cake dairy free, do not use Terry’s chocolate oranges, as they are not dairy free)
- Decorate the cake with a few sliced candied oranges
Cake Pan Size Adjustments
You can make this chocolate orange cake in a variety of different pan sizes! Here are a few helpful adjustments:
9 Inch Round Cake Pans: The cake layers will be slightly thinner and will bake quicker. Start checking on them after around 16 minutes in the oven.
9×13 Rectangular Pan: To make this into a sheet cake, use a 9×13 pan and bake for around 20 minutes or until a toothpick inserted in the middle comes out clean. You will only need around half of the amount of buttercream since there aren’t any layers.
3 Layer Cake: Whenever I want to convert a two layer cake into a three layer cake, I find it easiest to just divide the batter between three cake pans. You will have thinner cake layers using this method, since the cake batter is divided between three pans. Alternatively, you can also multiply the ingredients in the recipe by 1.5.
Expert Tips
- Don’t skip the parchment paper lining at the bottom of the pan! I never used to do this and my cakes would always crumble underneath or be super hard to remove. If you aren’t doing this with every cake you make, it will change your life! Line the bottom of the pan then lightly grease the insides of the pan with cooking spray.
- Measure your flour properly, please! I highly recommend a kitchen scale. They cost less than $15 and will make a HUGE difference. If you don’t have one, you can use the fluff, scoop, and level method, but do not scoop the flour directly out of the bag with a measuring cup. This goes for cocoa powder too.
- Add extra orange zest or orange extract to the buttercream for more orange flavor: for me, the amount of orange flavor is perfect in this recipe, but you can absolutely taste it then add more orange zest or ⅛ tsp of orange extract to it.
- Don’t over-mix the cake batter! Mix the cake batter only until it is just combined!
- Adjust buttercream recipe as needed: If the buttercream seems too thin, add a little more powdered sugar, around ¼ cup at a time. If it seems too thick, add in milk, 1 tablespoon at a time until your desired consistency is reached.
- Let the cakes cool completely before you try to take them out of the pan so that they don’t fall apart! The easiest way to do this is to run a butter knife around the outside of the cake then flip it over onto the cooling rack.
Storage Instructions
The cake can be stored covered at room temperature for 3-4 days. I store mine in a cake carrier.
To freeze the cake layers (once they’ve completely cooled), then tightly wrap each individual layer in plastic wrap, then repeat with aluminium foil. Put the cakes into a large ziploc bag and freeze for up to 3 months, then let them thaw at room temperature.
You can also freeze the leftover cake slices individually in the same way that you would freeze the cake layers!
Any leftover buttercream can be stored in an airtight container in the freezer for up to 2 months, then thawed in the fridge when ready to use. Once it has thawed, you can use a handheld or standing mixer to re-whip it back to its fluffy consistency.
More Cake Recipes You’ll Love


If you make this recipe, let me know how it went in the comments below, I’d love to hear from you! You can also tag me on Instagram or Facebook so I can check it out!
Baking FAQ
These are the topics I’m asked about most frequently:
You can get these answers and more in my frequently asked questions post!

Chocolate Orange Cake
Video
Ingredients
Chocolate Orange Cake
- 1½ cup (187.5 g) all-purpose flour
- ½ tsp salt
- 1½ tsp baking soda
- ½ tsp baking powder
- ¾ cup (64.5 g) unsweetened Dutch processed cocoa powder
- ½ cup canola oil (or other neutral oil)
- 1¼ cup (250 g) granulated sugar
- 2 tbsp orange zest
- 1 tsp vanilla extract
- 2 eggs
- ¼ cup orange juice
- ½ cup milk, (regular or dairy free)
- ¾ cup hot water
Chocolate Orange Buttercream
- ¾ cup butter, softened, (regular or vegan)
- ¼ cup + 2 tbsp vegetable shortening, (or butter if not dairy free, SEE NOTES)
- 1½ tbsp orange zest
- ¾ tsp vanilla extract
- ¾ cup (64.5 g) unsweetened cocoa powder
- 2½-2¾ cup (312 g) powdered sugar (icing sugar/confectioner's sugar), SEE NOTES
- ½-1½ tbsp milk, if needed, (regular or dairy free)
Instructions
- Preheat the oven to 350°F and prepare two 8 inch round cake pans. Spray the inside with cooking spray, then cut round pieces of parchment paper so that they fit in the bottom of each pan (do not skip the parchment paper lining!)
- Whisk flour, cocoa powder, sugar, salt, baking powder, baking soda together in a large bowl.
- Add in the eggs, vanilla, oil, orange zest, orange juice, hot water, and milk. Mix until smooth.
- Divide the batter evenly between the two cake pans and bake on the middle rack of the oven for 20-26 minutes or until a toothpick inserted in the middle of the cakes comes out clean.
- Let the cakes cool in the pans, then run a butter knife around the outside of the cake to loosen it from the pan and flip upside down onto a cooling rack.
- Make the buttercream. In the bowl of a standing mixer or handheld mixer, beat butter and shortening together until combined. Skip if using all butter. Beat in the cocoa powder and vanilla extract until smooth.
- Add in the orange zest, then add the icing sugar, ¼ cup at a time until desired consistency is reached. If the buttercream is too thick, add in milk 1 tablespoon at a time to thin it out to the consistency you want. If it's too thin, add in more confectioner's sugar (powdered sugar) ¼ cup at a time.
- Once the cakes have cooled completely, frost them and enjoy!

Notes
The calorie information provided for this recipe is an estimate. The accuracy of the calories listed is not guaranteed.
Hi Gabby! Thank you so much for this recipe. It’s the best cake I’ve made so far! This is my second time making it since I first did for my birthday back in January. I cut back on the sugar (dark chocolate girlie here) and added a bit more orange juice, and it comes out amazing every single time. It’s so easy to make, yet incredibly moist and delicious. I’ve already had so many requests from friends and family to make it again!
Yayyy! Thank you for sharing this Shreeya! I’m so glad that you love the recipe!
The perfect chocolate orange cake – easy, moist and delicious. It’s a firm favourite in our home.
Thank you, appreciate your review!
Thank you for sharing this recipe! Three questions: do you use single-acting or double-acting baking powder? What temperature should the hot water be? Should the “smooth” batter have no lumps? (I’m concerned about over mixing.)
Hi Jule! I use double. As hot as the water in your sink will go is perfect! There should be no lumps in the batter, correct! Enjoy!
Made this for my husband’s birthday using (2) 9 inch pans. Had to bake the cakes about 20 minutes even though a larger pan. As written, I did not have enough frosting to add icing decorations to the final cake so made an additional 1/2 batch of buttercream icing without the cocoa powder and dyed it orange. This was a very moist cake and the orange flavor really comes through! Will definitely make again! Next time, I would probably just decorate with some orange slices.
Hi Dina! Hope your husband had a very happy birthday! Thank you for your review 🤗
It’s the best cake recipe I’ve cooked everyone who’s tasted it agrees
Hi Carol! Thank you for your review! I’m so happy to hear you enjoyed this cake recipe 😊
lovely looking recipe, I’m wanting to slightly adjust it for a winter theme! not sure how commenting here works but I’m curious, is this the cooking time for gas oven? and can I substitute about 3 tbsp of the plain flour for 3 tbsp ground blanched almonds?
Hi Luke! This is for a standard oven (not convection). I’m not sure how substituting the almonds for flour would work as I have never done that or tested it that way so I can’t recommend it!
recipe looks great and I want to try it! curious though is this the recommended baking time also for gas ovens? and would I be safe perhaps substituting 3 tbsp of the flour for 3 tbsp ground blanched almonds?
Thank you so much for this recipe! I made this cake for my boyfriend’s birthday and he loved it. It was a great success with our friends. The flavour of orange was perfectly balanced. A very moist and delicious cake.
I’m so happy to hear that everyone loved the cake Valentina! Thank you for the review!
This sounds amazing but I’m wondering if you can use chocolate cake mix instead of making it from scratch? I came across this today and I’d like to make it for Christmas.
Hi Tammy! You can yes – but I’m not sure about quantities of orange juice in a box mix so I’d suggest skipping that and just adding the orange zest into the box mix. Enjoy!
This was a terrific cake recipe! It tasted amazing and even came out of the pan well.
Hi Thea! I am so pleased to hear how much you loved the cake! Thanks so much for taking the time to come back and leave a review 🙂
I scaled this down (by half for a 2 layer 6” cake) and it turned out AMAZING. The flavor and texture of this cake could not be any better!! I made my own frosting and an orange curd to fill the cake and it was a huge hit. I can’t wait to add this recipe to my recipe box.
Hi! I am so thrilled to hear that you loved the recipe!! The orange curd sounds delicious too! Thanks so much for the review 🙂
Absolutely LOVED this cake and will be incorporating it into my Holiday baking! I’m also looking forward to trying all your other recipes!
Hi Holly! I’m thrilled to hear that you loved the recipe and will be making it again too! I hope you find more recipes you love – and thanks for taking the time to come back and leave a review 🙂
Hi, my oven is quite small. Hence, planning to bake a 6 inch cake instead of 2. Then, I’ll cut the cake into 2 layers. Any idea how long would the baking time be? May I also know the weight of your eggs with shell?
Hi Lee. The eggs are around 60 grams with shell. The baking time will likely be quite long – the baking time in the recipe is written for two 8 inch cakes. That is quite a lot of batter for one 6 inch cake pan. If you are planning to bake just one 6 inch cake then I would recommend cutting the recipe in half instead.
Delicious!!
Hi Linda! So glad to hear that you love the recipe – it’s one of my favorites! Thanks so much for the review 🙂
Chocolate – yes. Orange – yes.
Thank you for providing such a wonderful recipe!
Hi Mike! I am so happy to hear that you loved the cake! Thanks so much for trying it out 🙂
This sounds amazing but I’m wondering if you can use chocolate cake mix instead of making it from scratch? I came across this today and I’d like to make it for Christmas.
Made this cake for Thanksgiving family dinner and it was a total hit! So soft and moist I’ll be making it for every family gathering!
Hi! Yay! I’m so happy to hear that the cake was a hit at Thanksgiving! 🙂
So easy and SO delicious. This is my families new favourite cake.
Hi Andrew! I’m so happy to hear that you all loved the recipe – thanks so much for taking the time to come back and leave a review 🙂
This cake is soooo good omg. I’m not usually a fan of chocolate and orange, but my boyfriend is so I thought why not try it out. The orange flavor in this is so much better than artificial (in my opinion) and the texture of the cake was heavenly. Will be making again at Christmas!
Hi Kate! I’m so happy to hear that you loved the cake! Thanks so much for coming back to leave a review 🙂